
这里介绍的是如何用Puppy通用安装程序来简化安装Puppy,其实,用Pup2usb安装Puppy到硬盘或U盘,也是简化安装的最简便方式。
Frugal Installation using Puppy Universal Installer
A Frugal Installation copies the image from the Puppy CD to the harddrive. At bootup, Puppy is loaded into your computer's memory (RAM)just as it is when you boot Puppy from CD, however, loading it from ahard drive is much faster. This way, Frugal Installation combines theadvantages of booting from CD-ROM (protection from malware) and a harddrive bootup (speed). Moreover, upgrading to a new Puppy version isvery simple - all you have to do is replace some files.
Start "Menu | Setup | Puppy universal installer". Choose whichmedium Puppy should be installed to. In this example, I chose theinternal hard drive.
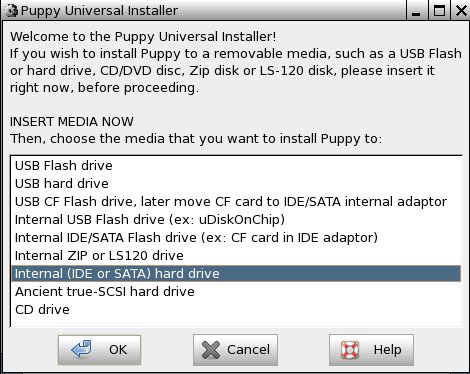
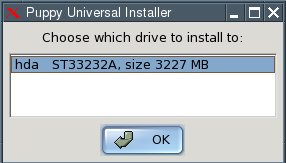
If you have several hard drives, select one.
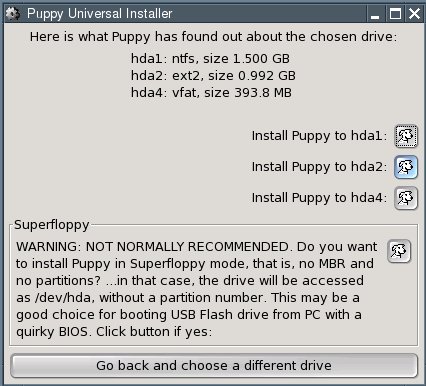
Next, click on the button next to the partition that you want Puppy to be installed to - /hda2 in this example.
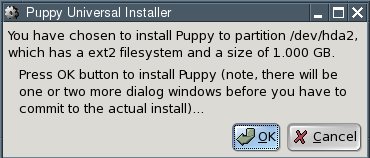
In the dialogue box, click "OK".
You now have to decide whether you want a "Frugal" or a "Full" installation. In our example, click on the "FRUGAL" button.

Now you change the installation directory. Just click on the "OK" button.

The files are now copied from CD to the hard drive.
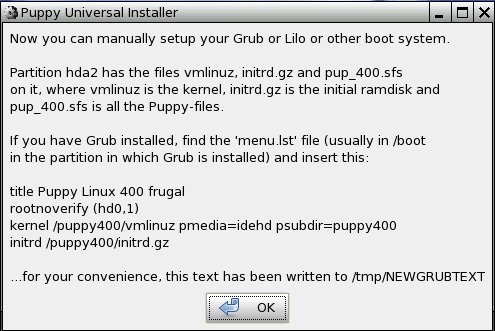
The installation is finished. In the next two dialogue boxes, click "OK".
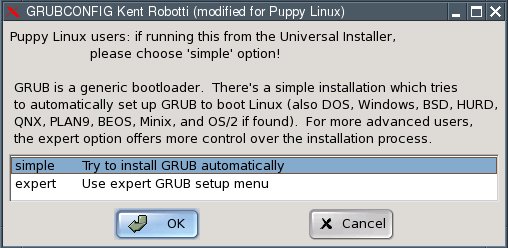
Since you now have two operating systems on your computer (Windowsand Puppy Linux), you need a boot loader. The boot loader is the firstprogram executed after switching the computer on. It enables you tospecify which operating system should be started up. If Windows was theonly operating system on your computer up to now, you do not have aboot loader. Start the installation of the boot loader GRUB with "Menu| System | Grub bootloader config".
Select "simple installation" and click "OK".
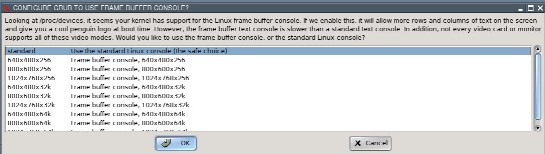
In the next dialogue box, select "standard" and click "OK".
Now you have to specify where the GRUB boot loader should store itsfiles. These can only be written to a Linux file system partition.Thus, please specify one of the Linux (ext2 or ext3 file system)partitions you created (/dev/hda2 in the example). If you do not have aLinux file system partition yet, you need to create one.
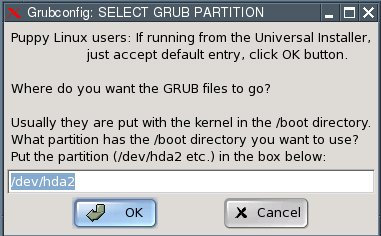
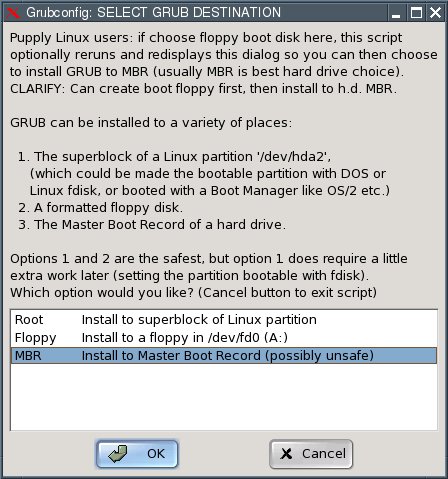
Now you have to specify where the GRUB boot loader itself should beinstalled to. Select the Master Boot Record "MBR" and click "OK".
In the next dialogue box, click "OK".

The installation is complete. What remains to be done is toconfigure the GRUB boot loader so that Puppy Linux can be booted. Thisis how to do it:
Open the file "menu.lst". You will find this file in the /boot/grubdirectory of the partition you installed the GRUB files to (/dev/hda2in our example). For Linux newbies, I include detailed instructions onhow to find and open this file. More advanced users can skip ahead towhere menu.lst gets edited.
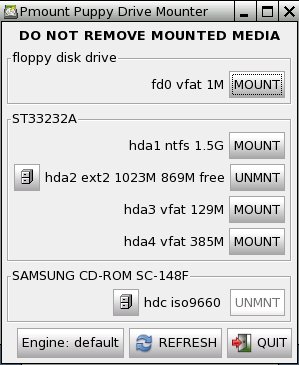
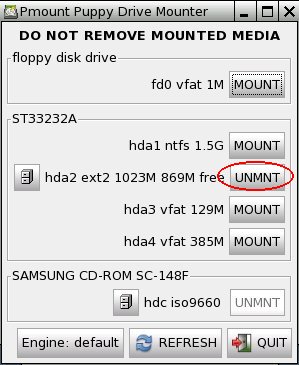
Start "Menu | Filesystem | Pmount mount/unmount drives" and click on the button "MOUNT" next to "/dev/hda2".

The button changes to "UNMNT".
Start "Menu | Filesystem | ROX-Filer file filemanager".
Right-click with the mouse and choose "Window | Enter Path".
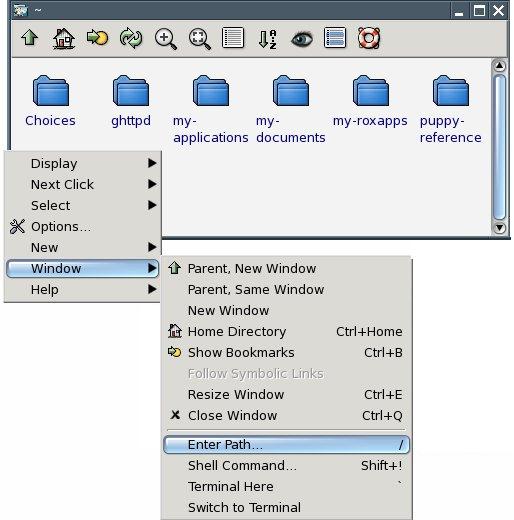
Enter the following path next to "Goto: /mnt/hda2/boot/grub/
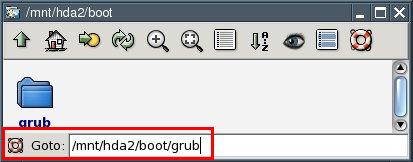
You are now at the folder /mnt/hda2/boot/grub/
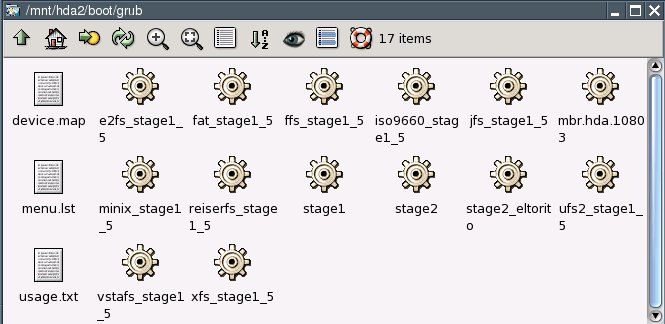
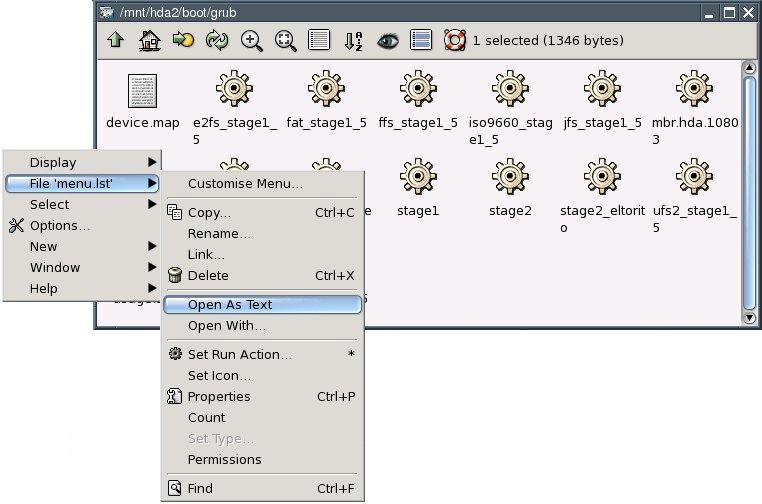
Use the right mouse button to click on the file called "menu.lst".
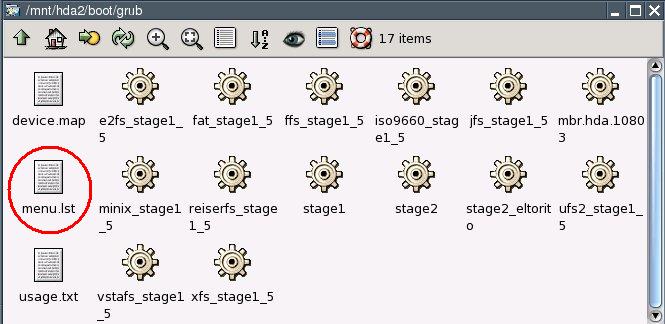
From the context menu that pops up, select "File menu.lst | Open As Text".
You can now see the contents of the menu.lst file.
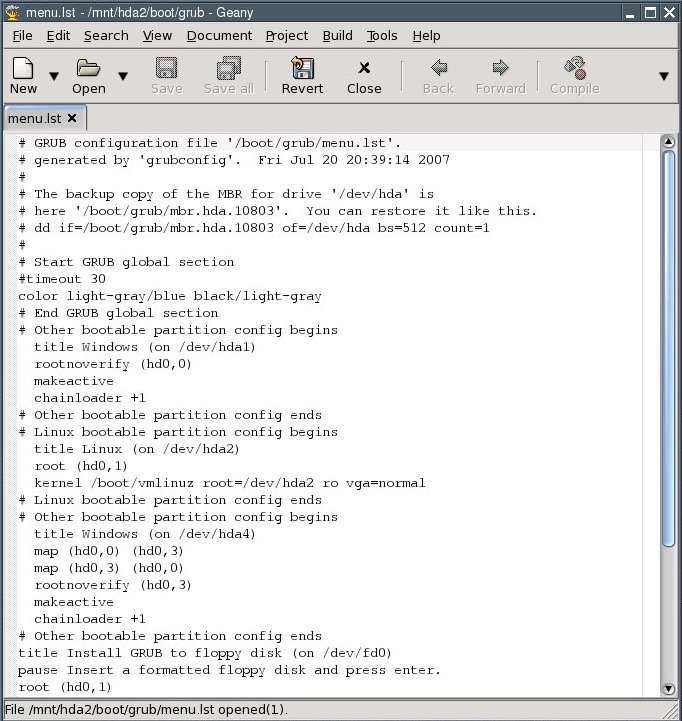
Edit the file at this point:
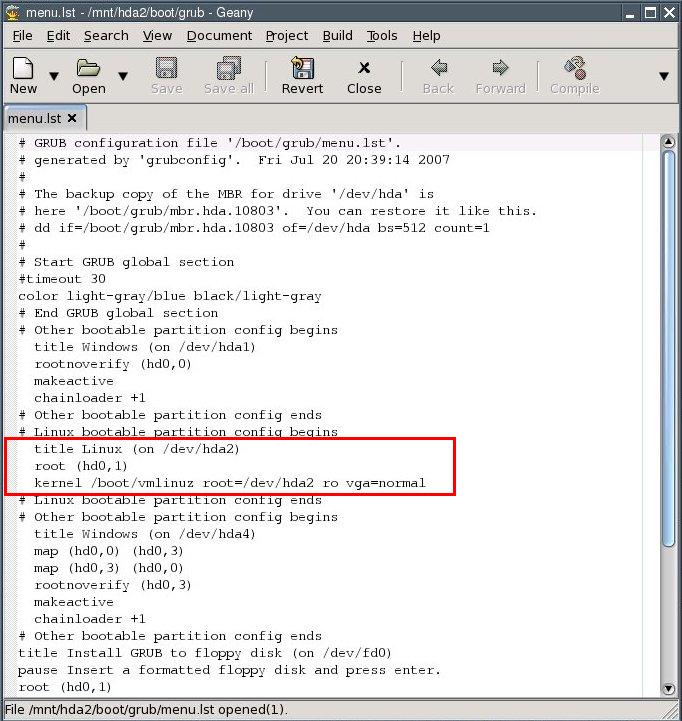
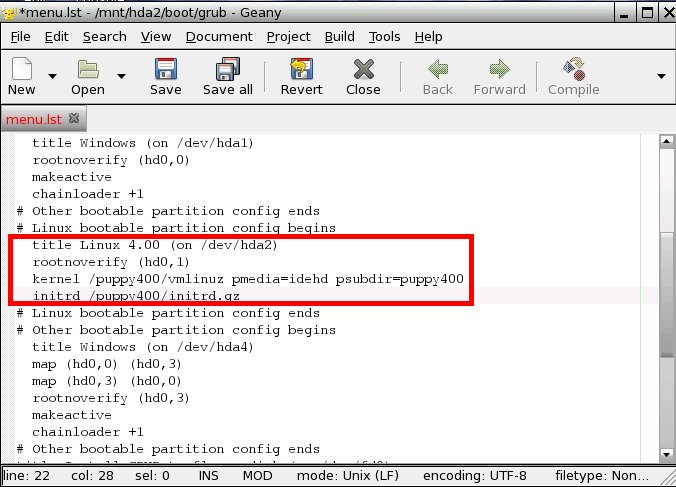
title Puppy Linux 4.00 frugal (on /dev/hda2)
rootnoverify (hd0,1)
kernel /puppy400/vmlinuz pmedia=idehd psubdir=puppy400
initrd /puppy400/initrd.gz
(Notice: depending on what medium you boot from, you have to set thepmedia parameter to one of usbflash, usbhd, usbcd, ideflash, idehd,idecd, idezip, satahd, scsihd or scsicd. If you did not install theGRUB files to the /dev/hda2 partition, you need to change therootnoverify parameter as well - partition number and Linux driveletter minus one, so if the GRUB files are on /dev/hdb3, make it"rootnoverify (hd1,2)".)
The bit you changed in the file should now look like this:
"Comment out", i.e. put a number sign (#) before each of the following lines:
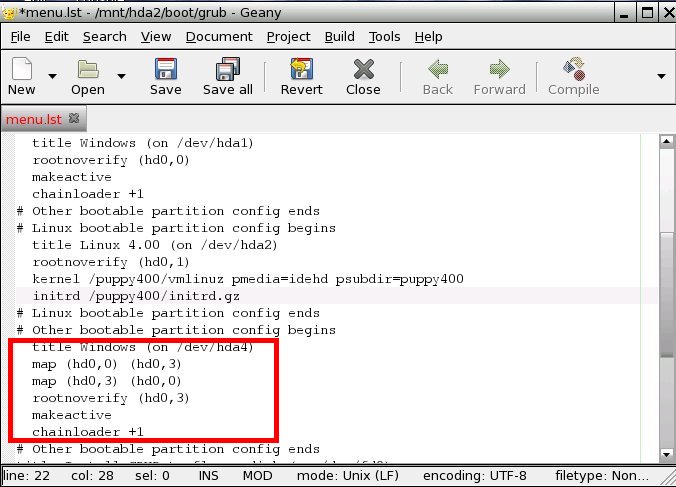
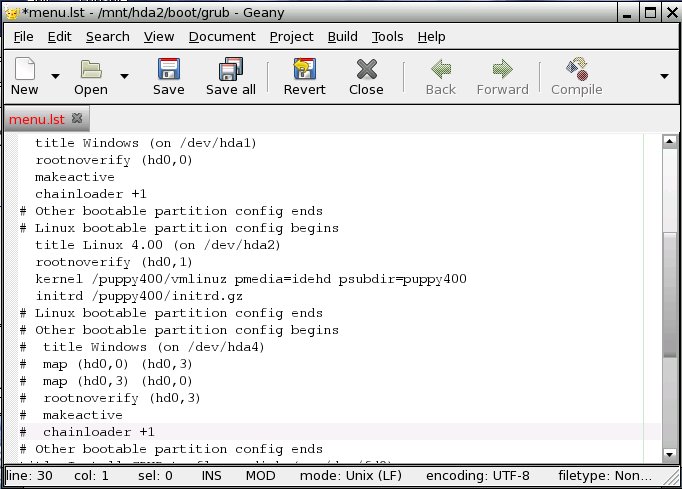
It should now look like this:

All necessary changes have been made. The file should now look like this:
Save the file by selecting "File | Save" from the program's menu. Exit the text editor.
Close the ROX file manager.
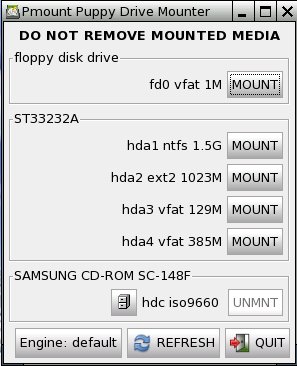
Click on the button "UNMNT" next to /dev/hda2.
The button changes to "MOUNT".
Click on the button "QUIT".
Exit Puppy and reboot the computer: "Menu | Shutdown | Reboot computer".
When you reboot the computer, you will be asked whether you want tosave the "session" (i.e., all the configuration changes you made). HitReturn to select the entry "SAVE TO FILE", which is alreadyhighlighted.
Confirm the next dialogue (Warning) by hitting Return.
In the next dialogue, select the "hda2" partition with the cursor keys and press Return.
Now. you will be asked, if the file should get a special filename. Just press Return.
You will be asked whether you want a normal (unencrypted) or anencrypted save file. Select "NORMAL" with the cursor keys and pressReturn.
The next dialogue lets you choose a size for your save file. A filesize of 512 megabytes is usually sufficient. You can increase (but notdecrease) this size anytime from within Puppy. Pick the desired filesize with the cursor keys and press Return.
In the next screen you see a summary. Choose "Change Folder" and press return.
Next, you enter "/puppy400" as subfolder and confirm with return.
Again a summary is shown and if everything seems to be ok, choose "Yes, save" with the arrow keys, then press return.
Please be patient while the file is created.
Next you will be asked if Puppy 4.xx should test for serial devicesat each boot. Choose ""No" with the arrow keys and confirm with return.
Now you decide wether the system file pup400.sfs should be copiedover to the harddrive. Choose "Yes" with the arrow keys and confirmwith return.
Last not least the computer restarts automatically. Remove the PuppyCD from the drive before the shutdown is complete. Upon reboot the bootloader will show up. Choose ""Puppy Linux 4.00 frugal (on /dev/hda2)""with the arrow keys and confirm with return.
Frugal Installation using Puppy Universal Installer
A Frugal Installation copies the image from the Puppy CD to the harddrive. At bootup, Puppy is loaded into your computer's memory (RAM)just as it is when you boot Puppy from CD, however, loading it from ahard drive is much faster. This way, Frugal Installation combines theadvantages of booting from CD-ROM (protection from malware) and a harddrive bootup (speed). Moreover, upgrading to a new Puppy version isvery simple - all you have to do is replace some files.
Start "Menu | Setup | Puppy universal installer". Choose whichmedium Puppy should be installed to. In this example, I chose theinternal hard drive.
If you have several hard drives, select one.
Next, click on the button next to the partition that you want Puppy to be installed to - /hda2 in this example.
In the dialogue box, click "OK".
You now have to decide whether you want a "Frugal" or a "Full" installation. In our example, click on the "FRUGAL" button.
Now you change the installation directory. Just click on the "OK" button.
The files are now copied from CD to the hard drive.
The installation is finished. In the next two dialogue boxes, click "OK".
Since you now have two operating systems on your computer (Windowsand Puppy Linux), you need a boot loader. The boot loader is the firstprogram executed after switching the computer on. It enables you tospecify which operating system should be started up. If Windows was theonly operating system on your computer up to now, you do not have aboot loader. Start the installation of the boot loader GRUB with "Menu| System | Grub bootloader config".
Select "simple installation" and click "OK".
In the next dialogue box, select "standard" and click "OK".
Now you have to specify where the GRUB boot loader should store itsfiles. These can only be written to a Linux file system partition.Thus, please specify one of the Linux (ext2 or ext3 file system)partitions you created (/dev/hda2 in the example). If you do not have aLinux file system partition yet, you need to create one.
Now you have to specify where the GRUB boot loader itself should beinstalled to. Select the Master Boot Record "MBR" and click "OK".
In the next dialogue box, click "OK".
The installation is complete. What remains to be done is toconfigure the GRUB boot loader so that Puppy Linux can be booted. Thisis how to do it:
Open the file "menu.lst". You will find this file in the /boot/grubdirectory of the partition you installed the GRUB files to (/dev/hda2in our example). For Linux newbies, I include detailed instructions onhow to find and open this file. More advanced users can skip ahead towhere menu.lst gets edited.
Start "Menu | Filesystem | Pmount mount/unmount drives" and click on the button "MOUNT" next to "/dev/hda2".
The button changes to "UNMNT".
Start "Menu | Filesystem | ROX-Filer file filemanager".
Right-click with the mouse and choose "Window | Enter Path".
Enter the following path next to "Goto: /mnt/hda2/boot/grub/
You are now at the folder /mnt/hda2/boot/grub/
Use the right mouse button to click on the file called "menu.lst".
From the context menu that pops up, select "File menu.lst | Open As Text".
You can now see the contents of the menu.lst file.
Edit the file at this point:
title Puppy Linux 4.00 frugal (on /dev/hda2)
rootnoverify (hd0,1)
kernel /puppy400/vmlinuz pmedia=idehd psubdir=puppy400
initrd /puppy400/initrd.gz
(Notice: depending on what medium you boot from, you have to set thepmedia parameter to one of usbflash, usbhd, usbcd, ideflash, idehd,idecd, idezip, satahd, scsihd or scsicd. If you did not install theGRUB files to the /dev/hda2 partition, you need to change therootnoverify parameter as well - partition number and Linux driveletter minus one, so if the GRUB files are on /dev/hdb3, make it"rootnoverify (hd1,2)".)
The bit you changed in the file should now look like this:
"Comment out", i.e. put a number sign (#) before each of the following lines:
It should now look like this:
All necessary changes have been made. The file should now look like this:
Save the file by selecting "File | Save" from the program's menu. Exit the text editor.
Close the ROX file manager.
Click on the button "UNMNT" next to /dev/hda2.
The button changes to "MOUNT".
Click on the button "QUIT".
Exit Puppy and reboot the computer: "Menu | Shutdown | Reboot computer".
When you reboot the computer, you will be asked whether you want tosave the "session" (i.e., all the configuration changes you made). HitReturn to select the entry "SAVE TO FILE", which is alreadyhighlighted.
Confirm the next dialogue (Warning) by hitting Return.
In the next dialogue, select the "hda2" partition with the cursor keys and press Return.
Now. you will be asked, if the file should get a special filename. Just press Return.
You will be asked whether you want a normal (unencrypted) or anencrypted save file. Select "NORMAL" with the cursor keys and pressReturn.
The next dialogue lets you choose a size for your save file. A filesize of 512 megabytes is usually sufficient. You can increase (but notdecrease) this size anytime from within Puppy. Pick the desired filesize with the cursor keys and press Return.
In the next screen you see a summary. Choose "Change Folder" and press return.
Next, you enter "/puppy400" as subfolder and confirm with return.
Again a summary is shown and if everything seems to be ok, choose "Yes, save" with the arrow keys, then press return.
Please be patient while the file is created.
Next you will be asked if Puppy 4.xx should test for serial devicesat each boot. Choose ""No" with the arrow keys and confirm with return.
Now you decide wether the system file pup400.sfs should be copiedover to the harddrive. Choose "Yes" with the arrow keys and confirmwith return.
Last not least the computer restarts automatically. Remove the PuppyCD from the drive before the shutdown is complete. Upon reboot the bootloader will show up. Choose ""Puppy Linux 4.00 frugal (on /dev/hda2)""with the arrow keys and confirm with return.
- 适合打印的版本
- 15671 次点击
发表新评论