文档
Puppy Linux精华帖索引
网络交流
IRC聊天室:服务器:irc.freenode.net:6666,频道:#puppylinux-cn WebIRC聊天室:简化版;完整版Puppy Linux4.xx中文版(小芭比Linux)系列精华帖
- Puppy Linux4.00一步到位中文包 最新版本:0.2.12[增加ADSL上网补丁及Seamonkey中文首页]
- “小芭比Linux”来啦~~~最新版本:小芭比linux标准版+QQ集成版 V4.0.2.11
- 比Puppy还要袖珍的中文SliTaz New!!!!!!
- Pup2Usb—Puppy Linux(小芭比Linux)硬盘/U盘通用安装程序 for windows 已支持vista!
- 小芭比安装使用F.A.Q
- 站内自助搜索页面 自助搜索,让自己成为解决问题的高手!!!
- 从XP轻松跨入全新的中文Puppy Linux世界 小芭比安装教程!
- 关于小芭比Linux或英文puppy无法ADSL上网问题的调试方法 New!!!
- 关于pup_400.sfs not found 的解决办法
- 常用★跨平台★软件秀●mini●版
- Puppy Linux专题新闻集萃 全球Puppy Linux相关新闻纵览
- Puppy Linux获InfoWorld2008年度最佳迷你操作系统奖
- labrador随手笔记
- Vista下硬盘启动小芭比Linux全攻略
- Win下无障碍安装Puppy Linux必备软件包
- 硬盘安装及中文化Puppy Linux 4.0简要流程
- Puppy Linux之世界排名 全球自由操作系统大本营之前100名Linux发行版排行榜
- Winxp与Puppy Linux4.00软件对照表
- puppy4iso集成pet包一览表
Puppy Linux网站
中文Puppy Linux开发者之家 中文测试站 中文论坛官方网站 官方下载 英文社区 英文论坛 日语版 加拿大站点
友情连接
LuPa开源社区 eeload 鸟哥的Linux私房菜 Linux网站导航 新DOS时代进入虚拟芭比世界把自己变成芭比娃娃!!男孩♂♂免进!!
在安装使用中难免会碰到各种各样的问题,请先看看中文手册或进入自-助-搜-索-页-面进行搜索,也许答案就躲在网站的某个角落,正等着你去发现呢!
F.A.Q.
请问在PUP下如何和WINDOWS对传文件
可以利用windows的文件共享功能。步骤如下- 确认两台电脑可以通过网络访问,windows防火墙设置允许其他机器访问;
- 在windows上设立共享,假设共享名是sharename,用户名是username;
- 用smbclient测试能否从puppy连接到windows上,在puppy的虚拟终端上运行:
smbclient -U username //address_of_windows_pc/sharename
然后输入密码,再运行ls,查看目录,put上传文件,get下载文件; - 如果第3步可以成功,那么可以在/etc/fstab中加入一行
//address_of_windows_pc/sharename /mnt/sharename cifs auto,rw,iocharset=utf8,user=username,pass=password 0 0
重启电脑以后就可以自动挂载上了。如果没有挂载成功,可以试试mount -a
能不能像Redhat一样,启动的时候要求输入密码
可以在创建个人文件(也就是pup_save.2fs)的时候,把它设为加密的。Puppy关机时无法自动关掉电源
可以试试加内核参数acpi=force。任务栏中QQ图标闪烁却无法打开
参见:http://www.minilinux.net/node/166Puppy看Word文档有乱码
Puppy自带的Abiword对Word文档支持不好。出现乱码一个凑合的解决方法是全选,然后改字体为中文字体。如果有条件上网,还是推荐使用在线Doc文本编辑工具。启动时出现pup_400.sfs not found怎么办
参见:http://www.minilinux.net/node/192Puppy的root密码是什么
用户名:root 密码:woofwoof国外常用Puppy下载站点(如puppylinux.ca)的登陆用户名和密码是什么
用户名:puppy 密码:linux如何设置Puppy的开机密码
方法有很多种,比较好的是给Puppy的pupsave.2fs文件设置一个密码,这需要在第一次关机是创建个人存储文件时设置。一个不怎么安全却比较简便的方法是,在Puppy启动到桌面时自动运行锁定屏幕的Xlock。首先点桌面上的锁定屏幕,然后设置一个密码,如果没有出现设置密码的窗口,可以试试先删除
/root/.xlockrc。然后打开终端,运行cd /root/Startup/ ln -sf /usr/local/apps/Xlock/AppRun xlock ln -sf /usr/local/apps/Xlock/locale #Puppy 4.0不需要运行这一句再重启X即可看到效果。
小芭比硬盘完全安装后不认网卡和声卡
出现这种情况的原因是因为部分驱动模块在zdrv_400.sfs文件里,而full安装时,4.0版本有个小bug就是这个sfs文件未被安装到硬盘上。解决办法先点击zdrv_400.sfs,puppy会自动将其挂载,然后把里面内容都复制到根目录下,运行depmod -a,重启即可。参见:http://www.minilinux.net/node/221更改鼠标的击键方式
rox文件管理器默认运行程序的方式是单击,要更改为双击,先打开rox,点鼠标右键,出现右键菜单。依次选择:选项… | 桌面 | 桌面行为 | 单击以开启
然后去除“单击以开启”前面的√,再点确定即可。
puppy中的firefox经常崩溃
一般原因是网页中的flash引起的,下载安装Flashblock插件可以大大减少崩溃的几率。使用、复制和删除文件时出现“stale NFS file handle”错误
个人存储文件因突然掉电或死机出错,可在启动时加上参数:pfix=fsck 来修复。用grub4dos启动linux iso光盘镜像文件
在menu.lst中添加(以slitaz cooking为例,iso放在c盘):title Slitaz cooking boot from iso map --mem (hd0,0)/slitaz-cooking-cn20080907.iso (hd32) map --hook chainloader (hd32) boot
怎么在桌面上创建快捷图标
从/usr/share/applications目录里将快捷方式复制到桌面上SMP内核的Puppy无法在老旧电脑(单核CPU)上启动
在menu.lst中添加以下启动参数:nosmp noht multicore=n例如:
title Puppy 421 smp
kernel (hd0,4)/pup421/vmlinuz pmedia=idehd psubdir=pup421 pdev1=sda5 nosmp noht multicore=n
initrd (hd0,4)/pup421/initrd.gz
如果用Live-CD启动,则用以下启动参数:
puppy nosmp noht multicore=n
小芭比启动时重置鼠标键盘X显示等设置
rm /etc/mousebuttons ### 重置鼠标rm /etc/mousedevice ### 重置鼠标
rm /etc/keymap ### 重置键盘类型
rm /etc/X11/xorg.conf ### 重置X显示
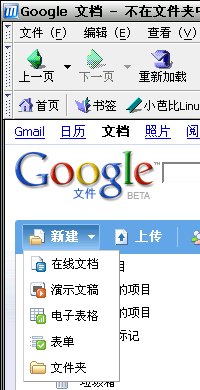
Firefox + gmail >>> Word + Excel + Powerpoint !!!
一、让本地运行office全部下岗让住在世界各地的1000人合作写一部小说或论文? m$ office能么?不能。openoffice能么?也不能。Google Docs能!
现在你只要一个gmail邮箱和Firefox浏览器,就能实现本地运行office(如m$ office、openoffice、abiword、gnumeric等等)的常用功能及本地office无法做到的协作办公功能。 (也可以用不是@gmail.com结尾的邮箱,如mm@qq.com; mm@163.com,但必须到Google帐户注册页面注册后才能使用;另外,用非gmail邮箱登陆google docs,用户名必须是完整的邮箱地址。)
如图:
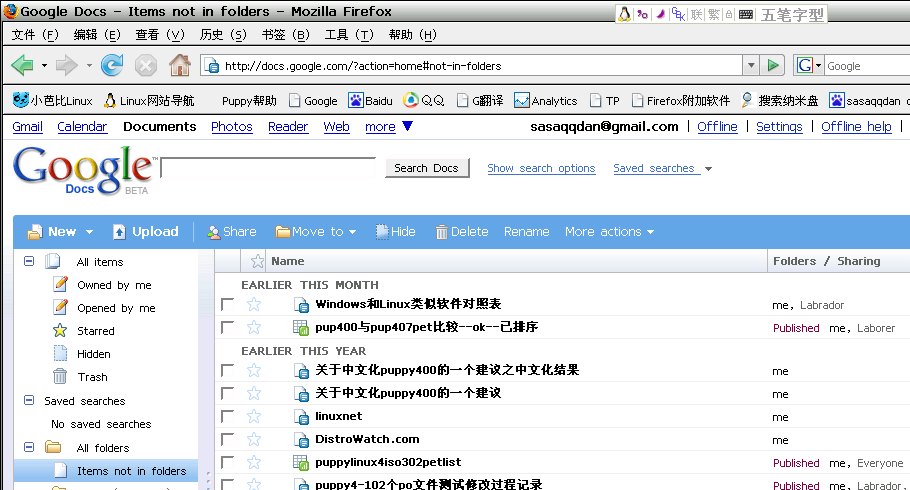
二、Firefox在线办公
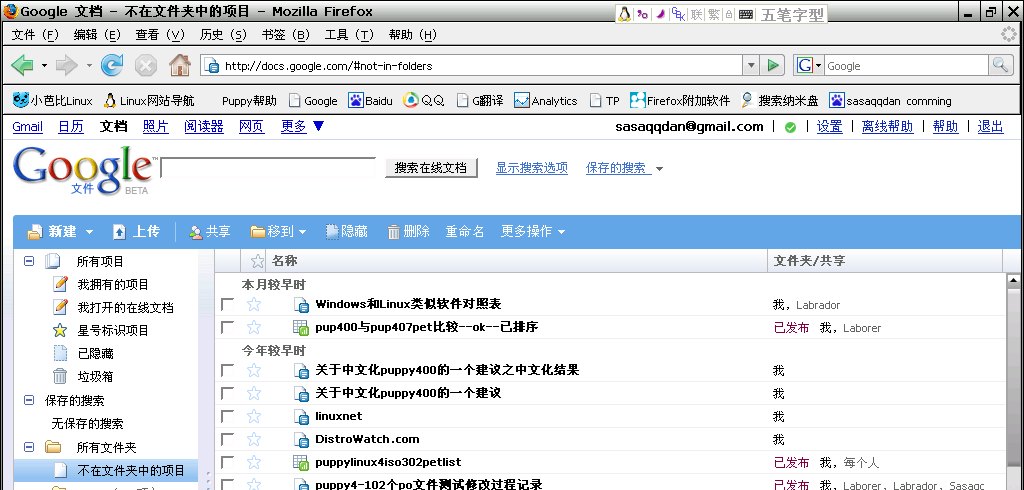
首先要注册一个gmail邮箱,再通过邮箱帐号和密码登陆http://docs.google.com开通在线文档编辑功能,进入后界面默认语言为english(us),可通过settings设置为中文简体。
三、Firefox离线办公
网络不通了,没有了本地office,你让我怎么办公哪?
别急,到http://gears.google.com/下载安装一个gears离线办公插件就行了,注意:离线办公插件只适用于Firefox V2.x.x系列,在安装时请确认docs界面默认语言为english(us),等全部安装好并在本地文档与网络文档同步结束后,再切换到中文简体。断网时,可在Firefox下进行离线编辑,等网络通时再接上进行同步就可以了。(离线办公插件安装成功后,会在邮箱地址右边添加一个绿色的“√”)

现在,终于可以把小芭比里面的Abiword和gnumeric请出去啰; 转到win下,又把msoffice给咔嚓掉了@@@@
Puppy Linux 3使用手册
本手册由gsxlm翻译英文原文:http://www.puppylinux.org/manuals/puppy-301/english
中文译文:http://puppylinux.5d6d.com/thread-10-1-1.html
连猜带蒙外加google翻译做出来供自己玩赏Puppy Linux。明知可能有错误和不准确的地方,也懒得改了。仅供参考。
这是Puppy 3.01的使用手册,很多内容也适用于其他的版本。
相关话题:Puppy4中文手册
导言
Puppy Linux是一个非常智能的Linux发行版,它是由澳大利亚教授Barry Kauler编制的。他刚刚开始退休生活。他制定了一种类似Windows的Linux ,这种linux包含了所有重要的程序。而且它小到足以在早期的电脑的内存中运行。Puppy 几乎能在所有的硬件上运行。它易于操作,可以非常容易地适合个人偏好。许多志愿者不断为它编写软件。Puppy 有一个全球性的群体,每天24小时用英语通过互联网进行交流。这本手册供想熟悉PuppyLinux的初学者和Linux用户使用。在互联网上有各种各样的信息,你可以到Puppy网站上去浏览。这本手册概括了最重要的资料,帮助Puppy 初学者迈开第一步。
如何使用手册:
菜单条目和按钮都用""括起来表示,子菜单用垂直线分开。例如:"Menu | Shut Down | JWM restart"的意思是,你先点击按钮"Menu" ,然后在出现菜单的菜单上单击"Shut Down" ,最后点击"JWM restart" 。在手册中字母X是用来表示一个数字。例如
/dev/hdax意味着你必须写成/dev/hda1,/dev/hda2或/dev/hda3——至于写成哪个数字要看你的电脑的具体情况。对"shell",可以运行"Menu | Run | Rxvt terminal emulator"程序。
如何获得Puppy
你可以从ibiblio.org这个网站得到Puppy Linux。把最新版本Puppy-3.xx-seamonkey.iso(如Puppy-3.01-seamonkey.iso)保存到你的硬盘。这个文件的大小约100 MB。为了确保您下载了一个真正的原始文件,你检查ISO文件的MD5码是否与相关文件Puppy-3.xx-seamonkey.iso.md5.txt(如Puppy-3.01-seamonkey.iso.md5.txt)中的相符。
在Linux操作系统中:
打开一个shell然后进入你保存上述两个文件的目录,输入以下命令:md5sum Puppy - 3.01 - seamonkey.iso你会得到一个校验结果。用一个文本编辑程序打开文件Puppy-3.01-seamonkey.iso.md5.txt 。比较两个值是否相同。
在Windows环境中:
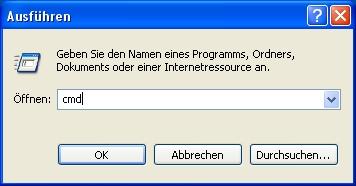
下载的DOS程序md5sum.exe 。打开DOS命令窗口,点击"开始|运行" ,打开运行窗口,输入以下命令:CMD

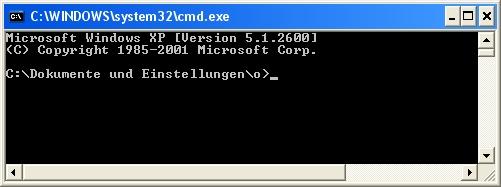
现在打开了一个DOS窗口。

进入你保存下载的两个文件的目录,如:
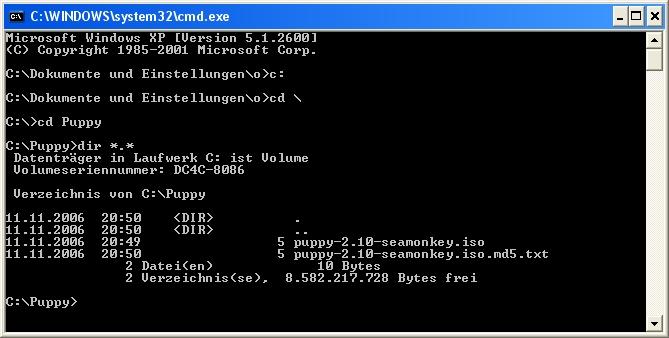
C:/Puppy。输入以下命令:c: cd \ cd puppy dir *.*

现在,你应该能看到Puppy文件。输入命令:
md5sum -c puppy-3.01-seamonkey.iso.md5.txt你应该得到一个"OK" 。
接着把ISO文件(我们以Puppy-3.01-eamonkey.iso为例)刻录成光盘。如何刻录光盘,请查看你的CD刻录软体的使用手册。初学者往往直接把ISO文件作为一种数据文件复制到光盘上,这是不行的。通常光盘刻录软件有一个特殊的选项,是专门用来把ISO文件刻录成光盘的。您可以用文件管理器来查看你的光盘是否正确刻录。如果你看到的文件中有
image.gz或vmlinuz.gz,说明你刻对了。如果你看到的文件是Puppy-3.01-seamonkey.iso,说明你没有刻对。 如何运行Puppy
有很大的好处就是Puppy Linux不须安装就可以使用。你可以直接从CD上运行Puppy。这样它不影响您的操作系统。除此之外,您也可以把Puppy 安装在硬盘或U盘上。首次运行Puppy应该如何做:
在BIOS设置成从光盘启动。如果您不知道如何设置BIOS,请查阅电脑手册。然后把Puppy 光盘放到光驱中,重启电脑。现在启动Puppy。在启动过程中会询问你的你的国家。你用光标键选中贵国。回车后出现另外一个窗口,在这个窗口中, "Xorg "已经高亮显示。按下回车键,等待几秒出现下一个窗口(Puppy 视频向导)出现。在这儿用光标键选择你的显示器类型( LCD或CRT)和分辨率。然后回车,过一会儿,Puppy桌面就会出现。
如果你的电脑上Xorg无法使用,请选择xvesa 。几秒钟后,Puppy 桌面会以640x480的分辨率显示。如果你想使用更高的分辨率如1280x1024x24,请选择好后点击“test"按钮 。

过几秒后Puppy 桌面再次出现。点击OK按钮。
不幸的是,使用xvesa时如果你使用的不是美国键盘,那么你必须调整你的键盘布局
这时Puppy完全装进了内存。它和你原来的操作系统,完全没有接触,这样你可以安全地使用Puppy Linux系统。现在你可以从光驱中取出光盘了。
如果您终止Puppy,系统会让你选择存储位置和介质。你可以把你的设置和你个人的文件储存在硬盘上的pup_save.2fs文件或光盘上的这个文件中。"SAVE TO FILE"或者"SAVE TO CD" 。如果你不想保存,选择"DO NOT SAVE" ,然后按下回车键。
如果你选择了储存,它会询问您相应的位置。
启动选项
当Puppy 启动时它会为您提供一些启动选项。如果您不输入任何东西,几秒中后Puppy就会装入内存。Puppy 会自动寻找pup_save.2fs文件。如果这个文件不存在,他就会要求你设置键盘和显示器分辨率 。选择下面这个选项:
puppy pfix=ram你选择这个选项启动,就不会从pup_save.2fs文件中载入你个人的文件和设置。这个启动选项是非常有用的,本手册有几次要用到它。另一个启动选项不用说就是正常启动了。
如何保存设置和你的个人文件
Puppy可以储存你的设置和你的个人数据,这些都会储存在pup_save.2fs文件中。这个文件,我建议设置为512MB大小。对于将来安装程序,这么大的空间也足够了,而且能够备份在一张光盘上。(注:如果你想要把这个文件备份在一个U盘上,这个U盘的容量必须大于这个文件的大小) 。Puppy只能把pup_save.2fs文件存储在FAT32分区上(注:U盘和外接硬盘一般都被格式化成FAT32文件系统,因此备份这个文件是不会有问题的)。Windows XP的用户通常只有一个NTFS的文件系统。有两种选择,为您存储pup_save.2fs文件以及:- 文件保存在一个外部硬盘或U盘上。
- 把NTFS分区调小,并创建一个或一个以上FAT32分区。
如何安装和卸载程序
安装程序有几种不同的方式,详述如下。在安装前建议备份pup_save.2fs。当你安装中出现错误时就可用备份恢复原样。如何安装官方程序
首先启动网络连接"Menu | Network | Roaring Penguin PPPoE ADSL"
然后打开这个程序:"Menu | Setup | Puppy package manager" 。在出现的窗口中点击第二个按钮。 ("click button to run the PETget package manager:")

一个新的窗口打开。

点击第一个按钮("Click the button to choose and install an official PET package..").
一个新的窗口出现。

在左边一栏中,你可以看到所有可用的程序。在右边一栏中显示所有已经安装的程序。(刚开始时,这一栏是空的)现在在左边一选择在左边一栏选择你要安装的程序,然后在两栏间的"Add"按钮上按一下。这个程序就会跑到右边一栏中去,然后点击"OKAY"按钮,这个程序就会安装上。
非官方PETget
除了官方的petget程序,Puppy论坛上还提供另外的petget程序下载。下载petget文件,然后开始"Menu | Setup | Puppy package manager".点击第二个按钮("click button to run the PETget package manager:")。一个新的窗口打开。

点击第二个按钮(or,if you have download a PET package ,official or unofficial,you can install it by clicking this button)。一个新的窗口打开。

选择petget文件,并点击确定按钮。

DotPups
dotpup是Puppy Linux用户为之编写的程序,dotpup 文件可从Puppy论坛(或别的互联网网站)下载。在文件管理器ROX中用鼠标左键单击一个Dotpup文件,出现一个窗口:
点击按钮"Unzip" 。现在一个警告讯息。

点击"Run"按钮。现在这个程序将被安装。安装完成后,会询问你是否删除这个Dotpup文件。

如果想保留,点击“No”,想删除,点击“Yes”。
Debian程序
Debian提供了一个巨大软件仓库,存放了约15000个程序包,这可以大大地扩大Puppy Linux的功能。首先,安装dillo浏览器和pb_debianinstaller程序(见如何安装官方程序) 。

接下来,从Debian网站http://www.debian.org/distrib/packages用Mozilla浏览器下载你想要的软件包。每个Debian软件包有三个版本,stable, testing, unstable(稳定,测试,和不稳定)。如果您不需要最新版本的程序,我建议你使用stable( http://packages.debian.org/stable/allpackages ),因为这些都已经经过测试的,问题很少的程序。让我们下载easytag安装包作为一个例子。我们这样做:

点击" easytag " 。向下滚动,到"Download easytag"段,点击你的计算机的体系结构-通常是在i386。

然后选择一个下载服务器。

下载程序并保存。然后,打开"Menu | Utility | Rxvt Terminal Emulator" ,并键入下列命令:
pb-debianinstaller

该dillo Web浏览器启动,并显示"Puppy Installer for Debian packages"。点击"choose file"按钮。

找到easytag文件,并单击" OK " 。

点击"next" 按钮。

按"check dependencies" 的按钮。注意:这时你必须在线 。


Pb-debianinstaller提醒您,有两个Debian软件包都必须安装。点击" libid3 - 3.8.so.3 "软件包后面的“install”。

关于 "libid3-3.8.so.3" Debian安装包的第二个浏览器窗口打开 。再在这个窗口的 "check dependencies" 按钮上点击一下。

这个安装包不需要别的 Debian安装包支持.单击 "install now".

下一个对话框出现,上面显示了你已经安装的所有的文件,并列出了它们的完整路径。单击 "finish".

在下一个对话框中,单击 "exit".

关闭浏览器窗口。

点击" libFLAC.so.7 "软件包后面的“install”。

象前面的一样安装libFLAC.so.7。


现在 "libFLAC.so.7"也安装好了。 在"install anyway" 按钮上点击一下安装 easytag程序本身。


easytag 程序已经安装好了。现在你点击 "Menu | Shutdown | Restart JWM"来更新你的菜单。假如这个程序没有菜单条,你可以用下面的命令来弄。在控制台窗口输入以下命令:
which easytag

这个命令显示这个程序的路径。然后你可以输入下面的命令运行它:
/usr/bin/easytag

你可以使用 "Puppy package manager" 像卸载 PETget/PupGet程序一样卸载Debian 软件包。(参看DotPups)
重要提醒:在 Puppy 2.17的有些情况下通过pb-debianinstaller 安装软件后可能菜单不能显示。假如出现这种情况,按下面的步骤去做:
通过点击Terminal图标打开一个控制台窗口.发出以下命令:
mv /root/.jwmrc /root.jwmrc-old

mv /root/.jwmrc-previous /root.jwmrc

通过按"CTRL+ALT+Backspace" 键杀死图形用户界面(“X”),然后键入如下命令:
xwinX重新启动,菜单出现。
如何卸载程序
打开程序"Menu | Setup | Puppy package manager".单击第二个按钮,打开一个新的窗口。
单击新窗口的第一个按钮,打开另一个窗口。

左边一栏你可以看到所有可供安装的程序,右边一栏你可以看到已经安装的软件。选中右栏中的你想卸载的程序,然后单击两栏间的"Remove"按钮 然后按 "OK".
Puppy CD-ROM上的程序不能卸载。但是你可以从菜单中把它们删除。 (参看如何创建自己的菜单).
如何设置Puppy
如何改变桌面背景图片
假如你想使用另外一张桌面图片,把你的图片复制到/usr/share/backgrounds目录下. 然后打开程序"Menu | Desktop | Puppybackground desktop image".在左边是可用的背景图片。选择一张图片,并在fit / stretch / center / tile四个按钮的一个上单击,桌面背景立马改变。
如何创建自己的菜单
Puppy 使用 JWM (Joes Windows manager)作窗口管理器。你能够改变 JWM让它适合你的需要。假如你想改变这个程序的菜单,执行以下命令。打开程序 "Menu | File managers | puppyROX file manager"
进入/root目录
单击 "Show all files"符号。

在 .jwmrc 文件上右击一下,然后选择 "Open As Text". .jwmrc就会用 Geany文本编辑器打开。
编辑文件,如下图:

保存并退出Geany.
用 "Menu | Shut Down | JWM restart"重启JWM。
提示: 安装新的PetGet程序会自动重建你的程序菜单,这次改写你个人的设置,因此你如果想保存设置,应在安装之前备份 /root/.jwmrc 文件,安装完后恢复即可。
在以下站点,你可以找到关于JWM的进一步的资料。
JWM Homepage
JWM Configuration
如何把在托盘区放置一个程序的快捷方式图标
假如你想放置一个程序的图标到托盘区,如此做:开始程序 "Menu | File managers | puppyROX file manager"
进入/root目录
单击"Show all files"(一个眼睛图标)
右击 .jwmrc-tray 然后选择 "Open As Text". .jwmrc-tray 就会用 Geany打开。.
假如你想添加比如abiword, 你应增加以下行,如图:

保存文件,退出Geany.
重启JWM: "Menu | Shut Down | JWM restart"
设置时间和日期
打开 "Menu | Desktop | Set date and time"设置时间和日期. 假如你想把时间从12小时制改为24小时制,可如此做:打开"Menu | File managers | puppyROX file manager"
进入 /root目录
在 "Show all files"图标上单击。

在 .jwmrc-tray 文件上右击,选择 "Open As Text". .jwmrc-tray 文件就会用Geany打开。
在文件末尾你会看到 "clock"命令,如图编辑:

保存文件退出 Geany.
重启JWM: "Menu | Shut Down | JWM restart"
如何储存和删除一个桌面图标
为了在桌面上建立一个指向某程序,目录或文件的快捷方式图标,你可以直接把文件从ROX文件管理器中拖到桌面上。假如你想从桌面上删除,右击该图标,并选择 "Remove Item".
如何安装字体
你可以安装字体,比如在Abiword中使用的。从网上下载TTF字体 保存到/usr/X11R7/lib/X11/fonts/TTF目录。字体可到以下两个站点下载:http://thelinuxbox.org,http://wiki.scribus.net。
单击下载的文件,xArchive就会打开。

单击"Select All"按钮,然后单击"Extract"按钮。一个新窗口就会打开。

单击它上面的 "Choose"按钮。

到/usr/X11R7/lib/X11/fonts/TTF目录下,单击"Open"按钮。

单击 "OK"按钮。

现在文件就会解压,字体就会复制到目录中去。对所有的下载的TTF文件都这样做,之后假如你打开Abiword,你安装的字体就能使用了。
如何做备份
如何备份pup_safe.2fs
文件pup_safe.2fs包含个人设置和你个人的文件(是指那些没有储存到另一个分区或U盘的文件)。备份是很简单的。你开始Puppy linux时选择"puppy pfix=ram",或者你启动windows系统或别的操作系统。然后你把该文件复制到备份介质(如:另一个硬盘,U盘,光盘)就行了。如何从pup_save.2fs里恢复文件
只有当启动Puppy时加载了pup_safe.2fs,才能看到它的内容。如果在启动时没有加载它,也有办法进入该文件保存其中的内容:以 "puppy pfix=ram"方式启动.
然后打开控制台输入以下命令:
mount -o loop /mnt/hdax/pup_save.2fs /mnt/data
/mnt/hdax是你保存pup_save.2fs文件的分区。(例如:mount -o loop /mnt/hda2/pup_save.2fs /mnt/data).现在你可以看到pup_save.2fs文件的内容,你也可以将其中的文件复制到另一个硬盘或者U盘上。
用rsync备份
如果你不把你的文件保存在pup_save.2fs文件中而是保存在ext2/ext3分区上,你可以用rsync-command来备份。我建议用另一块硬盘作为备份介质。备份硬盘上必须有一个ext2/ext3分区(见启动选项) 。rsync进行同步备份与您当前的文件,并备份你更新过的或修改过的文件。同时rsync 能够从备份中删除那些你被备份目录中不再有的文件。(如果你想这样做的话。)为了能够使用rsync ,你必须首先安装该程序。 (可到Puppy论坛上去搜索) 。
在你备份之前确保你的文件没有被破坏
下面的例子假设你备份你的
/mydata目录下的文件,目的是备份到/backup目录去。打开一个控制台,并输入以下命令:
mount /dev/hda4 /mnt/hda4挂载一个分区,这是你保存有你的文件的分区,它必须是 ext2/ext3分区。
mount /dev/sda1 /mnt/sda1挂载一个分区,这个是你准备备份你的文件的分区,它必须是 ext2/ext3分区。它可以是一块外接硬盘。
rsync -av --delete /mnt/hda4/myData/ /mnt/sda1/backup备份文件。假如没有备份的目录,可用以下命令创建:
mkdir /mnt/sda1/backupumount /dev/hda4卸载分区
umount /dev/sda1卸载分区
注意:
/mnt/hda4/mydata/后的斜杠是重要的。只有/mnt/hda4/mydata目录下的文件被复制,而不是mydata目录本身。下面是一些rsync的选项:
- a: 所有的目录和文件都拷贝
- v:你可以在屏幕看到进展
- delete: myData下的不再存在的目录和文件将被删除。如果你不想如此做,请不要使用该选项。
mount /dev/hda4 /mnt/hda4 mount /dev/sda1 /mnt/sda1 rsync -av --delete /mnt/sda1/backup/ /mnt/hda4/myData umount /dev/hda4 umount /dev/sda1
多用户
Puppy不是作为一个多用户的版本来编制的。和其他发行版相反,在Puppy中,每个用户对所有的文件、程序以及个人数据都拥有全权。不过它对多个用户,仍留有选择的余地。如何个性化pup_save.2fs文件
如果几个人都用Puppy工作,你可以为每个人分别指定一个pup_save.2fs文件。这样,每个人都可以各自配置Puppy并把他的个人文件存放在自己的pup_save.2fs文件中。所有的pup_save.2fs文件必须放在同一目录下,而且文件名必须以" pup_save "开头 。比如有两个用户Julia 和 Alexander,你可以把原来的pup_save.2fs文件复制一份。然后你把原来的文件改名为pup_save_julia.2fs,把复制的文件改名为pup_save_alexander.2fs 。当起Puppy启动的时候就会询问使用哪一个pup_save.2fs文件。
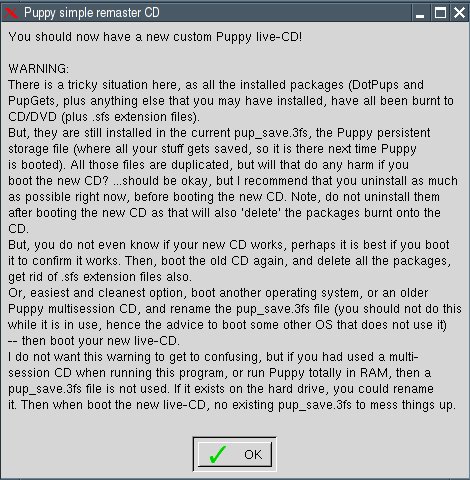
多会话
如第4.4章所述,每个用户都能使用带有个人文件和设置的专属的Puppy CD/DVD. 使用方法是在多项启动菜单中选择。虽然多会话是吸引人的,但我还是不敢在同一个CD/DVD盘上反复擦写。我总是担心丢失个人文件。制作你自己的Puppy-CD
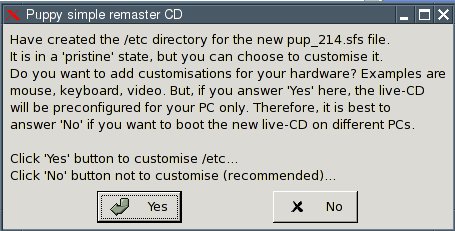
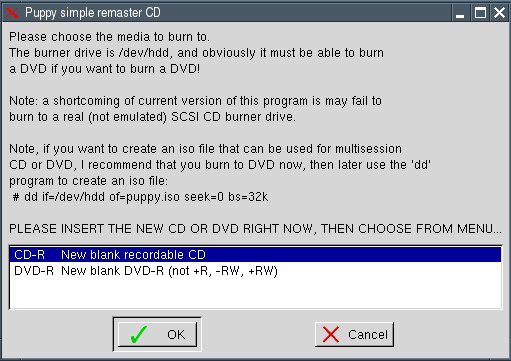
你可以使用下面的程序制作你自己的 Puppy-Linux打开 "Menu | Setup | Remaster Puppy live-CD":

点OK。

选择分区, 这个分区会用来存放临时工作目录。 然后按OK。

选择你的CD/DVD刻录设备。然后按OK。

插入当前的 Puppy-live-CD 然后按OK

然后按OK

然后按OK

然后按OK

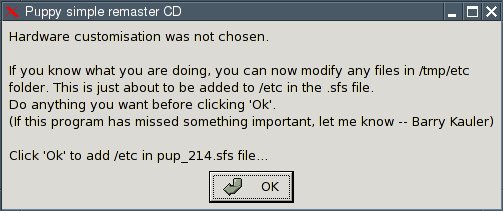
然后按 "No".也就是选择:“not to customiste(recommended)"

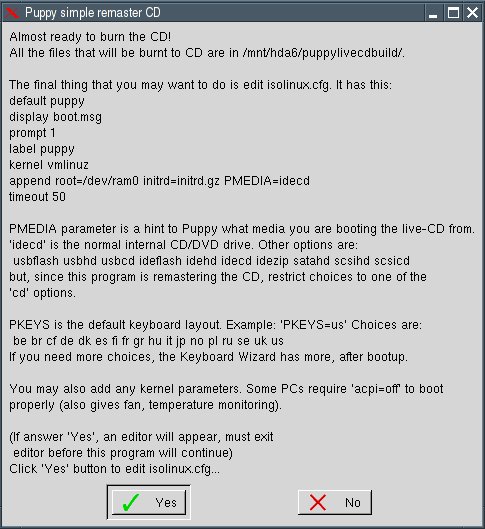
然后按OK.

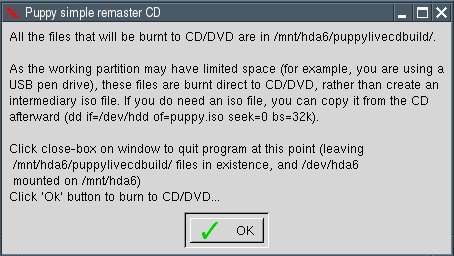
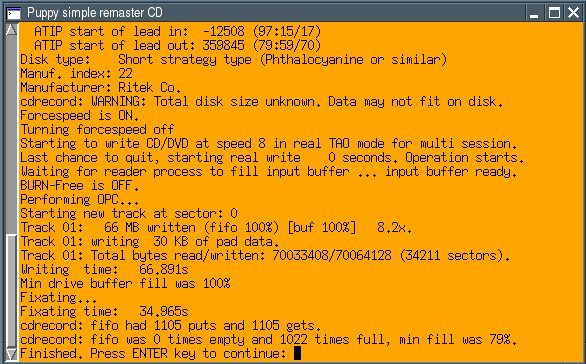
把live-CD从CD/DVD刻录机中取出,再放入一张新的待刻的碟。根据你的实际情况选择CD 或DVD 然后按OK。

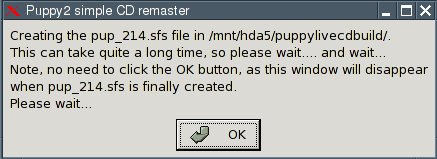
你的新的 Puppy-CD/DVD将会创建。完成后,按回车。

然后按OK,你的 Puppy-live-CD 好了。
技巧和小窍门
Windows程序和相应的Puppy Linux程序
| Windows | Puppy Linux |
|---|---|
| Windows 资源管理器 | ROX |
| Word | Abiword, OpenOffice Write |
| Excel | Gnumeric, OpenOffice Calc |
| PowerPoint | OpenOffice Impress |
| 记事本 | Geany |
| Internet Explorer | SeaMonkey Browser |
| Outlook | SeaMonkey Mail |
| Frontpage | Bluefish |
| Photoshop, Paintshop | Gimp |
| mp3-Player | Xmms |
| DVD-Player | Gxine |
大小写
Linux的总是区分大小写。这两个文件myfile.txt和myfile.txt是不同的文件。特殊字符
除了减(-) 和下划线调(_),不要使用特殊字符,作文件名和目录名称,也不要使用空字符。只使用字母A-Z,a-z,0-9,-,_。如何用rox移动文件
如果你左键单击某个文件,并拖动它到另一个目录中,文件会件被复制。如果您此时按下shift键文件将被移动。关于rox的进一步的资料见:http://puppylinux.org/wikka/rox
rox的情景菜单
右键点击一个文件或目录。在shell rxvt中复制和粘贴
复制=鼠标左键点击粘贴=鼠标中键点击
在shell rxvt自动完成
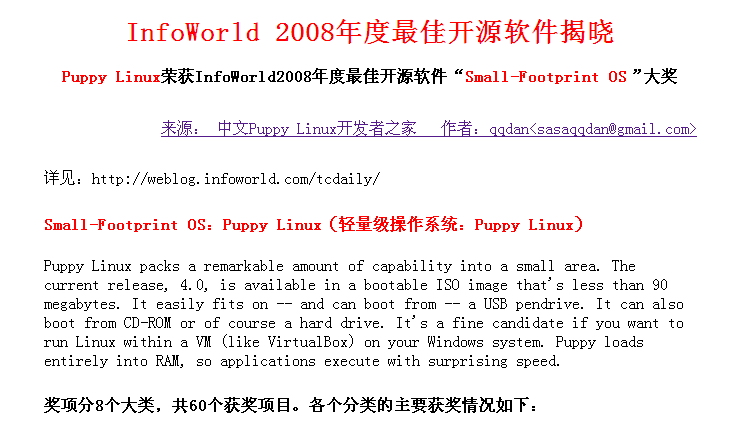
你并不需要键入整个路径或文件名,在shell 中,你输入第一个字母,然后按下Tab键。shell会完成了目录名或文件名。Puppy Linux获InfoWorld2008年度最佳开源软件“Small-Footprint OS”大奖
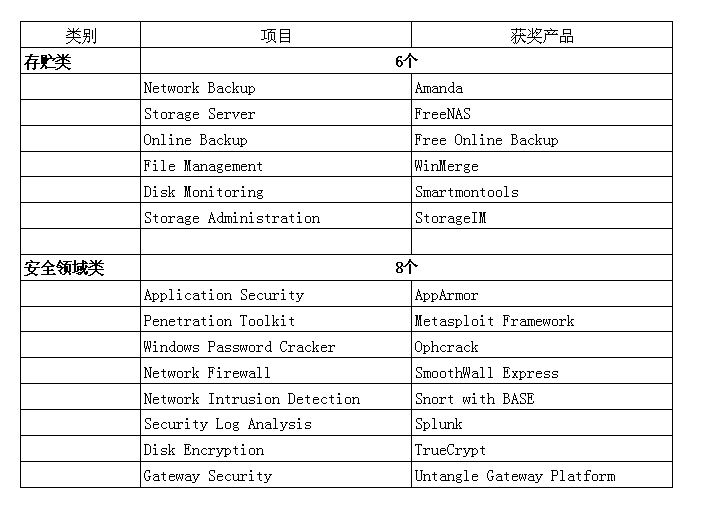
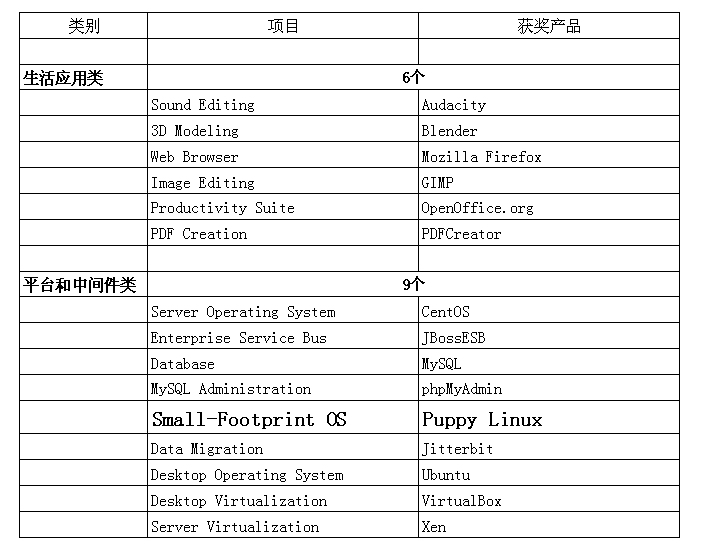
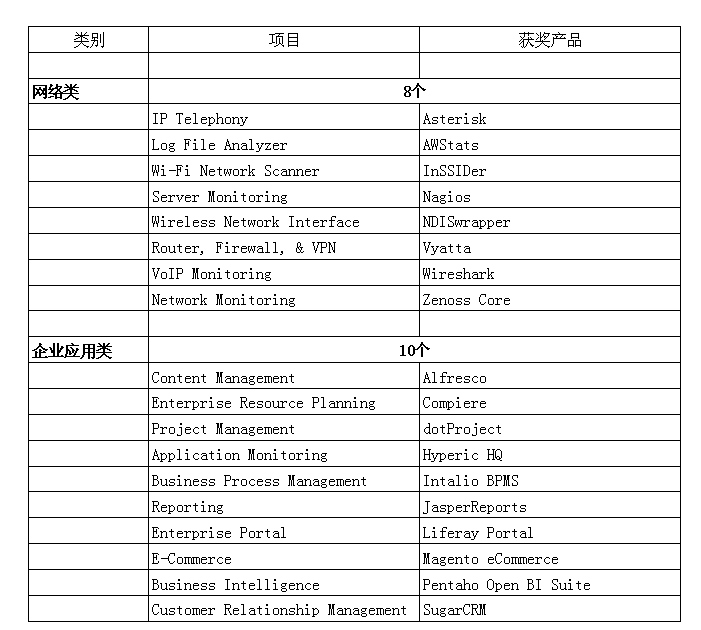
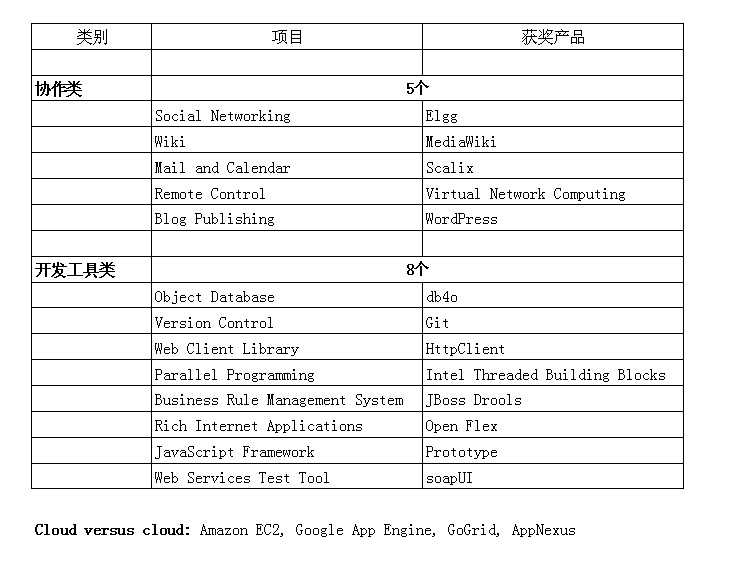
该帖已被cnbeta部分收录,请点击: http://www.cnbeta.com/article.php?sid=62007InfoWorld Bossie 奖项共分为8个大类,60个获奖项目。 Puppy Linux获最佳迷你操作系统奖;CentOS和Ubuntu分别获最佳服务器操作系统和最佳桌面操作系统奖;VirtualBox获最佳桌面虚拟机奖。
该奖项的英文原文介绍:
Small-Footprint OSPuppy Linux
Puppy Linux packs a remarkable amount of capability into a small area. The current release, 4.0, is available in a bootable ISO image that's less than 90 megabytes. It easily fits on -- and can boot from -- a USB pendrive. It can also boot from CD-ROM or of course a hard drive. It's a fine candidate if you want to run Linux within a VM (like VirtualBox) on your Windows system. Puppy loads entirely into RAM, so applications execute with surprising speed.
参考译文:
迷你操作系统Puppy Linux (中文版 小芭比Linux - 译者注)
Puppy Linux在很小的空间内集成了相当惊人的软件数量。最新版本4.0,是一个小于90MB的可启动iso镜像文件。她非常适合于通过U盘启动。她也可通过CD-ROM或硬盘启动。如果你想在windows系统里通过虚拟机(如VirtualBox)来玩Linux,Puppy是非常好的选择。由于Puppy完全加载到内存中,所以应用程序能以令人惊讶的速度运行。
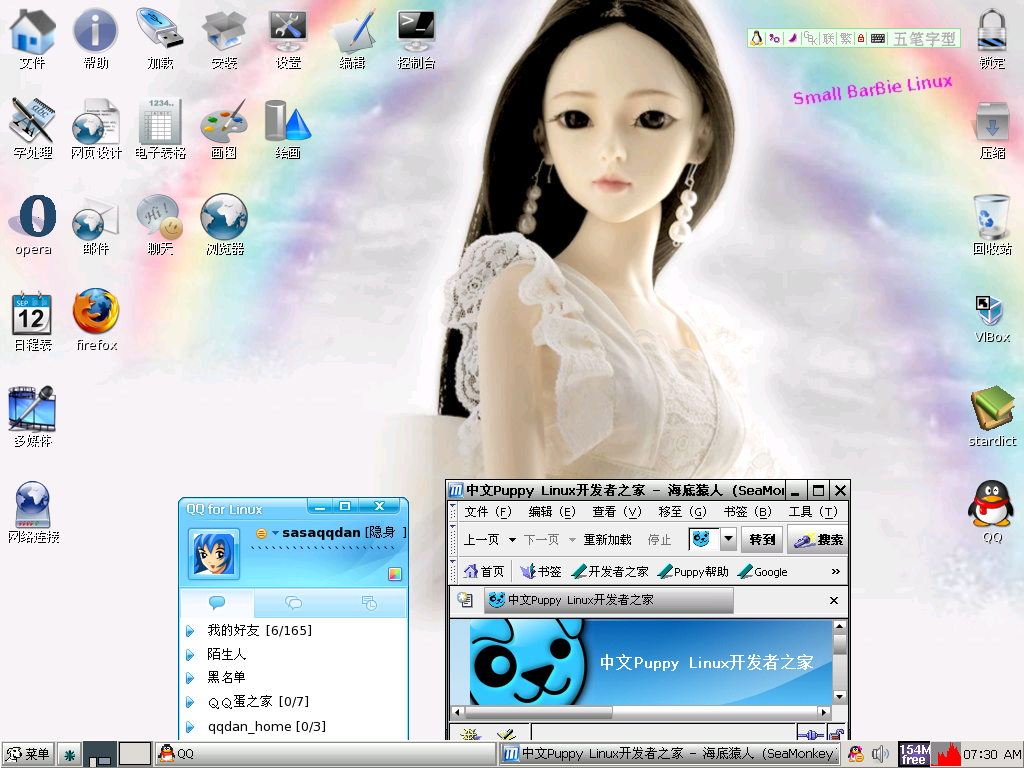
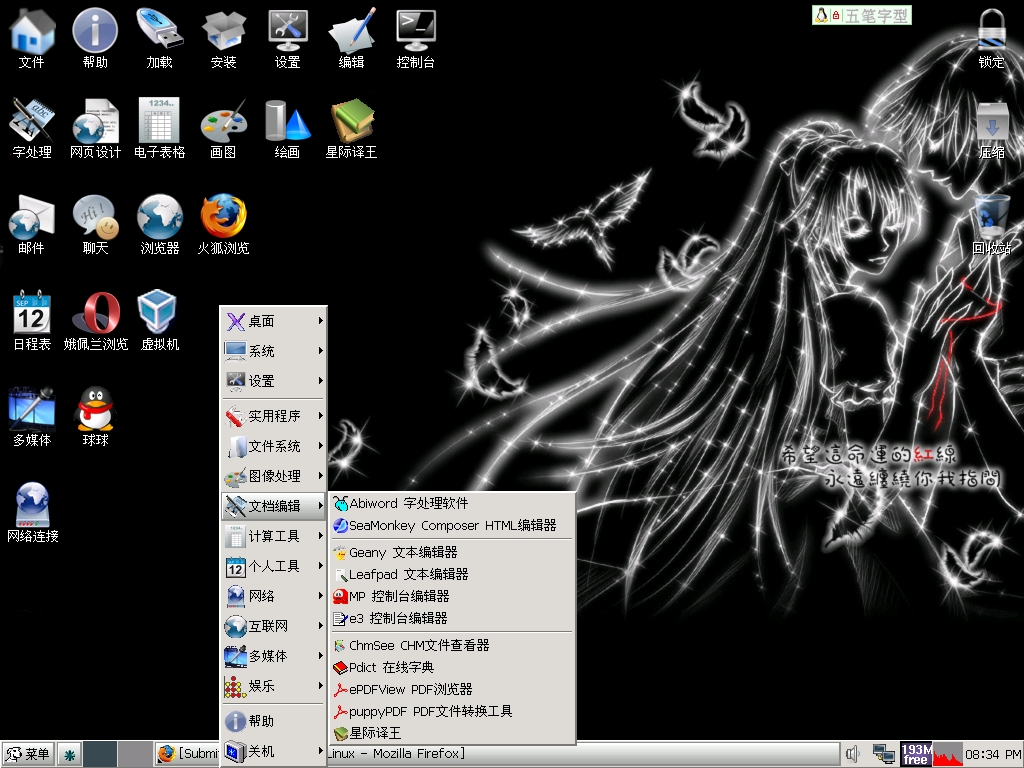
欢迎到“中文Puppy Linux开发者之家”下载“小芭比linux”:Puppy Linux4.00中文版
桌面截图:
桌面截图:
详见:
InfoWorld 2008年度最佳开源软件揭晓,Puppy Linux荣获InfoWorld2008年度最佳开源软件“Small-Footprint OS”大奖
新闻来源:
http://weblog.infoworld.com/tcdaily/archives/2008/08/best_of_open_so_4.html
Puppy4中文手册(翻译中……)
说明:Puppy Linux 4.0的英文(日语、德语、西班牙语)手册已出,为方便大家查看学习,特将英文手册先复制粘贴到这儿(翻译工作量较大,只能一步一步来啰!)大部分章节内容与Puppy3.01手册大同小异,可直接查看gsxlm翻译的Puppy Linux 3.01使用手册,未翻译章节已打上“★”号。如果想完整系统地学习Linux,尝尝 鳥哥的Linux私房菜 繁體版或简体版也不错!
由于大家都是业余爱好者,时间和精力有限,请有一定英语基础的朋友一起来翻译,只求意到,不求最好,翻译内容可用跟帖形式发布,谢谢!
Puppy Linux是一个非常智能的Linux发行版,它是由澳大利亚教授Barry Kauler编制的。他刚刚开始退休生活。他制定了一种类似Windows的Linux ,这种linux包含了所有重要的程序。而且它小到足以在早期的电脑的内存中运行。Puppy 几乎能在所有的硬件上运行。它易于操作,可以非常容易地适合个人偏好。许多志愿者不断为它编写软件。Puppy 有一个全球性的群体,每天24小时用英语通过互联网进行交流。
前言:
这本手册供想熟悉PuppyLinux的初学者和Linux用户使用。在互联网上有各种各样的信息,你可以到Puppy网站上去浏览。这本手册概括了最重要的资料,帮助Puppy 初学者迈开第一步。
如何使用手册:
菜单条目和按钮都用""括起来表示,子菜单用垂直线分开。例如:"Menu | Shut Down | JWM restart"的意思是,你先点击按钮"Menu" ,然后在出现菜单的菜单上单击"Shut Down" ,最后点击"JWM restart" 。
在手册中字母X是用来表示一个数字。例如/dev/hdax意味着你必须写成/dev/hda1,/dev/hda2或/dev/hda3——至于写成哪个数字要看你的电脑的具体情况。
对控制台"shell",可以运行"Menu | Run | Rxvt terminal emulator"程序。
英文原文:
Introduction
This manual will appeal to Linux beginners and Linux users, who would like to become acquainted with Puppy. This manual summarizes the most important information for Puppy beginners and explains the first steps with Puppy.
How to use the manual:
Menu entries and buttons are set in "", submenus are separated by vertical lines. Example: "Menu | Shut Down | JWM restart" means, that you first click on the button "Menu", than (at the appearing menu) on the headword "Shut Down" and finally on the headword "JWM restart".
In the manual the letter x is used as a substitute symbol for a number. For example /dev/hdax means that you have to write /dev/hda1, /dev/hda2 or /dev/hda3 - just use what suits your computer.
With the term "shell" the program "Menu | Run | Rxvt terminal emulator" is meant.
附:gsxlm翻译的Puppy Linux 3.01使用手册索引:
Puppy 4.0 中文手册索引:
如何获得Puppy(How to get Puppy)
你可以从ibiblio.org这个网站得到Puppy Linux。把最新版本Puppy-3.xx-seamonkey.iso(如Puppy-3.01-seamonkey.iso)保存到你的硬盘。这个文件的大小约100 MB。为了确保您下载了一个真正的原始文件,你检查ISO文件的MD5码是否与相关文件Puppy-3.xx-seamonkey.iso.md5.txt(如Puppy-3.01-seamonkey.iso.md5.txt)中的相符。
在Linux操作系统中:
打开一个shell然后进入你保存上述两个文件的目录,输入以下命令:md5sum Puppy - 3.01 - seamonkey.iso你会得到一个校验结果。用一个文本编辑程序打开文件Puppy-3.01-seamonkey.iso.md5.txt 。比较两个值是否相同。
在Windows环境中:
下载的DOS程序md5sum.exe 。打开DOS命令窗口,点击"开始|运行" ,打开运行窗口,输入以下命令:CMD
现在打开了一个DOS窗口。
进入你保存下载的两个文件的目录,如:
C:/Puppy。输入以下命令:c: cd \ cd puppy dir *.*
现在,你应该能看到Puppy文件。输入命令:
md5sum -c puppy-3.01-seamonkey.iso.md5.txt你应该得到一个"OK" 。
接着把ISO文件(我们以Puppy-3.01-eamonkey.iso为例)刻录成光盘。如何刻录光盘,请查看你的CD刻录软体的使用手册。初学者往往直接把ISO文件作为一种数据文件复制到光盘上,这是不行的。通常光盘刻录软件有一个特殊的选项,是专门用来把ISO文件刻录成光盘的。您可以用文件管理器来查看你的光盘是否正确刻录。如果你看到的文件中有
image.gz或vmlinuz.gz,说明你刻对了。如果你看到的文件是Puppy-3.01-seamonkey.iso,说明你没有刻对。How to get Puppy
You can get Puppy Linux from ibiblio.org. Save the current release puppy-4.xx-seamonkey.iso (e.g. puppy-4.00-seamonkey.iso) on your harddrive. The filesize is about 88 MB.
To make sure that you downloaded a genuine original file, you can compare the checksum of the ISO file with the associated file puppy-4.xx-seamonkey.iso.md5.txt (e.g. puppy-4.00-seamonkey.iso.md5.txt). Download this file as well.
Within Linux:
Open a shell and change into the directory, in which you stored the two files. Enter the following command:
md5sum puppy-4.00-seamonkey.iso
As a result you get the checksum. Open the file puppy-4.00-seamonkey.iso.md5.txt with a text program (e.g. abiword). The two checksums should be identical.
Within Windows:
Download the DOS-Program md5sum.exe. To open a DOS-Box click on "Start | Run". This opens an input window, into which you enter the following command:
cmd
Now you get a DOS-Box.
Change into the directory, in which you stored the two files, e.g. C:/Puppy. Enter these commands:
c:
cd \
cd puppy
dir *.*
Now you should see the Puppy-files. Enter the command:
md5sum -c puppy-4.00-seamonkey.iso.md5.txt
You should get an "OK".
Subsequently you burn the ISO file (in our example puppy-4.00-seamonkey.iso) on CD. To burn an ISO file on CD, consult the manual of your CD-burning software. Beginners sometimes copy the ISO file simply as a data-file on CD, which doesn’t work. Usually the CD-burning software has a special menu option for burning an ISO file on CD. You can verify whether you burned the CD correctly by looking at the CD with the file manager (e.g. Windows Explorer). If you see files as "image.gz" or "vmlinuz.gz" everything is OK. If you see the file "puppy-4.00-seamonkey.iso" this is incorrect.
Tip:
Create a second, identical Puppy CD as a backup copy, in case the original CD becomes corrupted.
如何运行Puppy(How to run Puppy)
How to run PuppyA great advantage of Puppy Linux is that Puppy doesn't have to be installed. You can run Puppy directly from the CD, without affecting your operating system. Alternatively you can install Puppy on a harddrive or a USB stick.
How to run Puppy the very first time
First you must set up the boot sequence in the BIOS. If you do not know how to get into the BIOS-setup, consult the computers manual. Usually you press one of the following keys immediately after switching on the PC: ESC, one of the function keys F1 to F12 or the delete key. At the BIOS-setup you change the boot sequence so that the CD-ROM drive is first and the harddrive is second. Close the BIOS-setup and store the settings.
The PC then usually reboots. Immediately insert the Puppy CD into the CD-ROM drive. If you are too slow your old operating system starts. In this case keep the CD inserted in the CD drive and start the PC again.
Now Puppy should start. During the starting procedure you are requested to choose your country. Navigate with the cursor keys downward to your country. Then strike the return-key. Thereafter a further window (Puppy video Wizard) appears, "Xorg" is already highlighted. Press the return-key. Wait some seconds till the next window (Puppy video Wizard) appears. There you navigate with the cursor keys to your screen (LCD panel = flat screen, CRT = standard monitor) and resolution. Then strike the return-key. After some seconds the Puppy desktop appears.
Should Xorg not work on your computer, choose Xvesa. A few seconds later, the Puppy desktop will be displayed using a resolution of 640 x 480 pixels. If you wish to use an even higher resolution choose e.g. 1280x1024x24 and click on the button "Change".

After some seconds the Puppy desktop appears again. Click on the OK-button.
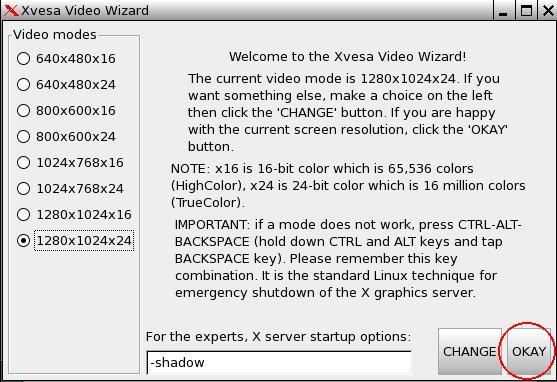
Unfortunately, with Xvesa you will have to adjust the keyboard layout if you are not using a US keyboard.
Puppy was loaded completely into RAM. Your old operating system is not touched, so that you can look safely at Puppy Linux. Now you can take the CD out of the CD drive, unless you do not have enough ram, in which case Puppy will not allow the CD to be ejected.
If you terminate Puppy you are asked whether you want to store the settings (and your personal files) in a file named pup_save.2fs on a harddrive "SAVE TO FILE" or CD-ROM "SAVE TO CD". (you can change between the options with the tab-key). If you do not want to save the settings mark "DO NOT SAVE" and press the return-key.
If you would like to store the settings (and your personal files) you are asked on which harddrive this should happen.
Boot-Options
When Puppy boots it offers you some boot-options. If you do not enter anything, Puppy is loaded after some seconds into RAM. When starting Puppy automatically looks for a previously stored pup_save.2fs-file. If this file doesn't exist yet, you are asked for the keyboard map and the screen resolution.
With the boot-option
puppy pfix=ram
you have the option to start Puppy into RAM without your pre-saved-settings and without your personal files even if a pup_save.2fs-file already exists. This boot option is very useful and is used in this manual a few times. The other boot-options are normally not needed.
How to save the settings and your personal files
So that Puppy can store all settings and your personal data, a file named pup_save.2fs is saved. I recommend a size of 512 MB for this file. This is big enough for further programs and can be backed-up on CD-ROM (note: if you want to backup the file on a USB stick, it must have a storage capacity of 1 GB). Puppy can store the pup_save.2fs-file on many different filesystems including FAT and NTFS as used by windows. (note: USB sticks and external harddrives are usually formatted with a FAT32-filesystem, so that they can be used without problems). Windows XP-users normally have a NTFS-filesystem only. There are two options for you to store the pup_save.2fs-file as well:
(1) Save the file on an external harddrive or USB-stick.
(2) Make the NTFS partition smaller and create one or more further partition with FAT32-filesystem and ext2/ext3-filesystem.
If you intend to use Puppy durably you should select the second alternative. This alternative has many advantages.
★如何安装Puppy(How to install Puppy)
如何安装Puppy友情提示:Windows用户如果没有特别需求,推荐在windows下使用pup2usb将puppy直接安装到硬盘或U盘中,这是最简便的精简(frugal)安装方式。这种pup2usb方法无需刻盘,不需要对硬盘进行专门分区,直接安装puppy到硬盘的NTFS或FAT32分区即可。(实际安装过程只是复制三到四个puppy专用文件到windows分区的puppy文件夹下,再在windows启动菜单里添加puppy启动项)
如果你不喜欢每次用光盘启动Puppy,您可以安装Puppy到硬盘中。这就需要一些准备工作。
硬盘,分区和文件系统
一个硬盘可以分为一个或多个分区。如果您要创建几个分区的硬盘,每个分区就好象操作系统中的一个硬盘。换句话说:尽管你只有一个硬盘在电脑上,你会在Windows或Linux中看到好几个(虚拟)硬盘。Windows会给每个分区指定盘符(包括软驱和CD/DVD驱动器)。通常A是软盘驱动器,C是硬盘(第一个分区),D是CD-ROM驱动器,E是硬盘(第二分区),F是硬盘(第三分区),等等。每个分区都有自己的文件系统,Windows通常使用NTFS(在WinXP中)或FAT32(在Win98,Win95中)。
在Linux下(第一个)硬盘的地址是/dev/hda或/dev/sda。如果您的电脑有第二个硬盘,地址为/dev/hdb或/dev/sdb。分区从1开始按顺序编号。您的硬盘分区地址是/dev/hda1(相当于Windows中的C盘),/dev/hda2(相当于Windows中的E盘),/dev/hda3,等等。Linux可以在不同的文件系统中工作,如ext2,ext3和ReiserFS。这些文件系统是Windows无法读取的。此外,Linux也可以在Windows文件系统中工作。利用FAT32在Windows和Linux之间交换文件是一个不错的办法。
How to install Puppy
If you don't feel like booting Puppy from CD-ROM all the time, you can install Puppy to hard disk. This requires some preparation.
Harddrives, partitions and filesystems
A harddrive can be divided in one or more partitions. If you create several partitions on a harddrive, each partition appears like a harddrive in the operating system. In other words: although you have only one harddrive in your PC, you will see several (virtual) hard-drives with Windows or Linux. Windows designates the harddrives (as well as the floppy disk drive and CD/DVD drive). In Windows they will be identified with letters. Usually A designates the floppy disk drive, C the harddrive (first partition), D the CD-ROM drive, E the harddrive (second partition), F the harddrive (third partition) and so on. Each partition has its own file system, Windows normally uses NTFS (Windows XP) or FAT32 (Win98, Win95).
With Linux the (first) harddrive is adressed as /dev/hda or /dev/sda. If your PC has a second harddrive, it is adressed as /dev/hdb or /dev/sdb. The partitions are sequentially numbered, starting with one. The partitions of your harddrive are adressed as /dev/hda1 (corresponds to the Windows C-partition), /dev/hda2 (corresponds to the Windows E-partition), /dev/hda3 and so on. Linux can work with different file systems such as ext2, ext3 or ReiserFS. These file systems are not readable by Windows. In addition Linux can work with Windows filesystems too. Due to this option a FAT32-Partition is ideal to exchange files between Windows and Linux.
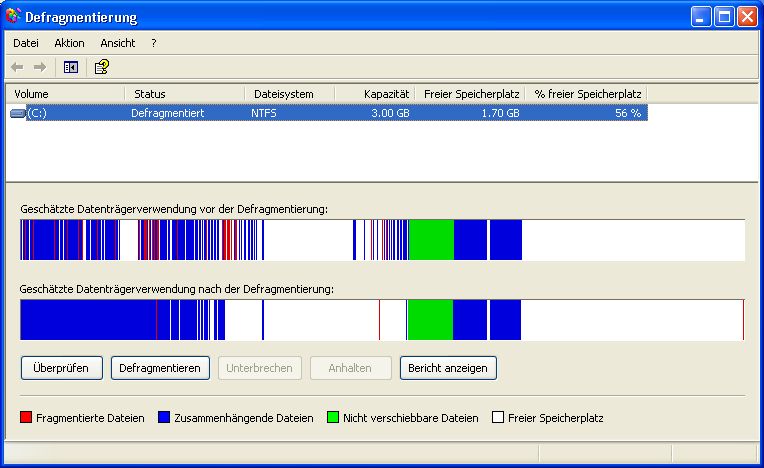
整理磁盘碎片(Defragment your hard disk)
Defragment your hard diskBefore creating new partitions on your hard drive, you shoulddefragment the drive so that all data is stored at the beginning of theexisting partition. Here is how to do it:
Start up Windows.
First, backup your files to CD-ROM, DVD, or an external hard drive.Also remember to backup your Internet link collection (Favourites) andyour e-mails. If your data is encrypted, it is advisable to decrypt itbefore backing it up. This protects you from data loss becausemodifying hard drive partitions always carries the risk of data loss.
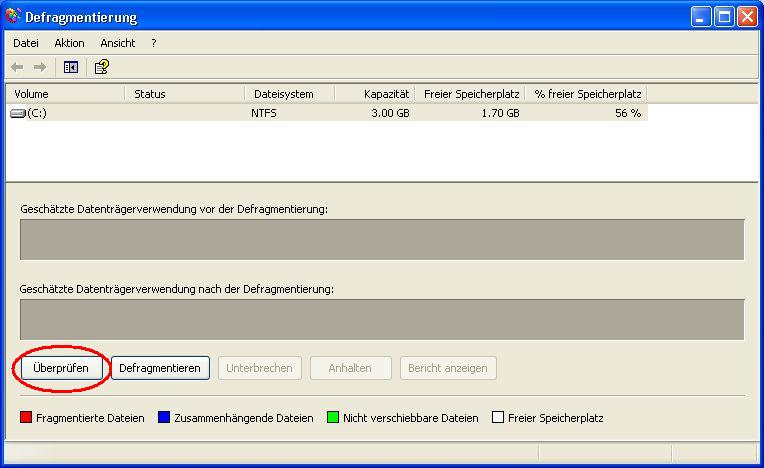
Next, start the Disk Defragmenter program under Windows. The programis located at "Start | All Programs | Utilities | System Programs |Disk Defragmenter". Select hard drive c:\ and click the "Check" button.
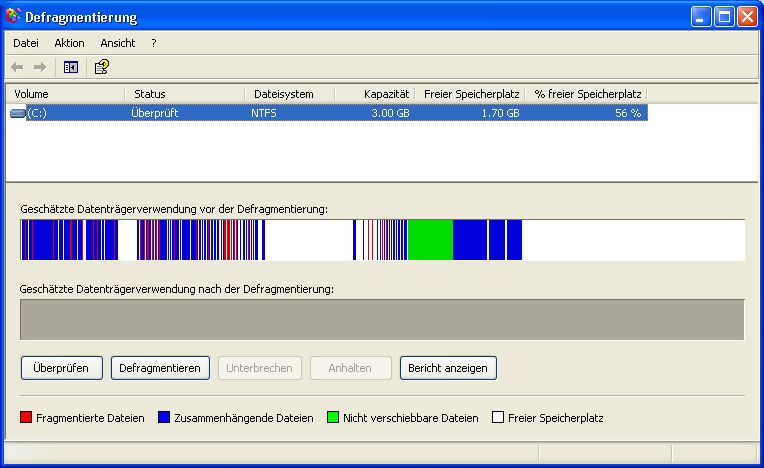
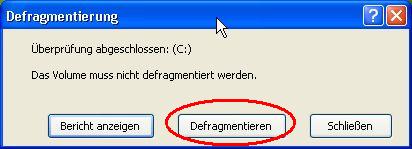
Click the "Defragment" button. Depending on the size of thepartition and the amount of data on it, this process can take a longtime (over an hour). If you have very large amounts of data, you canspeed up this process drastically by deleting your files after you havebacked them up (see the previous item) and restoring them once you aredone with the modifications. In this case, please make sure beforehandthat your backup is readable, otherwise there will be wailing andgnashing of teeth.

Click the "Close" button.
There is now space on the harddisk for additional partitions.
Shut down Windows.
创建分区(Creating partitions)
Creating partitionsNow you should plan the layout of your hard disk partitionsregarding file system and size. I recommend creating three or fourpartitions in addition to the Windows partition. The following exampleassumes you have exactly one Windows partition (drive letter C). Yourhard disk would then look like this:
First partition: NTFS or FAT32 (Windows)
Second partition: ext2 or ext3 (this is where Puppy will be installied to)
Third partition: Linux swap (for page files)
Fourth partition: FAT32 (for exchanging data between Windows and Linux)
Optionally, a fifth partition: ext2 or ext3 (Linux)
Windows will continue to reside on your first partition with all itsprograms and data. The second partition (recommended size about 1-2 GB)has a Linux file system (ext2 or ext3). This is the partition Puppywill be installed to. The third partition (exactly as large as yourcomputer's memory) will be a Linux swap partition that Linux can ...well, swap files to. The fourth partition has a FAT32 file system,which is recognized by both Windows and Linux. This partition(recommended size about 5 GB) is used for files that you want to accessfrom both Windows and Linux. If you want to manage large amounts ofdata under Puppy (e.g. music collection, pictures), you should create afifth partition with a Linux file system (ext2/ext3). This file systemcannot be accessed from Windows and is meant for Linux only.
To create the partitions, proceed as follows:
Start Puppy Linux from CD with the "pfix=ram" boot option.
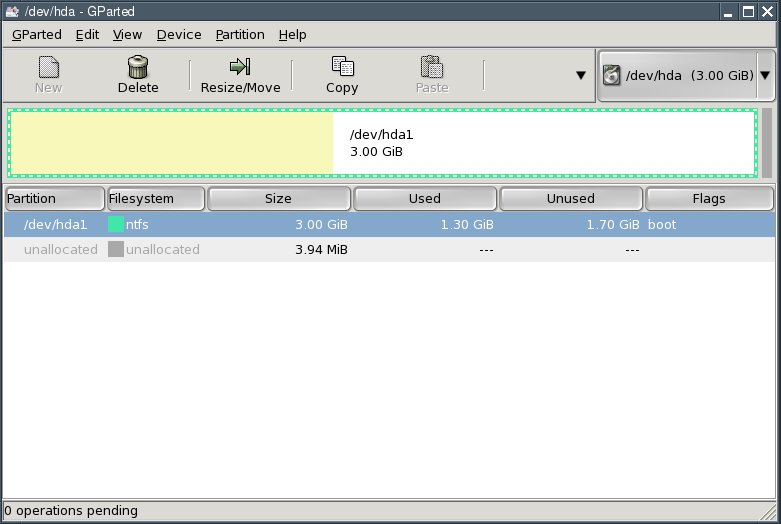
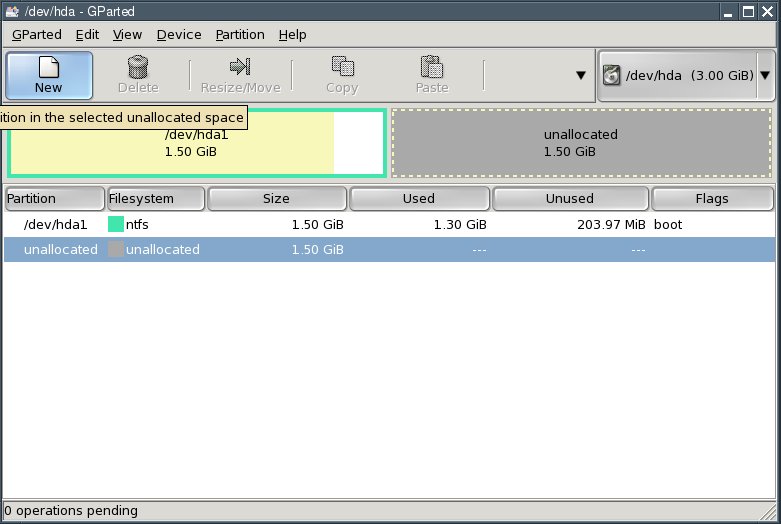
Start the Gparted program: "Menu | System | Gparted partition manager".
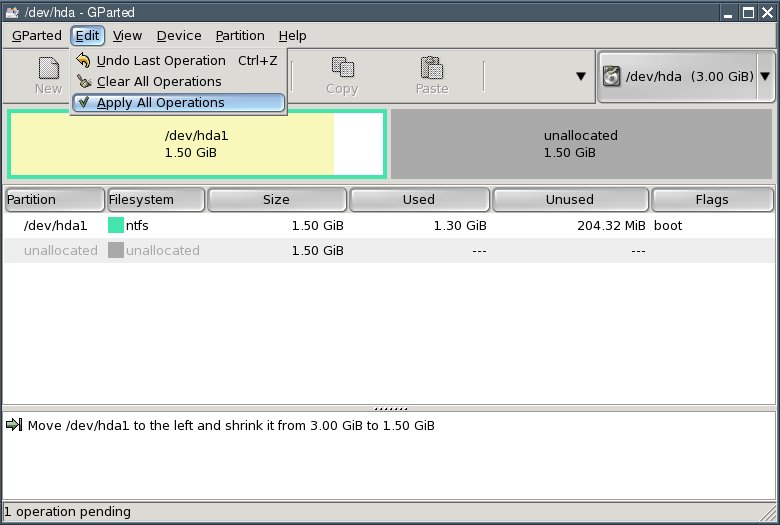
First, shrink your Windows partition (NTFS file system). To do this, select the Windows partition /dev/hda1.
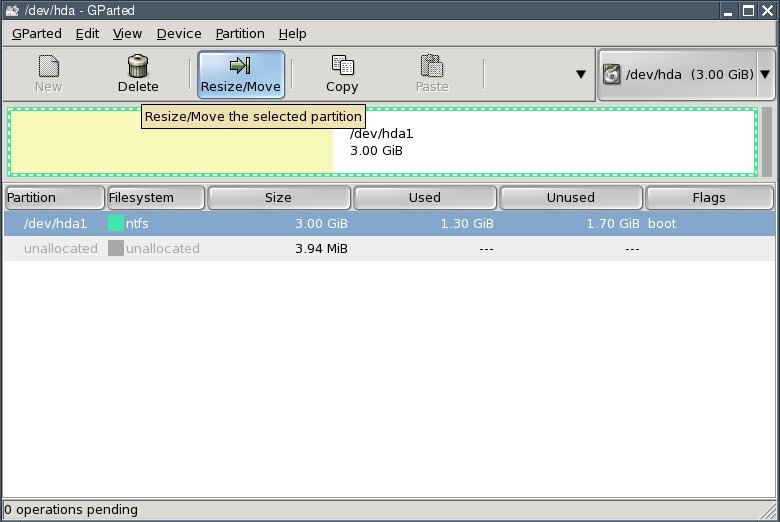
Click the "Resize/Move" button.
Reduce the "New Size" value until the "Free Space Following" fieldshows enough free space following for the new partitions. My testcomputer's hard disk has only 3 gigabytes; I am using half of that forthe mew partitions. You probably have a much larger hard drive so yourpartition sizes can be increased accordingly.
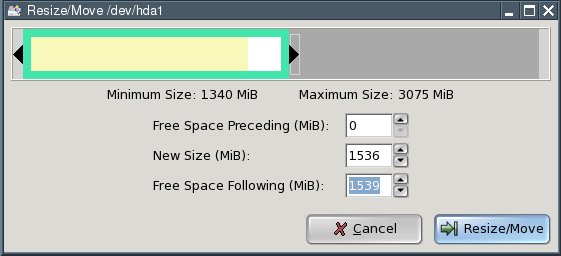
Then press the "Resize/Move" button.
Next, select "Edit | Apply All Operations" from the menu.
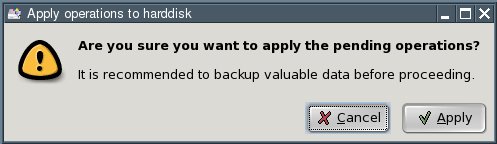
In the dialogue box that comes up, click the "Apply" button.
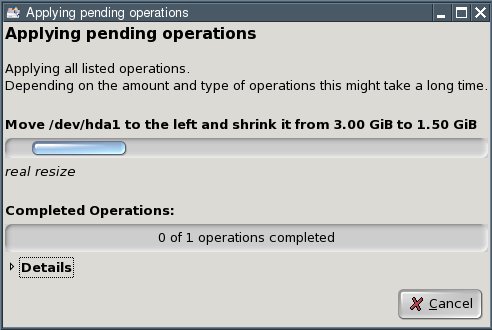
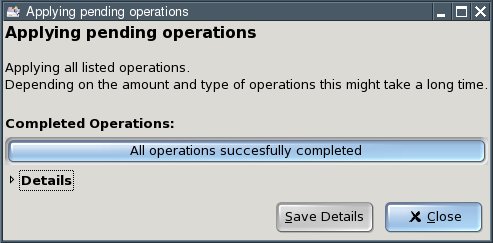
Click the "Close" button. You now have an "unallocated" area on your hard disk.
Select the line saying "unallocated" and click the "New" button.
Enter the size of the second partition in the "New Size" field. Thisis where Puppy Linux will be installed to. I recommend a size of 1 to 2gigabytes (i.e., 1024 to 2048 MB). Select ext2 from the "Filesystem"box and click "Add".

Again select the line saying "unallocated" and click the "New" button. (You can see where this is going.)

Enter the size of the third partition in the "New Size" field. Thispartition is to hold Linux's swap files as a Linux swap partition. Youshould make it as large as your computer's memory (RAM). With my testcomputer, this amounts to 128 megabytes (MB). Select linux-swap fromthe "Filesystem" box and click "Add".
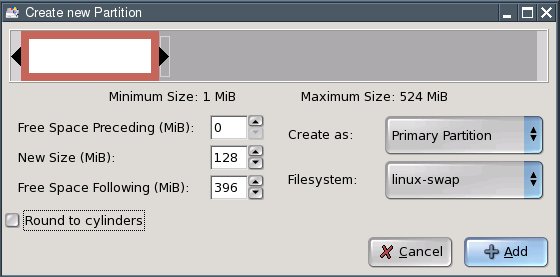
Again select the line saying "unallocated" and click the "New" button.

Enter the size of the fourth partition in the "New Size" field.Thispartition is meant for shared access to files from Windows and Linux. Irecommend a size of about 5 gigabytes (5120 MB). Since my test computerdoes not have a large enough hard disk, I am using 396 megabytes (MB)as an example. Select FAT32 from the "Filesystem" box and click "Add".

Hint: if you want to create additional partitions (e.g., for verylarge files under Linux), repeat the process outlined aboveaccordingly. In this case, you may have to create so-called logicalpartitions. Please consult additional sources if you are unsure abouthow to do that.
To actually write the changes to disk, select "Edit | Apply All Operations" from the menu.
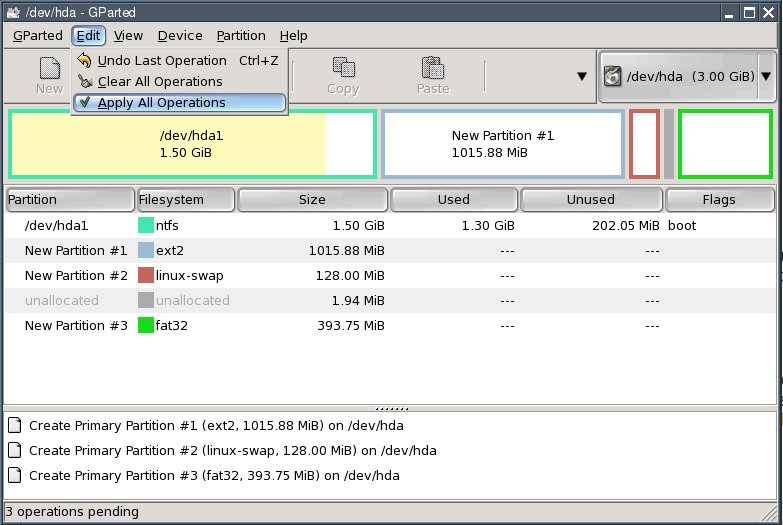
In the dialogue box that comes up, click "Apply".
Click the "Close" button.

Exit GParted.
系统安装(Installation)
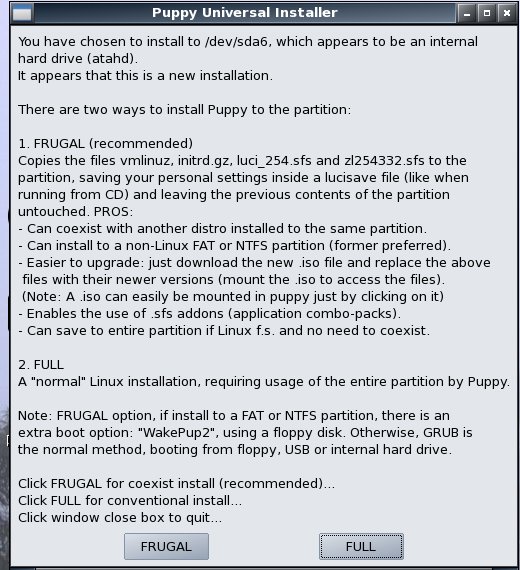
InstallationThere are different ways to install Puppy:
Frugal Installation (Pupy CD image on hard drive)
Full Installation
Installation to a USB flash drive
Installation to a CF card
I recommend Frugal Installation, if you have 256 MB RAM or more. If you have less than 256 MB RAM you should choose Full Installation.
简化安装(Frugal Installation)
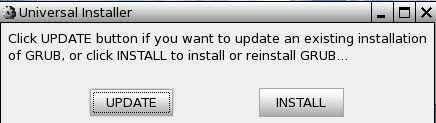
这里介绍的是如何用Puppy通用安装程序来简化安装Puppy,其实,用Pup2usb安装Puppy到硬盘或U盘,也是简化安装的最简便方式。Frugal Installation using Puppy Universal Installer
A Frugal Installation copies the image from the Puppy CD to the harddrive. At bootup, Puppy is loaded into your computer's memory (RAM)just as it is when you boot Puppy from CD, however, loading it from ahard drive is much faster. This way, Frugal Installation combines theadvantages of booting from CD-ROM (protection from malware) and a harddrive bootup (speed). Moreover, upgrading to a new Puppy version isvery simple - all you have to do is replace some files.
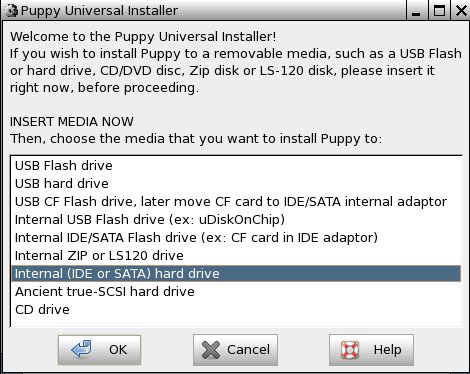
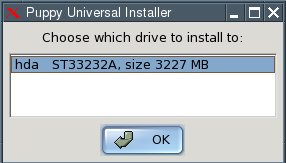
Start "Menu | Setup | Puppy universal installer". Choose whichmedium Puppy should be installed to. In this example, I chose theinternal hard drive.
If you have several hard drives, select one.
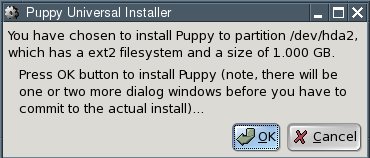
Next, click on the button next to the partition that you want Puppy to be installed to - /hda2 in this example.
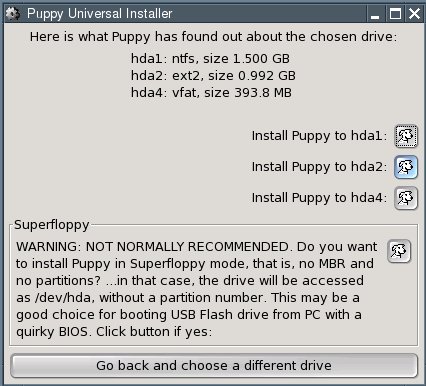
In the dialogue box, click "OK".
You now have to decide whether you want a "Frugal" or a "Full" installation. In our example, click on the "FRUGAL" button.

Now you change the installation directory. Just click on the "OK" button.

The files are now copied from CD to the hard drive.
The installation is finished. In the next two dialogue boxes, click "OK".
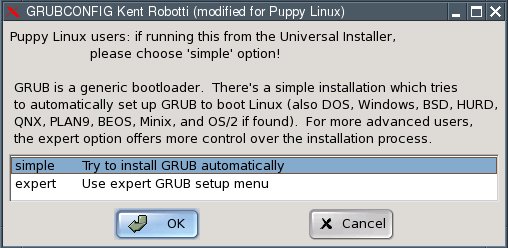
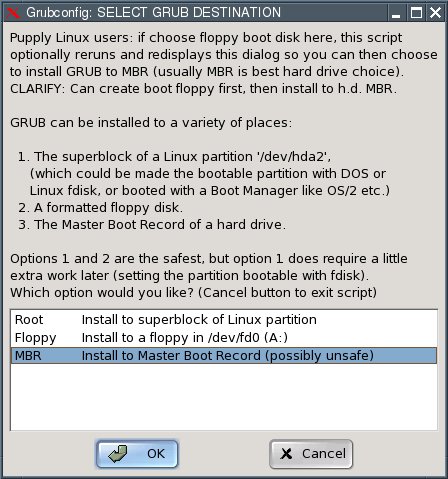
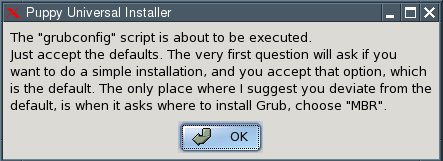
Since you now have two operating systems on your computer (Windowsand Puppy Linux), you need a boot loader. The boot loader is the firstprogram executed after switching the computer on. It enables you tospecify which operating system should be started up. If Windows was theonly operating system on your computer up to now, you do not have aboot loader. Start the installation of the boot loader GRUB with "Menu| System | Grub bootloader config".
Select "simple installation" and click "OK".
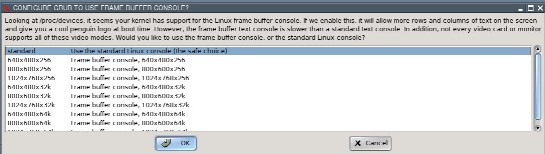
In the next dialogue box, select "standard" and click "OK".
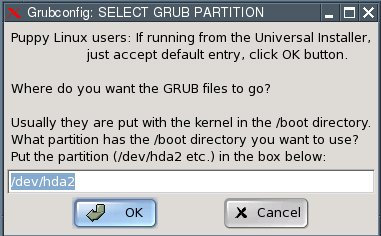
Now you have to specify where the GRUB boot loader should store itsfiles. These can only be written to a Linux file system partition.Thus, please specify one of the Linux (ext2 or ext3 file system)partitions you created (/dev/hda2 in the example). If you do not have aLinux file system partition yet, you need to create one.
Now you have to specify where the GRUB boot loader itself should beinstalled to. Select the Master Boot Record "MBR" and click "OK".
In the next dialogue box, click "OK".

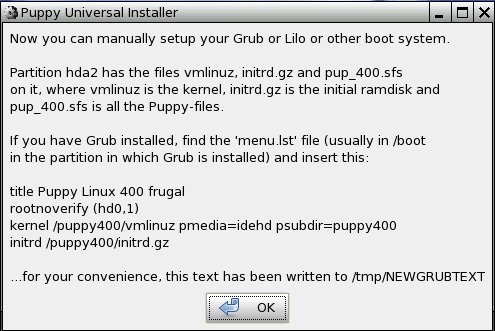
The installation is complete. What remains to be done is toconfigure the GRUB boot loader so that Puppy Linux can be booted. Thisis how to do it:
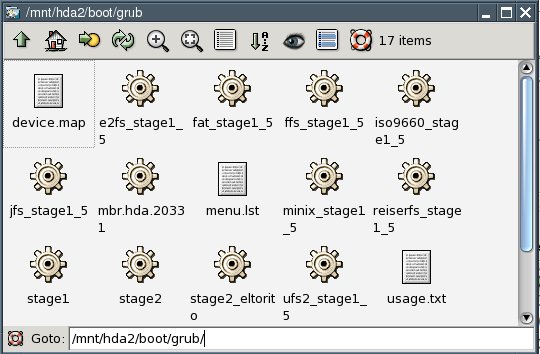
Open the file "menu.lst". You will find this file in the /boot/grubdirectory of the partition you installed the GRUB files to (/dev/hda2in our example). For Linux newbies, I include detailed instructions onhow to find and open this file. More advanced users can skip ahead towhere menu.lst gets edited.
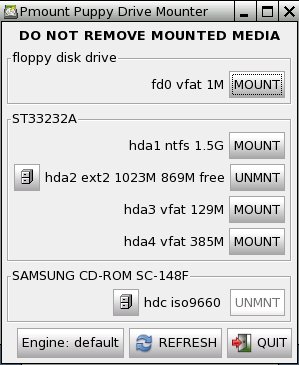
Start "Menu | Filesystem | Pmount mount/unmount drives" and click on the button "MOUNT" next to "/dev/hda2".

The button changes to "UNMNT".
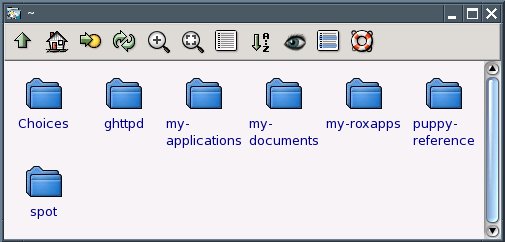
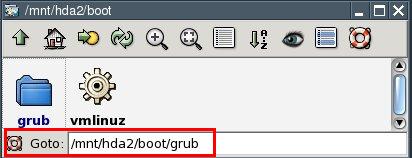
Start "Menu | Filesystem | ROX-Filer file filemanager".
Right-click with the mouse and choose "Window | Enter Path".
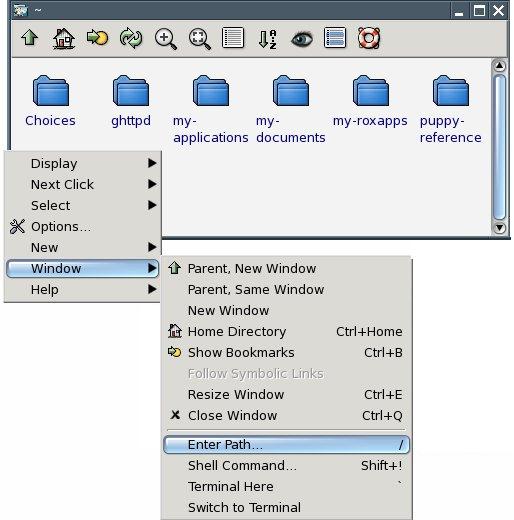
Enter the following path next to "Goto: /mnt/hda2/boot/grub/
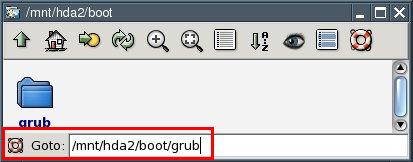
You are now at the folder /mnt/hda2/boot/grub/
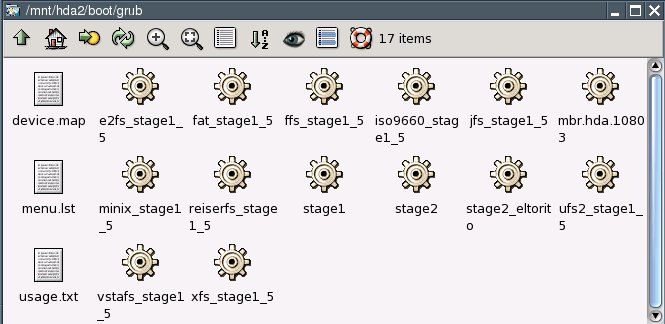
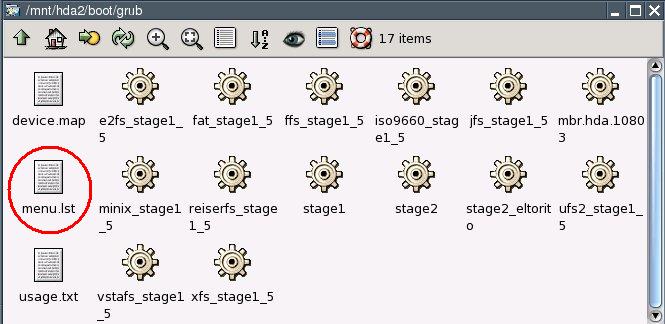
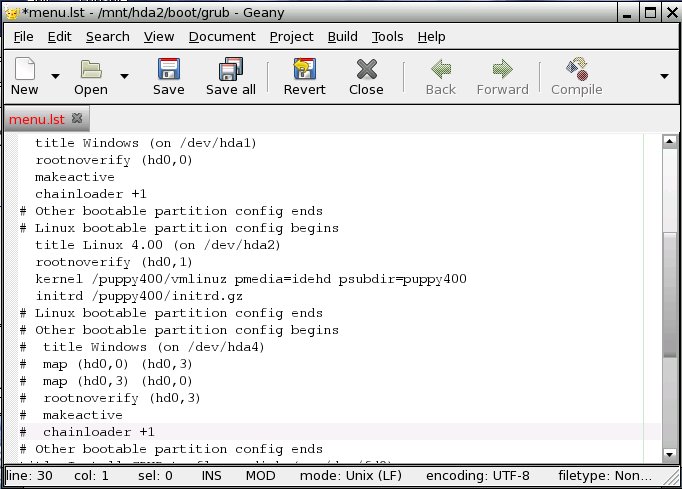
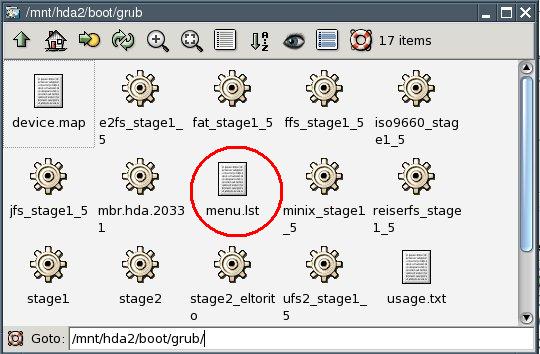
Use the right mouse button to click on the file called "menu.lst".
From the context menu that pops up, select "File menu.lst | Open As Text".
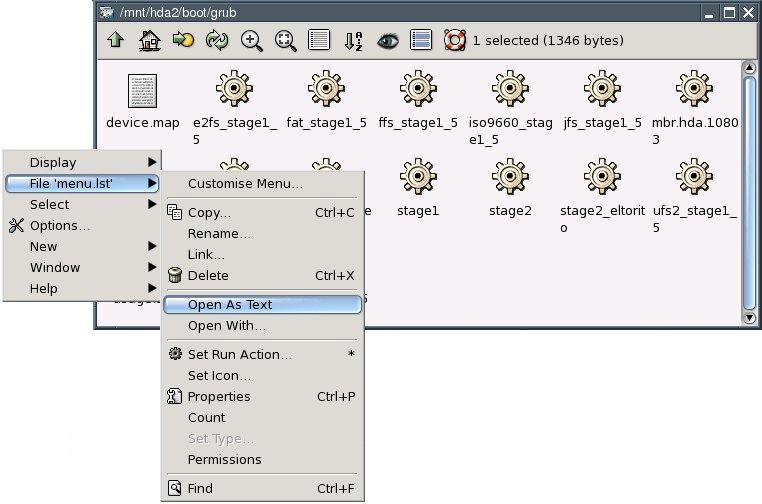
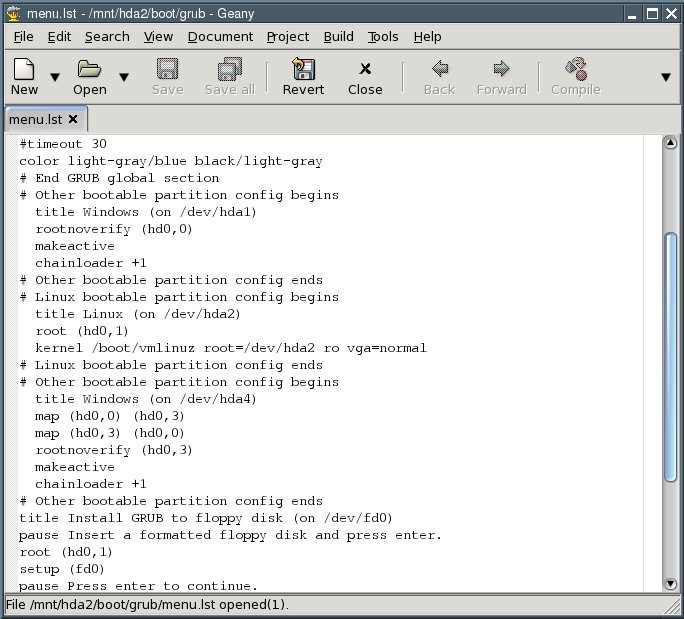
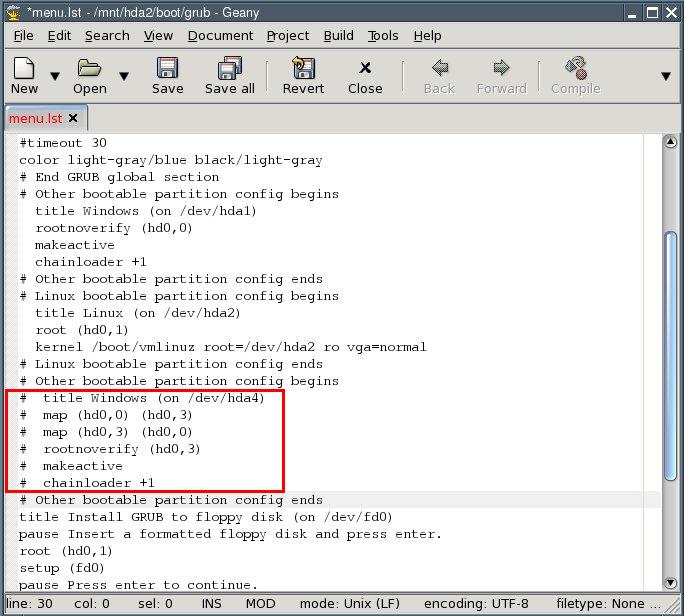
You can now see the contents of the menu.lst file.
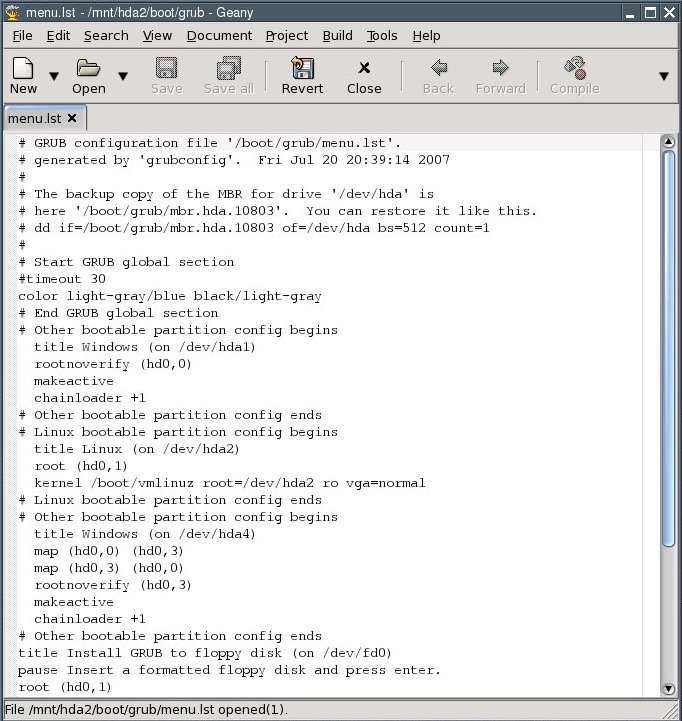
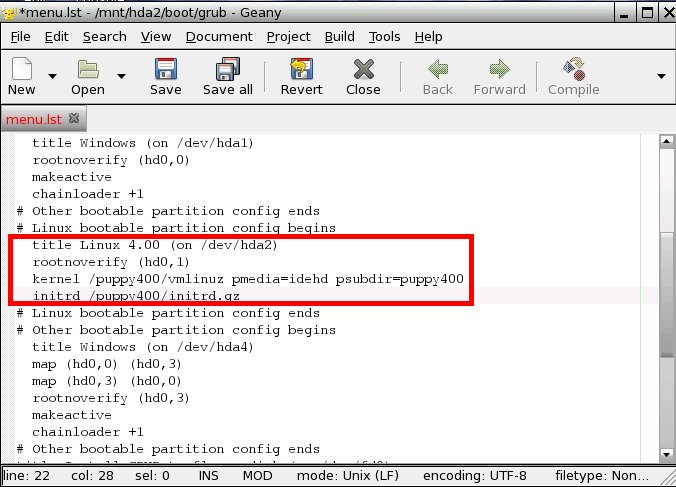
Edit the file at this point:
title Puppy Linux 4.00 frugal (on /dev/hda2)
rootnoverify (hd0,1)
kernel /puppy400/vmlinuz pmedia=idehd psubdir=puppy400
initrd /puppy400/initrd.gz
(Notice: depending on what medium you boot from, you have to set thepmedia parameter to one of usbflash, usbhd, usbcd, ideflash, idehd,idecd, idezip, satahd, scsihd or scsicd. If you did not install theGRUB files to the /dev/hda2 partition, you need to change therootnoverify parameter as well - partition number and Linux driveletter minus one, so if the GRUB files are on /dev/hdb3, make it"rootnoverify (hd1,2)".)
The bit you changed in the file should now look like this:
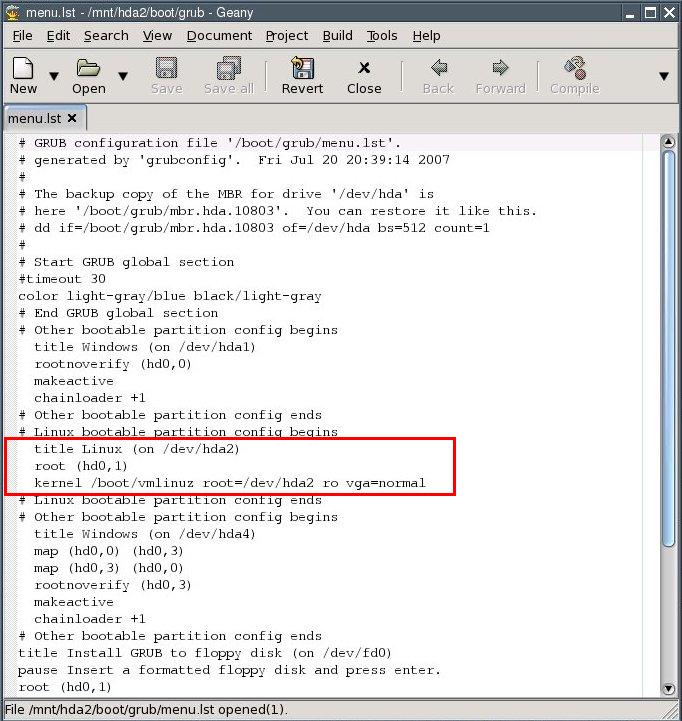
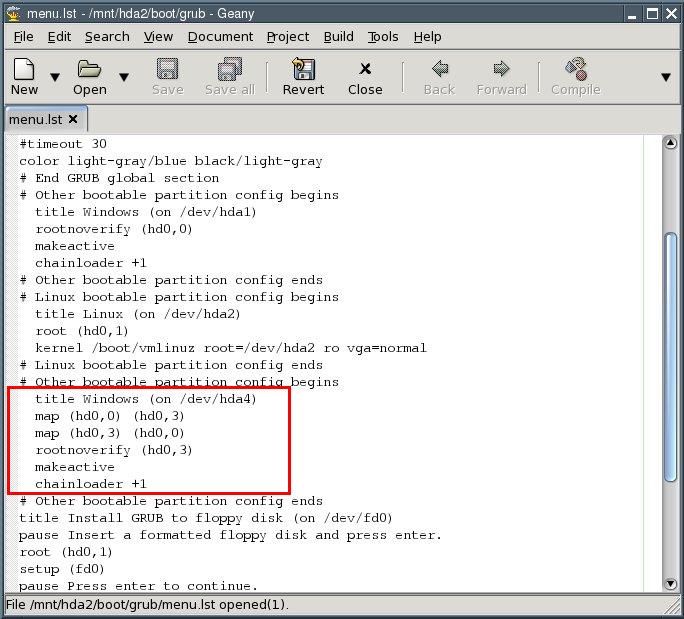
"Comment out", i.e. put a number sign (#) before each of the following lines:
It should now look like this:

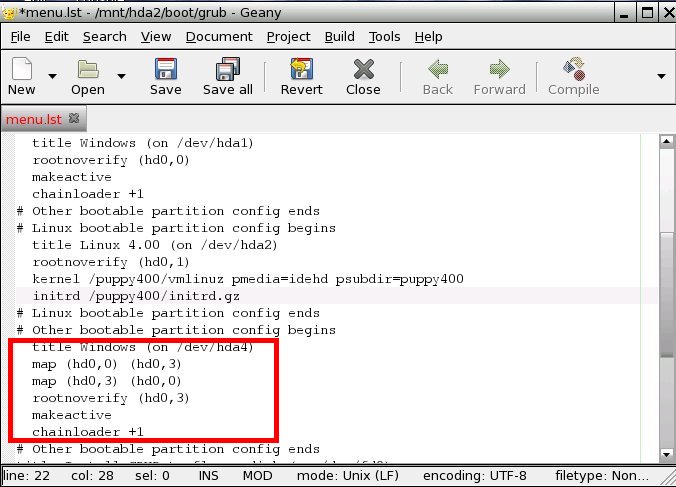
All necessary changes have been made. The file should now look like this:
Save the file by selecting "File | Save" from the program's menu. Exit the text editor.
Close the ROX file manager.
Click on the button "UNMNT" next to /dev/hda2.
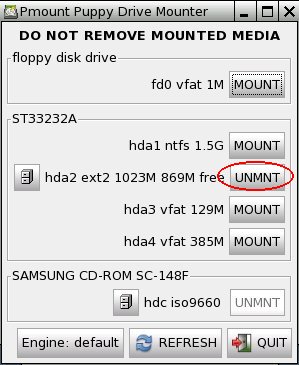
The button changes to "MOUNT".
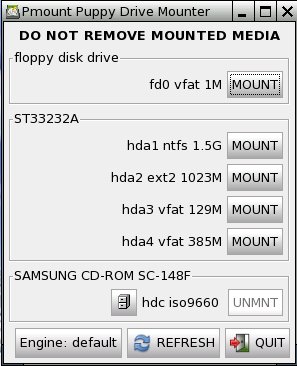
Click on the button "QUIT".
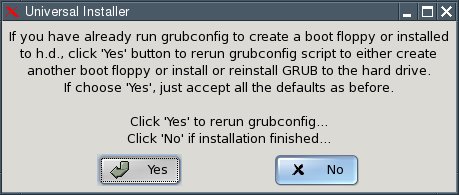
Exit Puppy and reboot the computer: "Menu | Shutdown | Reboot computer".
When you reboot the computer, you will be asked whether you want tosave the "session" (i.e., all the configuration changes you made). HitReturn to select the entry "SAVE TO FILE", which is alreadyhighlighted.
Confirm the next dialogue (Warning) by hitting Return.
In the next dialogue, select the "hda2" partition with the cursor keys and press Return.
Now. you will be asked, if the file should get a special filename. Just press Return.
You will be asked whether you want a normal (unencrypted) or anencrypted save file. Select "NORMAL" with the cursor keys and pressReturn.
The next dialogue lets you choose a size for your save file. A filesize of 512 megabytes is usually sufficient. You can increase (but notdecrease) this size anytime from within Puppy. Pick the desired filesize with the cursor keys and press Return.
In the next screen you see a summary. Choose "Change Folder" and press return.
Next, you enter "/puppy400" as subfolder and confirm with return.
Again a summary is shown and if everything seems to be ok, choose "Yes, save" with the arrow keys, then press return.
Please be patient while the file is created.
Next you will be asked if Puppy 4.xx should test for serial devicesat each boot. Choose ""No" with the arrow keys and confirm with return.
Now you decide wether the system file pup400.sfs should be copiedover to the harddrive. Choose "Yes" with the arrow keys and confirmwith return.
Last not least the computer restarts automatically. Remove the PuppyCD from the drive before the shutdown is complete. Upon reboot the bootloader will show up. Choose ""Puppy Linux 4.00 frugal (on /dev/hda2)""with the arrow keys and confirm with return.
手动安装(Manual Installation)
Manual InstallationTo be able to use this option, a boot loader has to be installed on your computer. If there is no boot loader installed on your computer, I recommend doing so using the Puppy Universal Installer.
Boot Puppy fom CD with the "puppy pfix=ram" boot option.
Create a new directory "puppy400" onto a partition with a Linux file system (ext2/ext3) or a FAT32 file system.
Copy the files
pup_400.SFS
zdrv_400.SFS
initrd.gz
vmlinuz
into this directory. If you are updating Puppy, overwrite the existing files. Reconfigure the GRUB boot loader by editing the menu.lst file. You will usually find this file on a Linux partition in the /boot/grub folder.
Append the following two lines to the file menu.lst:
title Puppy Linux 4.00 frugal (on /dev/hda2) rootnoverify (hd0,1) kernel /puppy400/vmlinuz pmedia=idehd psubdir=puppy400 initrd /puppy400/initrd.gz
Notice: (hd0,1) signifies the hard disk and partition on which GRUB is stored. Depending on your boot medium, you will need to set the pmedia parameter to one of usbflash, usbhd, usbcd, ideflash, idehd, idecd, idezip, satahd, scsihd or scsicd.
Save the file menu.lst
Close the text editor. Remove the Puppy CD from the drive and exit Puppy without saving your session. Reboot the PC. Puppy should now boot without the CD in the drive.
完整安装(Full Installation)
完整安装需要在硬盘里专门划出一个ext2/3/4分区,完整安装后,直接卸载半步中文体验包(或一步到位中文包)可能会导致系统无法启动或无法进入X图形界面,也无法外挂sfs镜像文件。如果没有特别需求,不推荐用这种方式来安装Puppy Linux。
Full Installation
A Full Installation installs Puppy onto the hard drive like any other"normal" Linux. This kind of installation is a good idea if you haveless than 256 MB of memory.
Start "Menu | Setup | Puppy universal installer". Select the mediumthat you want to install Puppy to. I chose the internal hard drive forthis example.
If you have more than one hard drive, choose one.
Click the button next to the partition that you want to install Puppy to.
Confirm the next dialogue by clicking "OK".
You now have to decide whether you want a "Frugal" or a "Full"installation. Since this chapter describes a Full installation, clickthe button labelled "FULL".
The files will be copied from the CD to the hard drive.


Since you now have two operating systems on your computer (Windowsand Puppy Linux), you need a boot loader. The boot loader is the firstprogram executed after switching the computer on. It enables you tospecify which operating system should be started up. If Windows was theonly operating system on your computer up to now, you do not have aboot loader. The Puppy Installer can install GRUB as a boot loader foryou. To do this, click on "INSTALL GRUB".

In the next dialogue box click "Install"
Confirm the next dialogue by clicking "OK".
Select "simple installation" and click "OK".
In the next dialogue box, select "standard" and click "OK".
Now you have to specify where the GRUB boot loader should store itsfiles. These can only be written to a Linux file system partition.Thus, please type "/dev/hda2" - that is, the same partition to whichPuppy has just been installed.
Now you have to specify where the GRUB boot loader itself should beinstalled to. Select the Master Boot Record "MBR" and click "OK".
Confirm the next dialogue by clicking "OK".
In the next dialogue box, click the "No" button.
The installation is complete. What remains to be done is toconfigure the GRUB boot loader so that Puppy Linux can be booted. Thisis how to do it:
Open the file "menu.lst". You will find this file in the /boot/grubdirectory of the partition you installed the GRUB files to (/dev/hda2in our example). For Linux newbies, I include detailed instructions onhow to find and open this file. More advanced users can skip ahead towhere menu.lst gets edited.
Start "Menu | Filesystem | Pmount mount/unmount drives" and click on the button "MOUNT" next to "/dev/hda2".
The button changes to "UNMNT".
Start "Menu | Filesystem | ROX-Filer file filemanager".
Click with the right mouse button and choose "Window | Enter Path" from the context menu.
Type this into the box labelled "Goto" (do not omit the slash at the end): /mnt/hda2/boot/grub/
You are now inside the /mnt/hda2/boot/grub/ folder.
Use the right mouse button to click on the file called "menu.lst".
From the context menu that pops up, select "File menu.lst | Open As Text".

You can now see the contents of the menu.lst file.
"Comment out", i.e. put a number sign (#) before each of the following lines:
All necessary changes have been made. The file should now look like this:
Save the file by selecting "File | Save" from the program's menu. Exit the text editor.
Close the ROX file manager.
Click on the button "UNMNT" next to /dev/hda2.
The button changes to "MOUNT".
Exit Puppy and reboot the computer: "Menu | Shutdown | Reboot computer".
When you reboot the computer, you will be asked whether you want tosave the "session" (i.e., all the configuration changes you made).Select "DO NOT SAVE" with the cursor keys and hit Return.
Your computer will now shut down completely and then start up again.You will then see the boot loader come up. Select "Puppy Linux (on/dev/hda2)" with the cursor keys and press Return. Puppy boots up. Atthe first bootup, you will once again have to specify your country andyour screen resolution. This configuration is saved so that you do nothave to repeat this process at the next bootup.
如何配置互联网连接(How to setup an Internet connection)
How to setup an Internet connection调制解调器(Modem)
ModemStart off clicking on "Menu | Network | PupDial modem dialup".
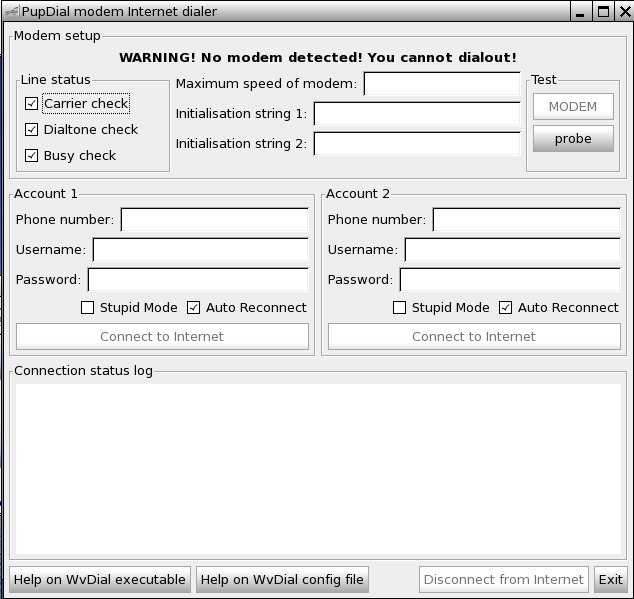
Next, enter the information from your provider.
宽带连接(DSL)
DSLFirst you should check if the ethernet-interface was detected.
Start a shell ("Menu | Utility | Rxvt terminal emulator") and enter the following command:
ifconfig
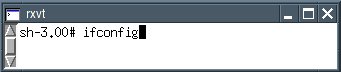
Can you see "eth0"?

If you can not see "eth0" enter the following command:
ifconfig eth0 up
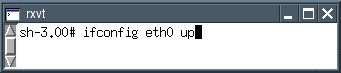
To check if the ethernet-interface is available now, enter the following command:
ifconfig
Now you should see "eth0". Close the shell.
Start the program "Menu | Network | Roaring Penguin PPPoE".
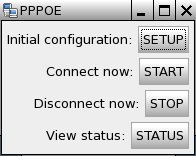
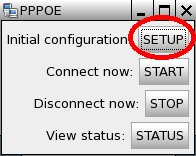
Press the button "SETUP".
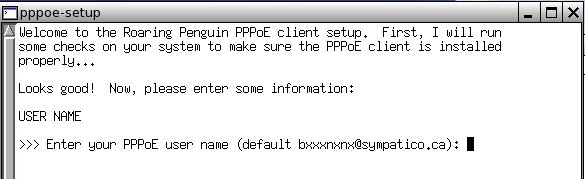
Enter your username (ask your provider), then press the return-key.
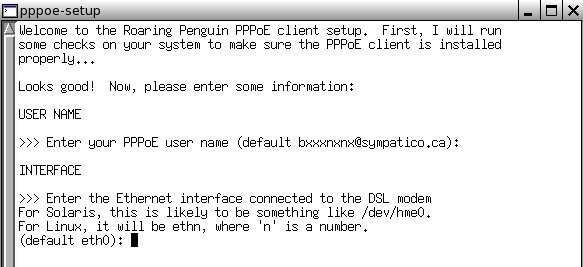
Enter the ethernet interface. eth0 is usually correct so you can press the return-key.
At the next question you confirm the default "no" and press the return-key.
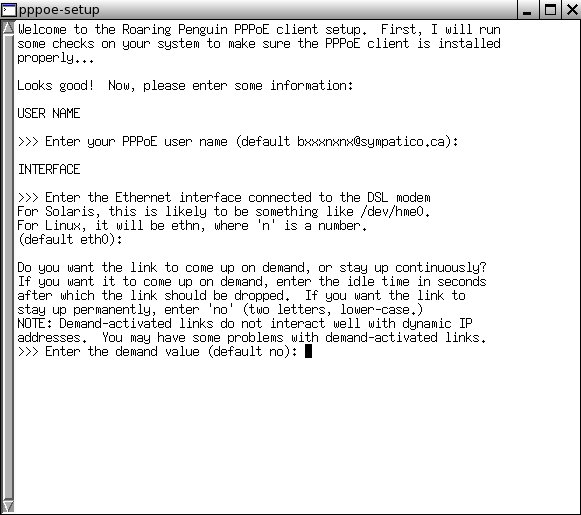
Then you have to enter your IP adress. If you get a dynamic IP adress press the return-key only.

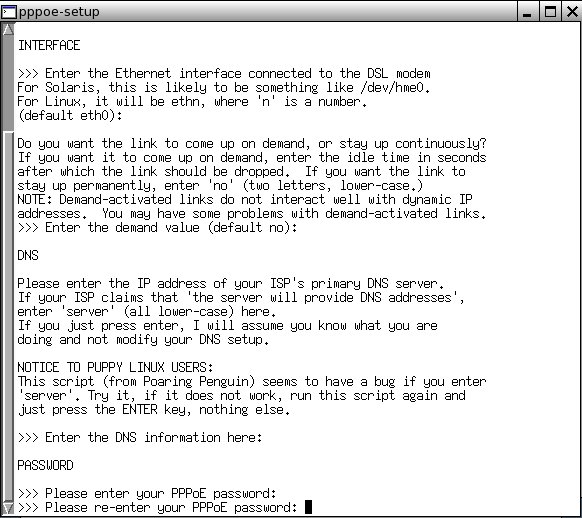
Now enter your password (ask your provider).
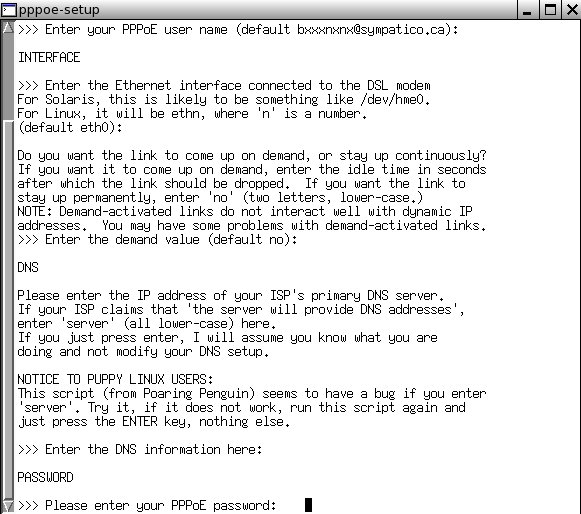
Enter your password again.
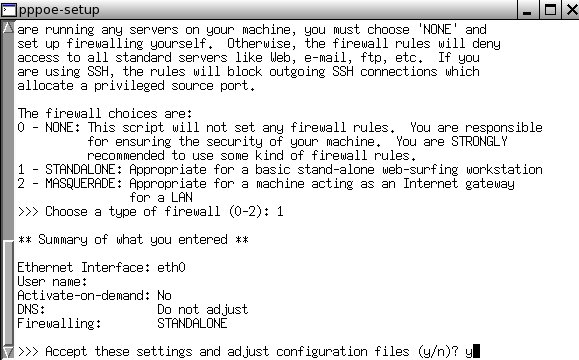
Choose "1" as a "standalone" firewall.

Now you can see your input again. If everything is alrigth press the key "y".
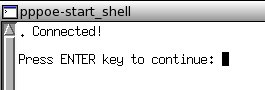
If you want to connect the internet-connection press the button "Start".
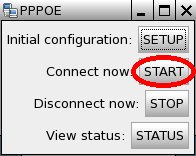
A message box opens and you get connected. Press the return-key.
You can now open the Internet browser "Menu | Internet | SeaMonkeyWebbrowser". Enter a URL and see if the Internet site is displayed.
If you want to disconnect the internet-connection press the button "Stop".
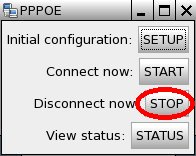
A message box opens and you get disconnected. Press the return-key.

路由(Router)
RouterThis chapter is still missing.
无线局域网(WLAN)
WLANTo connect your Puppy to a wireless network take the following steps: Step 1
Click on the "connect" icon on your Desktop, then click "Connect to the Internet by network interface"
.....OR.......
Click on Menu / Setup / Network Wizard

If Puppy recognizes your interface, it will be displayed in the upper portion of the box.
Just click the button for your interface and see step 2 below.
If puppy does not see your interface you will have to load the appropriate module with the Load Module button
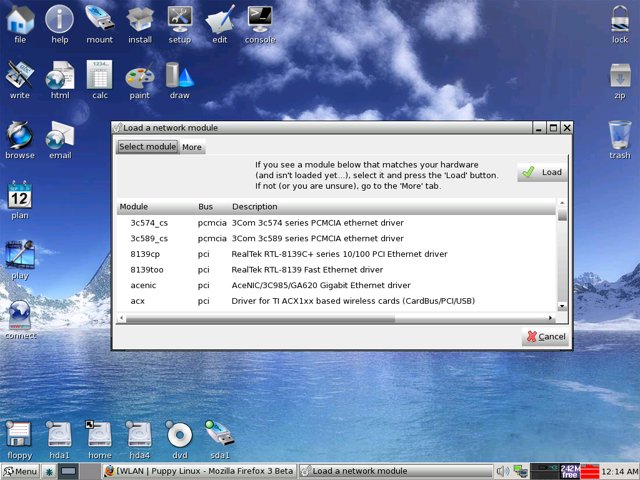
If you are unsure, click the "more" tab to Auto-probe drivers, or to install a Windows driver.
After you have loaded the correct module for your interface, it will show up in the first box seen above.
Click on it and proceed to step 2
Step 2
Configuring Network Interface
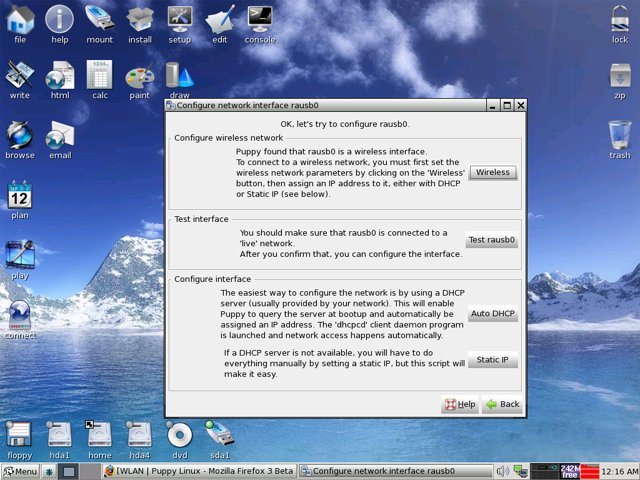
Click the Wireless button
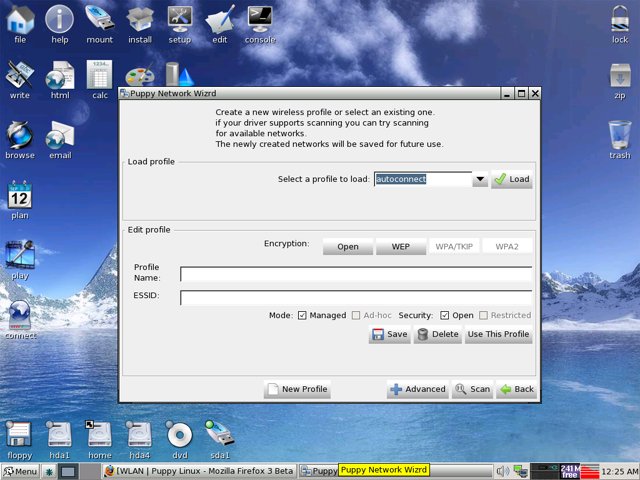
Click Scan ( Or enter the information for your interface if you know it)
Click on your Network from the list that appears . Click Save. Enter your WEP / WPA key if on a secured network.
Then click Use This Profile. Click the Test button to see if Puppy see`s a "live" connection. If it does, then click
Auto DHCP. If successful Puppy will ask you if you want to save the configuration for next boot. Choose yes or no.
Click Done on the box that appears, and you`re all set!
配置电子邮件(How to setup your email-program)
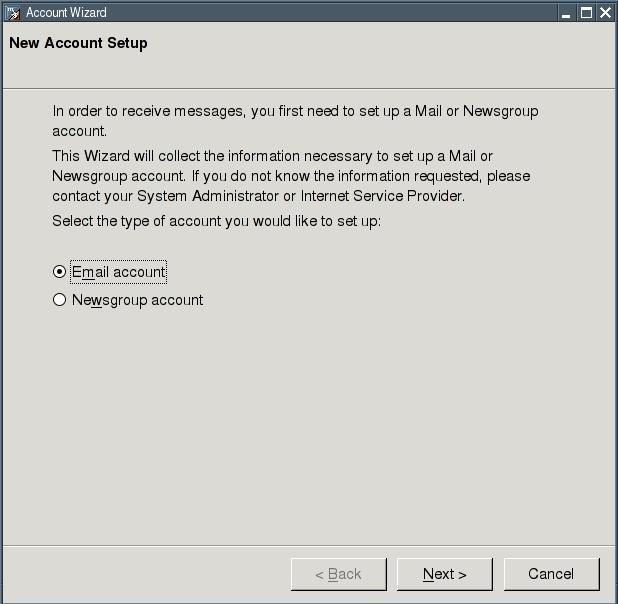
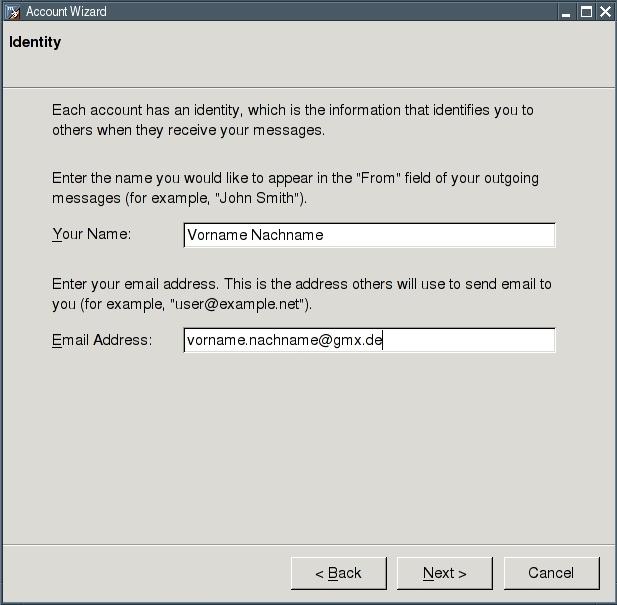
How to setup your email-programStart the program "Menu | Internet | SeaMonkey mail and news". Theconfiguration depends on your email-provider. In the following you willfind an example for GMX.
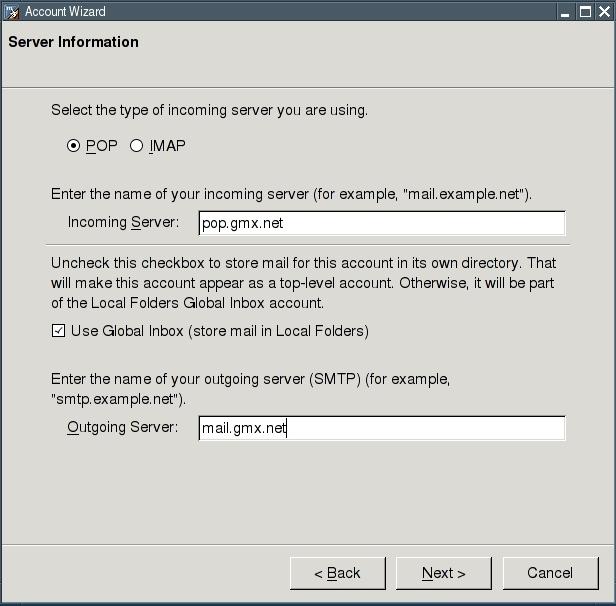
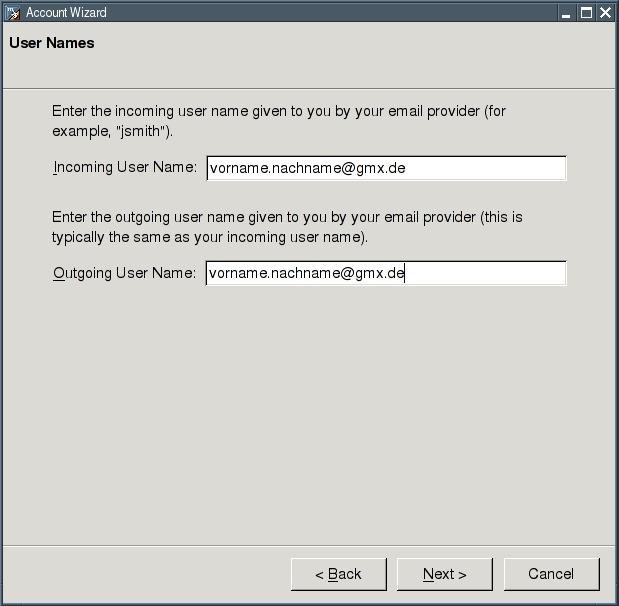
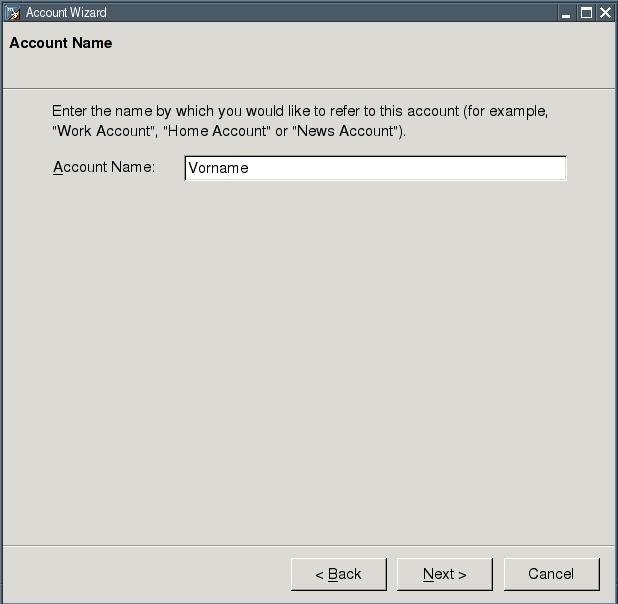
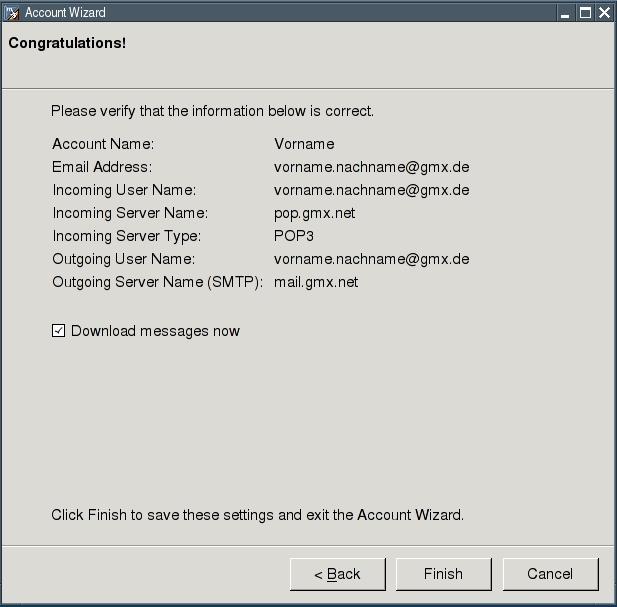
After you press the button "Finish" the program automaticallydownloads your emails from your email account. If you are offline, thefollowing error message appears:
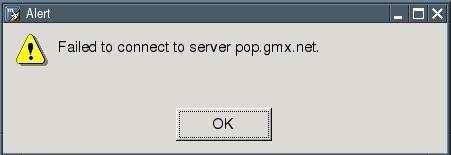
Start an Internet-connection and click (in the Seamonkey-Mail-Programm) on the button "Get new messages".

如何配置硬件(How to set up your hardware)
How to set up your hardware打印机(Printer)
PrinterThis is an easy one to get up and running.Just run "Menu | Setup | Printer Wizard" and the directions there should be sufficient to get most printers working.If your printer is not on the list that comes up try one that is similar for example if you have an superjet 23e try the superjet 23 or superjet 23f.
扫描仪(Scanner)
ScannerThis chapter is still missing.
U盘/外置硬盘(USB sticks / external harddrive)
USB sticks / external harddriveUSB sticks and external harddrives are very simple to use. Start the program "Menu | File managers | Pmount mount/unmount drives" and click on the button "Refresh". Then you click on the USB stick symbol and the file manager ROX will automatically open and show you the files on the USB stick. External harddrives with FAT32-filesystem can be used too. If you changed the file system of the external harddrive e.g. to an ext3-filesystem the program Pmount can not mount the external harddrive. In this case you open a shell and enter:
mount /dev/sdax /mnt/sdax (e.g. for the first partition: mount /dev/sda1 /mnt/sda1)
键盘布局(Keyboard layout)
Keyboard layoutIf you are using Xvesa as your video server and you do not have a US keyboard, you need to customise the keyboard layout. Start "Menu | Document | Geany text editor" and copy the following lines into it for a German keyboard layout.
clear shift
clear lock
clear control
clear mod1
clear mod2
clear mod3
!clear mod4
!clear mod5
!de-latin1.map: German keymap
keycode 9 = Escape Escape
keycode10 = 1 exclam
keycode11 = 2 quotedbl twosuperior
keycode12 = 3 section threesuperior
keycode13 = 4 dollar dollar
keycode14 = 5 percent
keycode15 = 6 ampersand
keycode16 = 7 slash braceleft
keycode17 = 8 parenleft bracketleft
keycode18 = 9 parenright bracketright
keycode19 = 0 equal braceright
keycode20 = ssharp question backslash
keycode21 = dead_acute dead_grave
keycode22 = BackSpace Delete
keycode23 = Tab Tab
keycode24 = q Q at
keycode25 = w
keycode26 = e E currency EuroSign
keycode27 = r
keycode28 = t
keycode29 = z
keycode30 = u
keycode31 = i
keycode32 = o
keycode33 = p
keycode34 = udiaeresis Udiaeresis
keycode35 = plus asterisk dead_tilde
keycode36 = Return
keycode37 = Control_L
keycode38 = a
keycode39 = s
keycode40 = d
keycode41 = f
keycode42 = g
keycode43 = h
keycode44 = j
keycode45 = k
keycode46 = l
keycode47 = odiaeresis Odiaeresis
keycode48 = adiaeresis Adiaeresis
keycode49 = dead_circumflex degree
keycode50 = Shift_L
keycode51 = numbersign apostrophe
keycode52 = y
keycode53 = x
keycode54 = c
keycode55 = v
keycode56 = b
keycode57 = n
keycode58 = m M mu
keycode59 = comma semicolon
keycode60 = period colon Multi_key
keycode61 = minus underscore
keycode62 = Shift_R
keycode63 = KP_Multiply
keycode64 = Alt_L Meta_L
keycode65 = space space
keycode66 = Caps_Lock
keycode67 = F1 F11
keycode68 = F2 F12
keycode69 = F3 F13
keycode70 = F4 F14
keycode71 = at F15
keycode72 = bar F16
keycode73 = dead_tilde F17
keycode74 = currency EuroSign F18
keycode75 = braceleft F19
keycode76 = braceright F20
keycode77 = Num_Lock
keycode78 = Scroll_Lock
keycode79 = KP_7
keycode80 = KP_8
keycode81 = KP_9
keycode82 = KP_Subtract
keycode83 = KP_4
keycode84 = KP_5
keycode85 = KP_6
keycode86 = KP_Add
keycode87 = KP_1
keycode88 = KP_2
keycode89 = KP_3
keycode90 = KP_0
keycode91 = KP_Decimal
keycode94 = less greater bar
keycode95 = bracketleft F11
keycode96 = bracketright F12
keycode98 = Up
!keycode99 = Prior
keycode 100 = Left
keycode 102 = Right
!keycode 104 = Down
keycode 105 = Control_R
keycode 106 = KP_Divide
keycode 108 = Alt_R
keycode 110 = Home
keycode 112 = Prior
keycode 113 = Left
keycode 114 = Right
keycode 115 = End
keycode 116 = Down
keycode 117 = Next
keycode 133 = Alt_L
keycode 134 = Alt_R
add shift = Shift_L Shift_R
add lock = Caps_Lock
add control = Control_L Control_R
add mod1 = Alt_L Alt_R
add mod2 = Mode_switch
add mod3 = Num_Lock
!add mod4 =
!add mod5 =
Save this file as .Xmodmap into the /root directory (please note that the first character of the file name should indeed be a dot). Then restart the X server by selecting "Menu | Shutdown | Restart X Server" (alternatively, you can open a console and issue the "xmodmap /root/.Xmodmap" command). Now the äöüÄÖÜ umlauts are available. The special characters @|~ have been assigned to the function keys F5, F6 and F7 (F7 has to be pressed twice to make the tilde appear). The {}[] brackets are located on function keys F9 to F12.
You can create country-specific keyboard layouts of your own by editing that file. To find out the correct keycodes, open a console and enter the "xev" command. The keycode of any key you press and its assigned character will then be displayed.
如何安装卸载程序(How to install/uninstall programs)
请查看:Puppy 3.01的使用手册中的如何安装卸载程序如何安装卸载程序
安装程序有几种不同的方式,详述如下。在安装前建议备份pup_save.2fs。当你安装中出现错误时就可用备份恢复原样。
How to install/uninstall programs
There are different ways of installing programs which are described below. Before an installation it is advisable to backup the pup_save.2fs-file. So you can restore the file, if something goes wrong with the installation.
[manual] Add section on Slackware
It would be useful to have an up-date on this subject specifically for 4.00, as in section from:
http://www.puppylinux.com/development/package-management.htm
A Slackware package can be converted to PET using the 'tgz2pet' utility. For example:
# tgz2pet xgames-0.2-i386-1.tgz
Which will create 'xgames-0.2-i386-1.pet'. Click on this and PETget
will install it, and will even run the install script inside the
Slackware package.
[manual] rename deinstall to uninstall
Uninstall would be preferable to deinstall. Will renaming this node and the other deinstall node to uninstall cause any structural problems?
如何备份(How to make a backup)
How to make a backup请查看puppy3.01使用手册中的 如何做备份
a starter at filling in the stub
First, what do we wish to back up and what can be safely ignored?
In most cases, one would want to back up user files. These are likely to be in /root or /root/spot. In my case, on my USB sticks, I also have files in /mnt/home (so they are also accessable by computers that I plug the USB stick into outside of Puppy).
The remainder of the file system holds the Puppy distribution (e.g. in /bin, /usr/bin, ...). There is little to be lost in these areas because they are all recoverable from the CD. And you will overtake these with the next release of Puppy anyway. A possible exception is /usr/local/bin (and ~/my-applications for Puppy) which is the traditional place that executable files external to the operating system distribution are stored. But even these are usually recoverable by use of the distribution CDs or another download, so there's little percentage in backing them up either.
The remaining place to worry about is files that control various settings. Some of these are dot files (e.g. .bashrc) in your home directory (/root in the case of Puppy) and files in /etc. In practice, few of these files are so valuable that they cannot be readily recreated -- aggravation perhaps, but usually no serious loss.
Therefore we can confine the areas to worry about backups to those in the first paragraph: the user files.
In unix, there is never just one way to do something. The list of alternatives is indefinitely long. But here are just two ways to do effective backups of your user files:
Open a gftp connection between your Puppy installation and some other computer. Use ssh (the tab in gftp says ssh2) and it should work 'out of the box' with just about any operating system except Windows (which does not natively support ssh). Simply transfer the entire /root/spot/* or /mnt/home/* directories to the archive machine.
Puppy also has rsync capability. There is, as of this writing, GRsync available for download that puts both a memory and a GUI front end onto rsync (so you can repeat the script next week without having to recreate the singularly unmemorable syntax). rsync also runs over ssh. rsync has an advantage over gftp in that it only updates files that have been changed. So if you backed up 101 files last week and since edited three of them, this week's backup will only update the three that you edited and leave the rest undisturbed in the archive. rsync is also easy to wrap into a cron script so it is done automatically at 0300 every Tuesday morning.
(accept this as an outline to get started -- I don't have good example syntax to plug in -- leave that for others).
多用户(Multiuser)
Multiuser请查看puppy3.01使用手册中的多用户
Puppy is not developed as a multi-user distribution. In contrast to other distributions each user has full access to all files, programs and personal data. Nevertheless there are some options for multiusers.
系统安全(Security)
Security即用CD(Live-CD)
Live-CDIf you start Puppy from CD-ROM (or from a CD-image on your harddrive) no potentially harmful programs can install on your computer. With every reboot all potential malware is gone.
However you are not wholly protected against malware while you are online, because (in theory) malware can be installed on your computer and can be active until the next reboot. That is why you should always run a firewall. Besides you can store checksums of all your files to make sure, no one has manipulated your files.
超级用户(Root)
RootIn contrast to most other Linux distributions Puppy does not differentiate between a normal user and the administrator root. Rather you always works as root, which simplifies the use of Puppy. The question arises if it is unsecure to work as root and to have full access to all files, programs and data.
For the normal home user, there are no special risks compared to other Linux distributions. On the contrary, Puppy is probably a bit safer than many other distributions.
First let's analyze the risk of a distribution, which differentiates between user and root. The user works as a normal user, who does not have privileges to write/delete programs and system files. An intruder can compromise only the user’s files. However the intruder has an entrance to the system and can try to gain root-privileges (find the password file, use exploits to transfer malware code and so on), and afterwards try to get access to all files.
As long as Puppy starts from CD-ROM (and is not installed on the harddrive) the program-files and system-files are secure. Everytime you reboot any malware programs, which an intruder could have left, are gone. Of course your own files stored into the pup_save.3fs-file or on a harddrive can be compromised by an intruder, but this can happen to the normal user of another Linux-distribution as well. If you want to be safe from intrusion, store checksums of all files and backup your files regulary.
防火墙与守护进程(Firewall and daemons)
Firewall and daemonsYou should always have an active firewall. It allows you to controlwhat ports your PC uses to communicate with the Internet. Ideally, allports are closed.
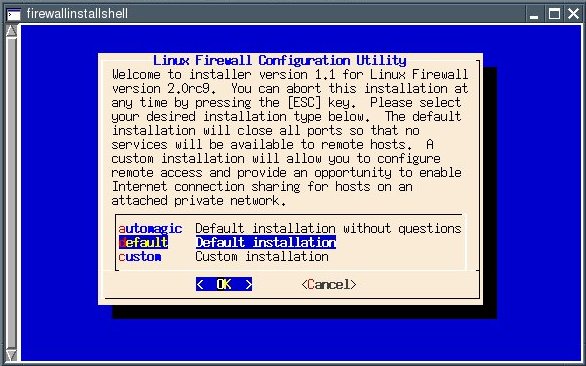
Start "Menu | Setup | Linux-Firewall Wizard".

Go to the "default" entry using the Arrow Down key (this option closes all ports) and press Return.
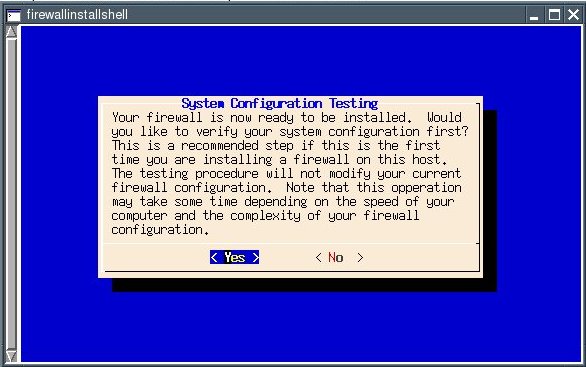
Now you can check the firewall rules. Confirm the default ("Yes") with the Return key.
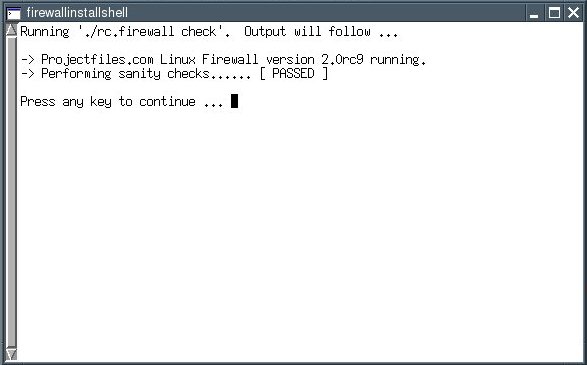
The line that reads "Performing sanity checks ..." should display "PASSED" now. Press the key you love best ...
... to get to the next dialogue. It allows you to activate the firewall rules.
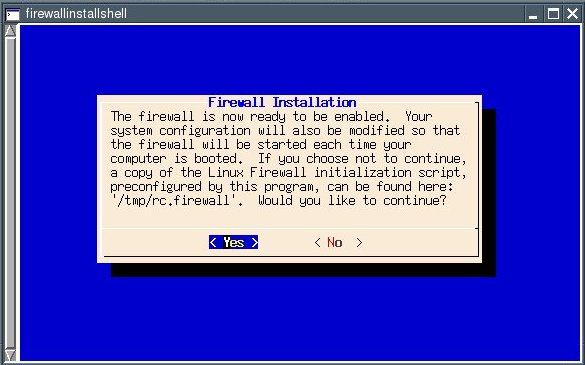
Confirm the default ("Yes") with the Return key.

The firewall is now active. Hit Return to finish setup.
The "default" option you selected closes all ports. You can specifywhich ports should be left open using the Firewall Wizard's "custom"option. You should only open the ports you really need. If you use acertain port only occasionally, you should open it only when you needit. An open port is usually not a security risk per se. It only becomesvulnerable if your PC is running a service (a so-called "daemon") whichuses that port to listen for incoming requests. This is why you shouldnot run any daemons you do not need on your PC.
This is how to check for which ports are open and which services are running:
Install the Program nmap. Nmap is available as a PETget.
Open a shell and enter:
nmap localhost
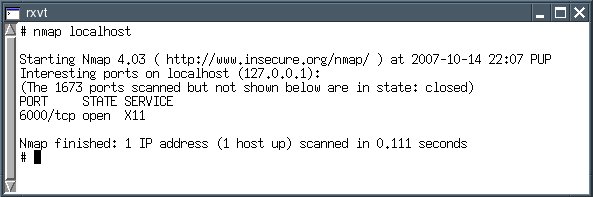
This lists open ports. A home user without a home network of her ownshould have no open ports. The X11 service is open because it is theone responsible for the graphical desktop.
The following command gives you a list of which services are listening on which ports:
netstat -anp --ip

This list, too, should be empty except for the X11 port if you are ahome user who does not run a web server or a home network; i.e., noservices (daemons) should be running.
You can test your firewall at the Web site Shields Up!. Load the page and click the Proceed-button.
病毒查杀(Virus scanner)
Virus scannerIf you want to scan your files or a Windows computer you can use F-Prot virus scanner. You can download the program from the Forum. After you have downloaded and installed the program open a shell and enter the following command while you are still online.
/usr/local/bin/xfprot-gtk
or
/usr/local/xfprot/xfprot-gtk
Now you can update the virus definitions. Then you can get offline.Mount your Windows-partition (mount /dev/hdax /mnt/hdax) and make thefollwing settings in F-Prot:
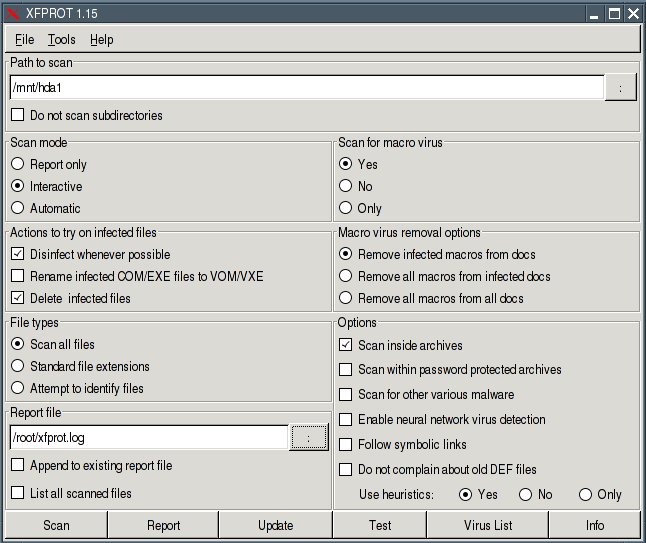
Path to scan: /mnt/hdax
Scan mode: Interactive
Report file: /root/xfprot.log
When the virus scan has finished you can find the log-file at /root/xfprot.log.
If you want to scan another Windows computer, you can remasterPuppy. Boot the Windows computer from the remastered Puppy CD(boot-option puppy pfix=ram) and scan the PC as described above.
入侵检测(Intrusion detection)
Intrusion detectionFor further improvement of your security you should store a checksum (a fingerprint) for all files. At regular intervals, but in any case before a backup, you examine the checksums of your files. If the checksums do not agree, the file was changed or deleted.
In order to compute and store the checksums, you open a shell and enter the following commands:
md5sum /usr/bin/md5sum
Create a checksum of the program md5sum. Write down the checksum.
mount /dev/hda4 /mnt/hda4
Mount the harddrive with your files.
find /mnt/hda4 -type f -exec ls -ail {} \; \-exec md5sum {} \; > /root/check1.dat
Create the file check1.dat with the checksums of all files.
md5sum /root/check1.dat
Create a checksum of the file. Write down the checksum.
If you want to check, which files have been changed enter these commands:
md5sum /usr/bin/md5sum
Create a checksum of the program md5sum. Compare the checksum with the checksum of step (1).
md5sum /root/check1.dat
Create a checksum of the file /root/check1.dat. Compare the checksum with the checksum of step (3).
mount /dev/hda4 /mnt/hda4
Mount the harddrive with your files.
find /mnt/hda4 -type f -exec ls -ail {} \; \-exec md5sum {} \; > /root/check2.dat
Create the file check2.dat with the actual checksums of the files.
diff /root/check1.dat /root/check2.dat > /root/diff.txt
Compare the two files check1.dat and check2.dat. The differences are written to the file diff.txt.
Open the file /root/diff.txt and check, if you know about the changed files. If not think why these files have been changed.
Delete the file /root/check1.dat
Rename the file /root/check2.dat as /root/check1.dat.
md5sum /root/check1.dat
Create a checksum of the new check1.dat-file. Write down the checksum.
用bcrypt加密文件(Encrypt with bcrypt)
Encrypt with bcryptYou should encrypt very sensitive files with the program bcrypt. Bcrypt uses the secure Blowfish-algorithm.
Open a shell and enter:
bcrypt /MyDirectory/MyFile
Then you are asked a passwort (at least eight characters long; you can abort bcrypt with "Ctrl" + "C"). Bcrypt encrypts your file and appends the extension bfe to the file. The original file is deleted automatically.
If you want to encrypt more than one file or a complete directory you should create an archive-file. Start the program "Menu | Utilities | Xarchive archiver". Afterwards you encrypt the archive-file.
Note that bcrypt deletes the original file automatically. You can't recover the file. If you don't want to delete the file start bcrypt with the option -r:
bcrypt -r /MyDirectory/MyFile
If you want to decrypt the file start bcrypt again:
bcrypt /MyDirectory/MyEncryptedFile
Than you enter your password.
For further information see :
Homepage bcrypt
制作自己的Puppy光盘(Make your own Puppy-CD)
Make your own Puppy-CD请查看puppy3.01使用手册中的制作自己的Puppy-CD
You can create your own Puppy-Linux with the following program.
Start the program "Menu | Setup | Remaster Puppy live-CD":
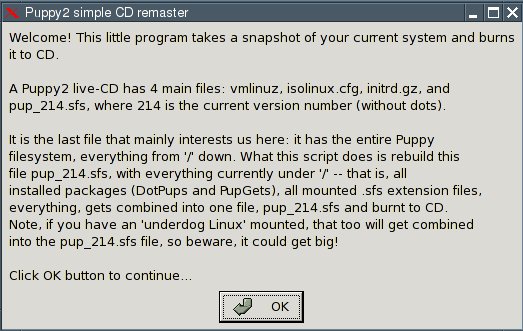
Click on the OK-button.
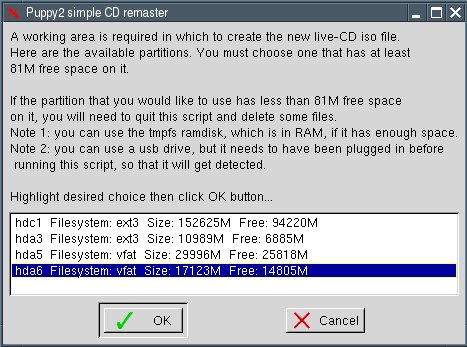
Choose the partition, on which a temporary working directory should be made with the tabulator-keys. Then press the OK-button.
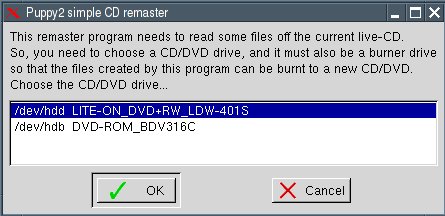
Choose your CD/DVD-burning device with the tabulator-keys. Then press the OK-button.
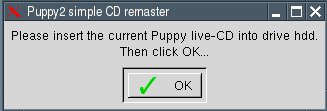
Insert the current Puppy-live-CD and press the OK-button.
Click on the OK-button.
Click on the button "No".
Click on the OK-button.
Click on the button "No".
Click on the OK-button.
Take the live-CD out of the CD/DVD-burning device and insert a newCD-ROM or DVD. Choose if you want to create a CD or DVD with thetabulatorkeys. Then click on the OK-button.
Your new Puppy-CD/DVD will now be created. When it has finished, press the Return-key.
Click on the OK-button. Your Puppy-live-CD is now ready.
Windows程序和相应的Puppy Linux程序(Windows-programs and corresponding Puppy-Linux-programs)
Windows-programs and corresponding Puppy-Linux-programsWindows程序和相应的Puppy Linux程序对照表:
| Windows | Puppy-Linux |
| Windows Explorer | ROX |
| Word | Abiword, OpenOffice Write |
| Excel | Gnumeric, OpenOffice Calc |
| PowerPoint | OpenOffice Impress |
| Notepad | Editor Geany |
| Internet Explorer | SeaMonkey Browser |
| Outlook | SeaMonkey Mail |
| Frontpage | Bluefish |
| Photoshop, Paintshop | Gimp |
| mp3-Player | Xmms |
| DVD-Player | Gxine |
提示和技巧(Tips and tricks)
Tips and tricksUpper and lower case
Linux always differentiates between upper and lower case. The two files MyFile.txt and myfile.txt are different file.
Special characters
Do not use special characters except for minus (-) and underline (_) for filenames or directory-names. Don't use the space-character. Use the characters A-Z, a-z, 0-9, -, _ only.
How to move files with ROX
If you left-click on a file and pull it to another directory the file is copied. If you press the shift-key at the same time, the file is moved.
Further inforamtions about ROX
The contextmenu of ROX
To use the contextmenu of ROX right-click on a file or directory.
Copy and paste in the shell rxvt
Copy = left mouse-click
Paste = middle mouse-click
Automatic completion in the shell rxvt
You do not have to type the entire path or filename at the shell. It is enough to type the first letters and then press the tabulator-key. The shell completes the directory-name or filename.
相关链接(Links)
JWM 窗口管理器主页: http://www.joewing.net/programs/jwmJWM 窗口管理器配置: http://www.joewing.net/programs/jwm/config.shtml
ROX 文件管理器手册: http://rox.sourceforge.net/desktop/manual
ROX 文件管理器信息: http://puppylinux.org/wikka/rox
rxvt 脚本信息: http://gd.tuwien.ac.at/linuxcommand.org/man_pages/rxvt1.html
Man-页面: http://www.linuxinfor.com/man-pages-1.htm
脚本命令: http://www.oreillynet.com/linux/cmd
脚本命令:http://www.tldp.org/LDP/abs/abs-guide.pdf
Linux在线指南 http://www.linuxtopia.org
英文原文:
JWM Windowsmanager Homepage: http://www.joewing.net/programs/jwm
JWM Windowsmanager Configuration: http://www.joewing.net/programs/jwm/config.shtml
ROX Filemanager Manual: http://rox.sourceforge.net/desktop/manual
ROX Filemanager Info: http://puppylinux.org/wikka/rox
Shell rxvt Infos: http://gd.tuwien.ac.at/linuxcommand.org/man_pages/rxvt1.html
Man-Pages: http://www.linuxinfor.com/man-pages-1.htm
Shell commands: http://www.oreillynet.com/linux/cmd
Shell commands: http://www.tldp.org/LDP/abs/abs-guide.pdf
Linux online guides: http://www.linuxtopia.org
U盘操作系统Puppy Linux4.1正式版已于2008年10月6日发布
U盘操作系统Puppy Linux4.1正式版已于2008年10月6日发布了。初次体验Puppy4.1,你可能会觉得与4.0没什么区别,其实在底层(你看不到的基础部分)有了很大改进,大大提高了Puppy的硬件兼容性,并支持热插拔。官方发布的Puppy4.1 iso有两个:一个是基于Linux内核2.6.25.16的标准版本;另一个是基于Linux内核2.6.21.7的复古版本,仅适用于老硬件。Puppy4.1正式版官方英文版iso下载地址:(推荐下载第一个)
ftp://distro.ibiblio.org/pub/linux/distributions/puppylinux/puppy-4.1-k2.6.25.16-seamonkey.iso
ftp://distro.ibiblio.org/pub/linux/distributions/puppylinux/puppy-4.1retro-k2.6.21.7-seamonkey.iso
用于安装到U盘的Ghost版Puppy Linux4.1 gho镜像下载地址:
http://www.minilinux.net/node/272
Puppy4.1正式版中文支持包下载地址:
http://www.minilinux.net/node/353
devx_410.sfs 文件(用于C / C++编译)下载地址:
ftp://distro.ibiblio.org/pub/linux/distributions/puppylinux/sfs_modules-4/devx_410.sfs
Puppy4.1正式版发行说明:
http://puppylinux.com/download/release-4.1.htm
与puppy4.0相比,puppy4.1的主要变化有:
* 2.6.25.16, 2.6.21.7 内核:标准版本基于2.6.25.16
* 更多的驱动程序支持
* SCSI内核
* LZMA-enabled 内核
* 改进的PCMCIA 支持
* 改进的硬件检测
* Puppy事件管理
* 启动更快
* Psip VOIP网络电话
* PPLOG 博客
* Pmusic音频播放器
* Ayttm聊天程序替代了pidgin
* 冰岛(Xfprot)病毒检测
* 改进的网络配置向导:Network Wizard
* SeaMonkey 包含了邮件与新闻组
* 改进的modem支持
* GPRS modem 支持
* 取消了zdrv文件:zdrv_4xx.sfs文件已被去除,原先所有文件并入/lib/modules 和/lib/modules/firmware下.完整安装将不再有问题。
* Bug修复及更多应用程序升级(如rox、abiword、gnumeric)等
附:Puppy4.1正式版需要重点中文化的pet包列表:(共19个)
pbackup-3.1.4.pet
pburn-2.0.9.pet
pcdripper-3.7.pet
pdvdrsab-0.1.pet
pfilesearch-1.9.pet
pfind-4.4-1.pet
pmetatagger-2.0.pet
pmirror-0.3.pet
pmusic_THEME_pmusic_original-2008.08.10.pet
pmusic-0.3.2.pet
pnethood-0.65.pet
pplog-1.1.pet
pppoeconf_pup-1.17.pet
pprocess-0.6.pet
programchooser-0.3.pet
pschedule-0.6.pet
psip-0.12.pet
pupx-0.2.pet
pwireless-0.8.3.pet
详见:http://puppylinux.5d6d.com/thread-215-1-1.html
win2k/xp/2003/vista下硬盘启动 "小芭比 Linux" 或 Puppy Linux 4.00 英文原版全攻略
目前Pup2usb最新版本已支持Vista,该攻略仅适用于少数无法通过Pup2usb安装小芭比的电脑。准备工作:
在正式开始前,请先下载"小芭比 Linux" 或puppy linux 4.00英文原版的iso,并用winrar或winzip将iso解压到任意硬盘分区的根文件夹下。
一、基本工具
(1) MouseDos 硬盘版 3.0 For Vista
(2) WinGrub(汉化版已包含在XP下无障碍体验puppy必备软件包 之中)
二、安装MouseDOS(略)
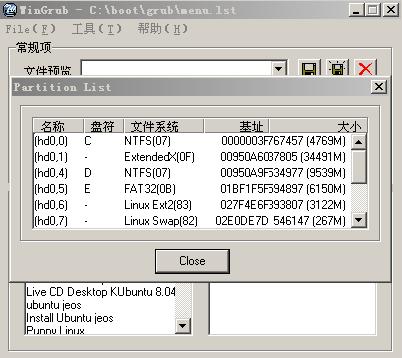
三、查看Puppy Linux与vista分区对应关系
通过WinGrub工具查看windows硬盘分区与linux分区的对应关系。
在一般情况下,两者的对应关系如下:(在sata 硬盘中显示为 sd0或sda )
C盘 → (hd0,0) → hda1
D盘 → (hd0,4) → hda5
E盘 → (hd0,5) → hda6 如图:
WinGrub详细用法请参照:
从XP轻松跨入全新的中文Puppy Linux世界的第二步
四、修改MouseDOS配置
用记事打开C:\MouseDos\MouseDos.cfg,根据第三步找到的对应关系,添加如下:
# 这是iso文件解压到C盘的例子(硬盘为IDE类型)
title Puppy-Linux
kernel (hd0,0)/vmlinuz root=/dev/ram0 PMEDIA=idehd
initrd (hd0,0)/initrd.gz
代码说明:
title Puppy-Linux------------# 显示在GRUB上的标题
kernel (hd0,0)/vmlinuz------# 加载 C盘根目录下的vmlinuz(内核)文件
PMEDIA=idehd--------------# 指定硬盘格式,PMEDIA必须大写,如satat硬盘:PMEDIA=satahd, PMEDIA可有以下参数,如usbflash usbhd usbcd ideflash idehd idecd idezip satahd satacd scsihd scsicd cd ataflash atahd atacd atazip。 如果无法确定PMEDIA参数,可以去掉该项试试。
五、重新启动,选择MOUSEDOS工具箱进入Grub菜单,再选Puppy-Linux就OK了.
从XP轻松跨入全新的中文Puppy Linux世界(小芭比Linux硬盘/U盘安装专题)V0.049 for pup2usb!
一、准备工作在使用Pup2Usb正式安装小芭比(Puppy)前:
请先对想安装到的硬盘分区进行磁盘扫描;(磁盘扫描程序在 开始 | 附件 | 系统工具 下)
如果是NTFS分区,最好在磁盘扫描后再进行磁盘碎片整理;(磁盘碎片整理程序在 开始 | 附件 | 系统工具 下)
如果想安装到U盘,先把U盘格式化成FAT(FAT16);(在我的电脑中右击U盘盘符,选择 格式化...,文件系统选FAT)
U盘里已有文件的,在磁盘扫描后再运行磁盘碎片整理;否则可能会出现莫名其妙的错误。
目前最新的pup2usb已支持Vista和Win7。
Vista下硬盘启动小芭比Linux全攻略
二、下载东东(假设放到c:\tmp 文件夹下)
下载小芭比Linux: 点击下载
下载Pup2usb: 点击下载
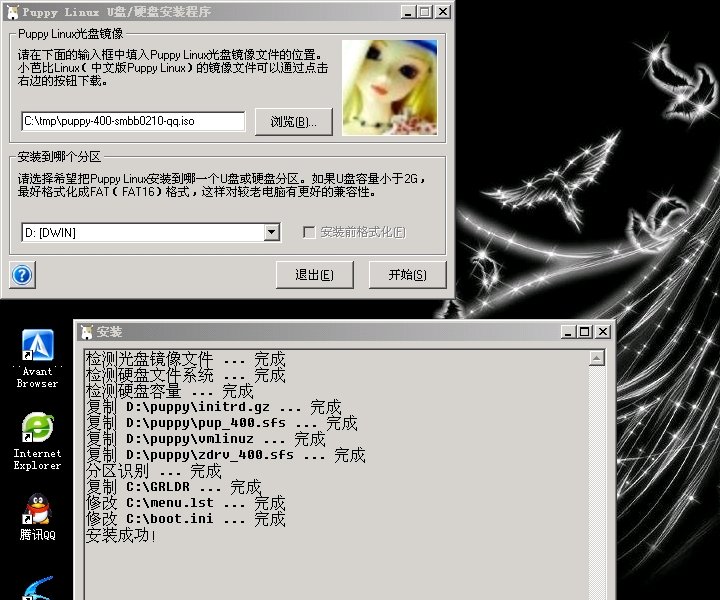
三、运行pup2usb
- 选择小芭比iso
- 选择想安装到的硬盘分区或U盘
- 开始安装小芭比到硬盘分区或U盘
如果碰到错误无法安装,请制作Bug报告发到小芭比网站上,Bug报告至少要写明以下三项内容:
- 操作系统类型;
- 硬盘(U盘)的类型、分区格式、大小;
- C:\pup2usb_drive.log里的内容。
四、重启系统,在Windows启动菜单中选择Puppy linux (pup2usb)启动项。
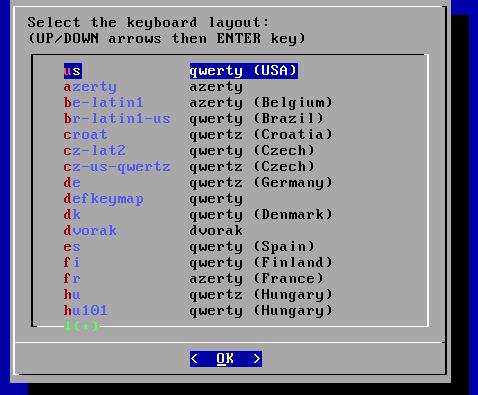
启动Puppy后,会提示你选择初始配置:先选择键盘US。再选择 X server。 Puppy自带了两种 X server: Xorg和Xvesa。建议先选择"Xorg",如果“Xorg”测试通不过的话,再选择"Xvesa"(分辨率较低,但保证能进入图形界面)。
如果安装到U盘,启动时可按F12选择U盘或修改一下CMOS配置,保证usbzip启动项在hddn之前。
相关图片如下:


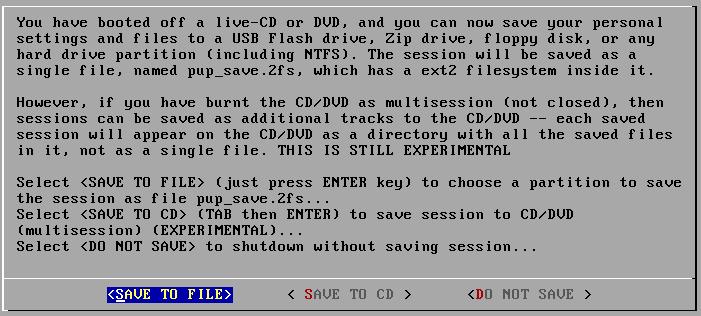
第五步:保存个人文件pup_save.2fs。
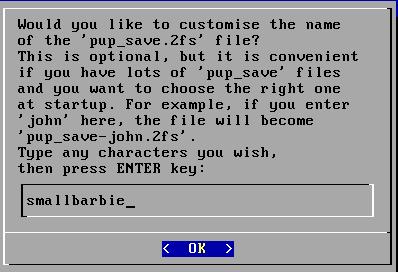
点击:开始 | 关机 | 重启 ,重启puppy linux系统,在关机前会有提示是否要保存session会话,选"Save_to_File",保存文件名为pup_save-XXX.2fs,大小建议为512MB以上。
第六步:接入互联网配置
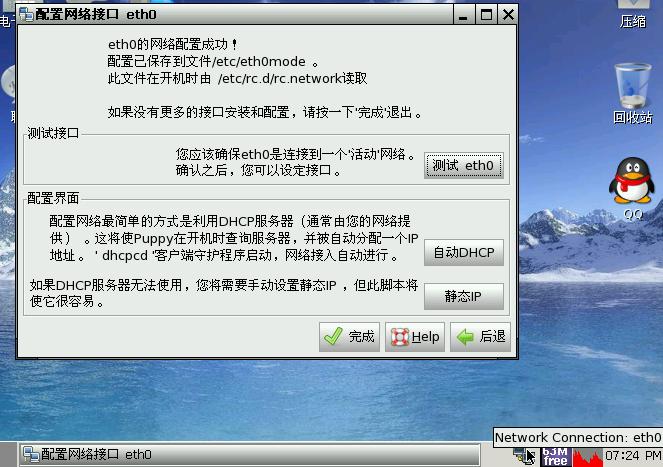
重启时请再次在Windows启动菜单中选择puppy-linux(pup2usb),进入jwm桌面后:
选择:设置 |网络配置向导 对网卡的IP 子网掩码 网关 DNS 进行配置,可先运行 自动dhcp 进行自动配置,如果不行,再作静态IP配置。
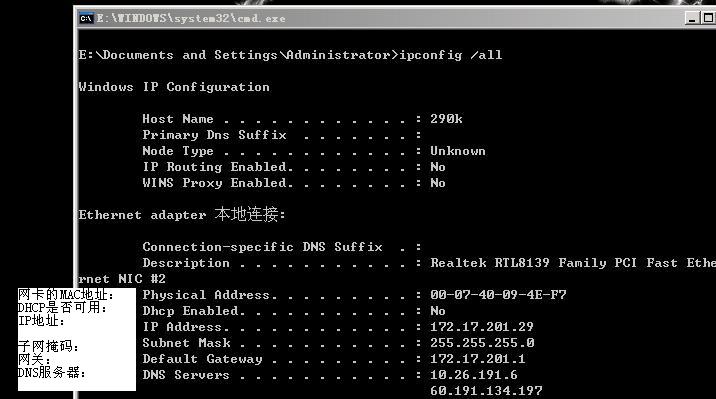
下面是静态IP的参考设置例子,其中的DNS是通用的OpenDNS,而静态IP参数:IP、子网掩码和网关请在win的dos控制台下输入:ipconfig /all 来获取。
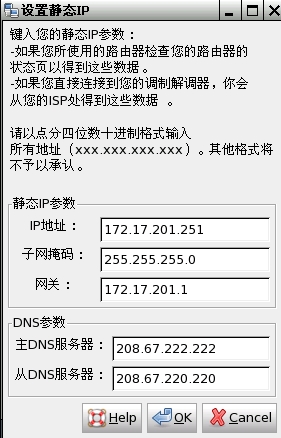
在win的dos控制台下输入: ipconfig /all 后:
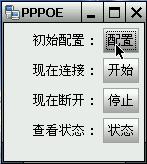
如果是ADSL拔号,还要运行:网络 | PPPOE管理工具| 配置 。一般情况下只输入账号(用户名)和密码即可。再点击PPPOE管理工具中的“开始”按钮 就可以接入到互联网了。OK!
有关网络设置问题还可参照:
http://www.minilinux.net/node/143
http://www.minilinux.net/node/121
看看桌面吧,喏,连QQ都汉化了哦。:-)
后记:
以上安装小芭比的方法最为简便快捷,推荐类似本人的广大小菜鸟们尝试。
在安装使用中难免会碰到各种各样的问题,请先看看中文手册或进入自-助-探-索-页-面进行搜索,也许答案就躲在网站的某个角落,正等着你去发现呢!
- iso刻盘后通过光驱启动
- 在虚拟机(吐血推荐VirtualBox)中运行
- 经过艰苦摸索DIY后,自助安装使用Puppy(小芭比),并成长为一代Puppy DIY大侠(大虾or美女)! ^_^ ^_^
---------------------------------------------------------------------------
附历史版本:v0.0.3
Puppy Linux 4.00 是一个相当迷你的 Linux 操作系统(ISO不到88MB)。但它自带了大量的扫描仪、打印机、数码相机、无线网卡的驱动以及音乐录制/编辑/转换软件。Puppy Linux 4.00 甚至还包含了一个完整的办公环境。对又大又慢的Winxp(vista)感到厌倦和喜欢尝试冒险的网友们,可以花上30分钟的下载时间再加上10-15分钟的安装时间,就可以实现从WinXP到Linux的轻松跨越,迈入全新的中文Puppy Linux世界,开始整个系统掉入内存高速运行的全新体验!
(以下方法的最大特色是:只要动动鼠标加回车鍵,就可轻松完成所有工作。)
(友情提示:在参照以下方法安装Puppy前,请保持C盘的自由空间在500MB以上,并启动磁盘扫描程序和磁盘碎片整理程序对C盘进行维护。)
第一步:先一次性全部下载以下三个软件包,放到任意分区的根文件夹下,三个包总计大小为105MB。
(记住,一定要事先全部下载哦!如果你精通英语再加上精通英文版显示的中文乱码,那你以后再下载也不晚 :XD)(一)英文版Puppy Linux 4.00 ISO文件 大小88MB
详细说明:http://www.minilinux.net/ftp/incoming/qqdanfiles/index.html
下载地址:
http://distro.ibiblio.org/pub/linux/distributions/puppylinux/puppy-4.00-k2.6.21.7-seamonkey.iso
(二)XP下无障碍体验puppy必备软件包 大小3.5MB
内含Puppy 2 installer for Windows XP(已汉化)WinGrub(已汉化)和grub4dos三个软件。详细说明:
http://www.minilinux.net/node/116
下载地址:
http://www.minilinux.net/ftp/incoming/qqdanfiles/installpup4xp.zip
(三)一步到位中文包 大小14.5MB
该包已集成了原来的中文支持包、中文支持附加包和中文化包,并对TTF中文字体作了适度精简,目前正在不断更新之中,所以下面的下载地址不一定是最新的,请注意。详细说明:
http://www.minilinux.net/node/113
下载地址:
http://www.minilinux.net/sites/default/files/chinese_pack_total-0.2.9.pet
为方便用迅雷等下载软件快速download以上三个软件包,特列出软件下载列表如下
------------------------------- 从这里复制 ----------------------------
http://distro.ibiblio.org/pub/linux/distributions/puppylinux/puppy-4.00-k2.6.21.7-seamonkey.iso
http://www.minilinux.net/ftp/incoming/qqdanfiles/installpup4xp.zip
http://www.minilinux.net/sites/default/files/chinese_pack_total-0.2.9.pet
------------------------------- 从这里复制 ----------------------------
第二步:解压安装“XP下无障碍体验Puppy必备软件包”
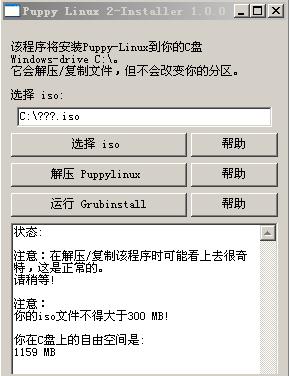
用winzip或winrar解压XP下无障碍体验必备软件包installpup4xp.zip,安装其中的Puppy2installerCHS.exe,安装结束后在桌面上会有一个名为Puppy 2 installer for Windows XP的图标,双击运行之,然后依次点击三个按钮:- 选择 iso
- 解压 Puppylinux
- 运行 Grubinstall
然后运行解压目录下的Wingrub.exe,打开菜单:工具 | 分区列表,记下存放三个软件包的windows硬盘分区与linux分区的对应关系。
在一般情况下,两者的对应关系如下:
C盘 → (hd0,0) → hda1
D盘 → (hd0,4) → hda5
E盘 → (hd0,5) → hda6 如图:
第三步:重启系统,在Windows启动菜单中选择Puppy-linux启动项。
启动Puppy后,会提示你选择初始配置:先选择键盘US。再选择 X server。 Puppy自带了两种 X server: Xorg和Xvesa。建议先选择"Xorg",如果“Xorg”测试通不过的话,再选择"Xvesa"(分辨率较低,但保证能进入图形界面)。第四步:安装中文包
进入Puppy Linux英文X桌面后,点击桌面上的Mount图标,将以linux方式显示硬盘分区列表(如下图),根据第二步Wingrub的检测记录,找到放置三个软件包的分区,点击mount按钮,将自动打开rox文件管理器并显示根分区文件,单击安装扩展名为pet的“一步到位中文包”。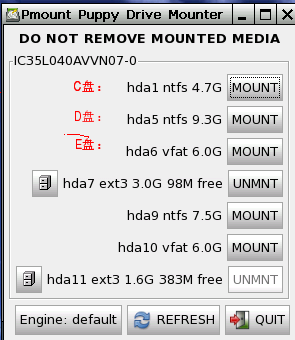
第五步:保存个人文件pup_save.2fs。
点击:Menu | Shutdown | Reboot computer,重启puppy linux系统,在关机前会有提示是否要保存session会话,选yes,保存文件名为pup_save-XXX.2fs,大小建议为512MB以上。现在所有工作完成,重启时请再次在Windows启动菜单中选择puppy-linux,就可以轻松体验全新的中文Puppy Linux世界啰。
常用★跨平台★软件秀●mini●版
为方便各位网友在“小芭比 linux ”与win之间的互通协作,现将常用的跨平台软件秀一下(不全,请跟帖补充):说明:
加“ ★ ”,表明已有可直接安装的已中文化的pet包
加“●●●”,表明已中文化并集成在小芭比Linux中

聊天工具:
QQ ★ pet包●●●Pidgin ★ pet包●●●
Skype pet包
浏览器:
Seamonkey ★ pet包●●●Firefox ★ pet包
Opera ★ pet包
Lynx
网络电视:
gsopcast ★pet包办公office:
Google Docs(网上协作办公平台,吐血推荐★★★★★)永中office sfs镜像文件 ★
OpenOffice sfs镜像文件 pet包
abiword ★ pet包●●●
gnumeric ★ pet包●●●
文本编辑:
geany★ pet包●●●emacs
Vim
播放器:
RealPlayer pet包图像编辑:
Gimp pet包mtpaint pet包●●●
inkscape pet包●●●
Picasa
杀毒:
avast ★pet包游戏:
蓝迪游戏 ★pet包虚拟机:
VirtualBox ★ (吐血推荐ing★★★★★)pet包qemu★ pet包
VMware
Parallels
翻译平台:
StarDict星际译王 ★ pet包-----------------------------------------------------------------------------------------------------------------------------
秀几个跨平台病毒!!!
SimileBi病毒(Parasite.Bi)
Linux版: Virus.Linux-BI-A, Win版: Virus.Win32-BI-A
跨平台OpenOffice.org病毒: SB/Badbunny-A
最后拜托大家千万别制作跨平台病毒pet版哦!!!
:-) :-) :-)
本站所用的bbcode语法
和一般论坛上常用的bbcode差不多,代码块的功能稍微要强一些。| BBCode | 显示效果 |
|---|---|
| [b]粗体[/b] [h1]标题1[/h1] [i]斜体[/i] [h2]标题2[/h2] [u]下划线[/u] [h3]标题3[/h3] [b][i][u]组合效果[/u][/i][/b] |
粗体标题1斜体标题2下划线标题3组合效果 |
| [quote=labrador]同志们好~~[/quote] | labrador写道: 同志们好~~ |
| [code] (message "Hello, world!") [/code] |
(message "Hello, world!") |
| [code:c] #include <stdio.h> int main() { printf("Hello, world!\n"); } [/code] |
#include <stdio.h>
int main() {
    printf("Hello, world!\n");
}
|
| [code:sh:20] if [ "`id -u`" -eq 0 ]; then PS1='# ' else PS1='$ ' fi [/code] |
    if [ "`id -u`" -eq 0 ]; then
      PS1='# '
    else
      PS1='$ '
    fi
|
| [code:py:0] class test: def __init__(): print "Hello, world" test() [/code] |
class test:
    def __init__():
        print "Hello, world"
test()
|
| [youtube]5CdYKaA6XXA[/youtube] |
硬盘安装及中文化Puppy Linux 4.0简要流程
1. 硬盘安装Puppy Linux 4.0 英文版
1.1. 下载Puppy Linux 4.00 英文版 ISO 文件 (88MB)
注意:在xp下安装puppy4更简单的方法是:下载Puppy2-installer for Windows XP,然后直接安装重启即可进入puppy linux系统。采取这个方法可省去以下1.2-1.4三个步骤。缺点是只能安装到C盘,要求C盘有较大可用空间。1.2. 下载Grub4dos
下载 grub4dos后,把里面的grub.exe,grldr和menu.lst解压到C盘根目录下,修改C盘根目录下的BOOT.INI,增加以下启动项。C:\grldr="GRUB LOADER"
1.3. 修改C:\menu.lst文件,增加title Puppy Linux项等内容。
可参照下面这个例子(安装在C盘)title Puppy Linux kernel (hd0,0)/vmlinuz root=/dev/ram0 PMEDIA=idehd initrd (hd0,0)/initrd.gz注意:有空格,上面的(hd0,0)就是vmlinuz内核文件所在的分区地址,如果你是在
d:\abc那就应该这样了kernel (hd0,4)/abc/vmlinuz root=/dev/ram0 PMEDIA=idehd initrd (hd0,4)/abc/initrd.gz这两条都需要改变,因为vmlinuz和initrd.gz放在同一个地方。
1.4. 用winrar解开Puppy Linux iso文件,将initrd.gz,vmlinuz,pup_4xx.sfs,zdrv_4xx.sfs四个文件复制到FAT32格式磁盘根目录下(NTFS格式不认),如C盘或D盘。
1.5. 重启,在Windows启动菜单中选择GRUB LOADER启动项。
然后在Grub启动列表里选择Puppy Linux ——正常启动PuppyLinux,加载pup_save.2fs文件(如果有的话)。启动运行后,会进行初始配置选择:选择键盘,通常选第一个us就可以了。选择 X server。 puppy 自带了两种 X server 一个是 Xorg 另一个是 Xvesa。 Xvesa 比 Xorg 更小巧但功能相比也要少一些。建议这里还是选择"Xorg",如果“Xorg”测试不通过的话,再选择"Xvesa"(分辨率较低,但保证能进入图形介面)。
选择显示器的分辨率和色彩的深度,这个根据自己的实际情况进行选择。配置完后,不一会就可以看到Puppy Linux 4.0 的桌面环境了。 进入menu/setup/network wizard 或 pppoe设置,就可以在 Puppy Linux 4.0 里上网了。无线网卡在 Puppy Linux 4.0 中也能正常识别了。
2. 安装中文支持包
用于显示和输入汉字。3. 安装initrd补丁
用于支持安装Puppy分区的中文文件名显示(这一步可选)。4. 安装中文支持附加包
提供一些额外的中文字体和补丁,使系统更好的支持中文(这一步可选)。5. 安装最新中文化测试包
6. 设置本地语言环境 locale
点“menu->desktop->chooselocale country localisation”,弹出窗口上按“local”按钮。再弹出一个窗口,选择:zh_CN.utf8,点OK。7.保存个人文件pup_save.2fs。
重启puppy linux系统,在关机前会有提示是否要保存会话,选yes,保存文件名为pup_save.2fs,大小建议为256M以上8.安装seamonkey简体中文语言包。
下载及安装方法详见:http://www.minilinux.net/node/85寻找更多有关Puppy Linux的内容,可以去:
Puppy Linux中文化开发网站: https://sites.google.com/site/cnpuppy
中文Puppy Linux开发者之家: http://www.minilinux.net
最后show一下中文化后的桌面:
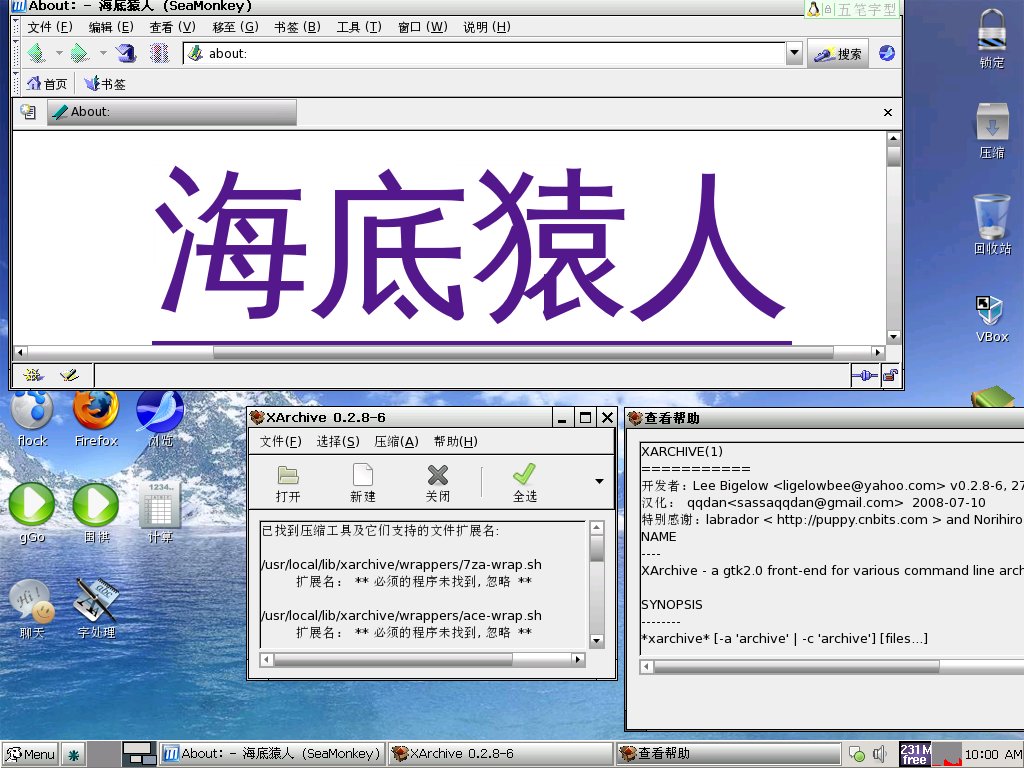

[ 本帖最后由 sasaqqdan 于 2008-7-7 08:07 编辑 ]