如何运行Puppy(How to run Puppy)
How to run PuppyA great advantage of Puppy Linux is that Puppy doesn't have to be installed. You can run Puppy directly from the CD, without affecting your operating system. Alternatively you can install Puppy on a harddrive or a USB stick.
How to run Puppy the very first time
First you must set up the boot sequence in the BIOS. If you do not know how to get into the BIOS-setup, consult the computers manual. Usually you press one of the following keys immediately after switching on the PC: ESC, one of the function keys F1 to F12 or the delete key. At the BIOS-setup you change the boot sequence so that the CD-ROM drive is first and the harddrive is second. Close the BIOS-setup and store the settings.
The PC then usually reboots. Immediately insert the Puppy CD into the CD-ROM drive. If you are too slow your old operating system starts. In this case keep the CD inserted in the CD drive and start the PC again.
Now Puppy should start. During the starting procedure you are requested to choose your country. Navigate with the cursor keys downward to your country. Then strike the return-key. Thereafter a further window (Puppy video Wizard) appears, "Xorg" is already highlighted. Press the return-key. Wait some seconds till the next window (Puppy video Wizard) appears. There you navigate with the cursor keys to your screen (LCD panel = flat screen, CRT = standard monitor) and resolution. Then strike the return-key. After some seconds the Puppy desktop appears.
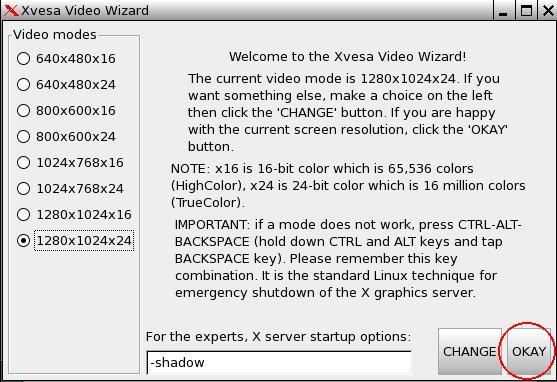
Should Xorg not work on your computer, choose Xvesa. A few seconds later, the Puppy desktop will be displayed using a resolution of 640 x 480 pixels. If you wish to use an even higher resolution choose e.g. 1280x1024x24 and click on the button "Change".

After some seconds the Puppy desktop appears again. Click on the OK-button.
Unfortunately, with Xvesa you will have to adjust the keyboard layout if you are not using a US keyboard.
Puppy was loaded completely into RAM. Your old operating system is not touched, so that you can look safely at Puppy Linux. Now you can take the CD out of the CD drive, unless you do not have enough ram, in which case Puppy will not allow the CD to be ejected.
If you terminate Puppy you are asked whether you want to store the settings (and your personal files) in a file named pup_save.2fs on a harddrive "SAVE TO FILE" or CD-ROM "SAVE TO CD". (you can change between the options with the tab-key). If you do not want to save the settings mark "DO NOT SAVE" and press the return-key.
If you would like to store the settings (and your personal files) you are asked on which harddrive this should happen.
Boot-Options
When Puppy boots it offers you some boot-options. If you do not enter anything, Puppy is loaded after some seconds into RAM. When starting Puppy automatically looks for a previously stored pup_save.2fs-file. If this file doesn't exist yet, you are asked for the keyboard map and the screen resolution.
With the boot-option
puppy pfix=ram
you have the option to start Puppy into RAM without your pre-saved-settings and without your personal files even if a pup_save.2fs-file already exists. This boot option is very useful and is used in this manual a few times. The other boot-options are normally not needed.
How to save the settings and your personal files
So that Puppy can store all settings and your personal data, a file named pup_save.2fs is saved. I recommend a size of 512 MB for this file. This is big enough for further programs and can be backed-up on CD-ROM (note: if you want to backup the file on a USB stick, it must have a storage capacity of 1 GB). Puppy can store the pup_save.2fs-file on many different filesystems including FAT and NTFS as used by windows. (note: USB sticks and external harddrives are usually formatted with a FAT32-filesystem, so that they can be used without problems). Windows XP-users normally have a NTFS-filesystem only. There are two options for you to store the pup_save.2fs-file as well:
(1) Save the file on an external harddrive or USB-stick.
(2) Make the NTFS partition smaller and create one or more further partition with FAT32-filesystem and ext2/ext3-filesystem.
If you intend to use Puppy durably you should select the second alternative. This alternative has many advantages.